Maintaining Catalogs with the Catalog Doctor
Designer provides the Catalog Doctor for you to maintain catalogs and diagnose problems with catalogs. This topic introduces the errors the Catalog Doctor can detect, and how you can start the Catalog Doctor and use it to diagnose the specific resources of catalogs: connections, tables and fields, formulas and summaries, and queries.
This topic contains the following sections:
- Errors the Catalog Doctor Can Detect
- Starting the Catalog Doctor
- Diagnosing and Fixing Problems for a Catalog
- Merging Catalogs
Errors the Catalog Doctor Can Detect
With the Catalog Doctor, you can diagnose and validate data resources in a catalog. Since the data resources in a catalog are constructed independently from each other, the Catalog Doctor diagnoses each type of data resource independently. For example, when it checks formulas, it only looks into the definition of parameters and DBFields in the current catalog, and does not check whether the DBFields exist in the connected database; when it checks queries, it only looks for the mapping fields which are currently in the catalog, and does not confirm whether the formulas are valid.
For your convenience, in the following statements, database refers to a raw database connected via JDBC, mapped table/view/synonym refers to a table/view/synonym in a catalog, raw table/view/synonym refers to a table/view/synonym in a raw database, and raw column refers to the columns in a raw database.
Mapped table/view/synonym and DBField
- Checks whether the raw table/view/synonym of a mapped table/view/synonym exists in the database.
- Checks whether the raw column of a DBField exists in the database. If it exists, then it checks to see whether the stored information such as SQL Date type matches the raw column in the database.
Formulas and summaries
- Checks to see whether the formulas and summaries have correct syntax. It checks whether the remapped parameters and DBFields need to be remapped again.
Queries
- Checks whether the data resources referenced by the query exist in the catalog.
- Checks whether the data resources are valid.
- Whether the DBFields of the data resources match those saved in the query.
- Whether or not the formulas and parameters can be found in the catalog.
Starting the Catalog Doctor
To start the Catalog Doctor, run the batch file CatDr.bat or CatDr.sh on UNIX/Linux in the <install_root>\bin directory.
You can also start it by issuing the following commands from a Command Prompt window:
>cd C:\LogiReport\Designer\bin
  C:\LogiReport\Designer\bin\>catdr
Diagnosing and Fixing Problems for a Catalog
After starting the Catalog Doctor, you can navigate to File > Open to open the catalog you want to diagnose. The Catalog Doctor lists all the resources in the specified catalog in the left panel. Select a resource from the resource tree, and you can get the information of the selected resource in the right panel, .
You should diagnose the resources in the following order: connection > table and field > formula and summary > query.
For Connections
You can use the Catalog Doctor to diagnose connections in the following aspects:
- Finding information of the current connection
Select a connection from the resource tree, and you can get the connection information in the left panel. - Modifying the current connection
Right-click the connection in the resource tree, and then select Modify on the shortcut menu. The Get JDBC Connection Information dialog box appears. You can now modify the connection.For a JDBC driver, you can fill in the class name of the driver, the URL, user ID, and password.
For a JDBC-ODBC bridge, you can clear Driver and select Use ODBC Data Source, then give the ODBC data source name, and the user ID and password.
You can also change the properties values in the Properties sheet directly. Select a property value, and then choose or type in the value.
 The JDBC-ODBC bridge is no longer included with Java for JDK 8 or later. To solve this issue, you need to add the path information of the ODBC-JDBC bridge to the class path during installation or by editing the file setenv.bat (setenv.sh on UNIX/Linux) in
 <install_root>\bin.
For Tables and Fields
You can use the Catalog Doctor to diagnose tables and fields in the following aspects:
- Finding all the mapping tables, views, synonyms, and DBFields in the catalog
In the resource tree, expand the connection node, then go to the Tables, Views, or Synonyms node and reveal it. The Catalog Doctor then lists all the mapping tables, views, synonyms, and DBFields in the catalog. The icon in front of each object has a specific meaning, which indicates whether the object is valid or not.The following are descriptions of the icons in front of each object:
 : Table
 : Table which does not exist in the database
 : Table which has invalid fields
 : View
 : View which does not exist in the database
 : View which has invalid fields
 : Synonym
 : Field
 : Field which does not exist
 : Field with a name which can be found in the database, but has a type mismatch.
 - Finding the stored information of a mapping table/view/synonym or a DBField
Select a table/view/synonym or a DBField in the resource tree to find its stored properties. The Catalog Doctor displays the information in the Properties sheet. - Finding all the raw tables/views/synonyms
Select a table/view/synonym in the Tables/Views/Synonyms node. The Catalog Doctor lists all the raw tables/views/synonyms in the Choose from following to re-map panel. Each item there shows the name of a table/view/synonym. - Getting the raw columns in a raw table/view/synonym
First select a mapping table/view/synonym, then choose a raw table/view/synonym from the Choose from following to re-map panel. The Catalog Doctor displays the raw columns in the bottom panel. If you select a mapping table/view/synonym with an existing raw table/view/synonym, the Catalog Doctor automatically selects the raw table/view/synonym.
 - Deleting a set of mapping tables, views, synonyms, or DBFields
To delete the mapping object, you can use one of the following methods:- Select an object from the resources tree, right-click and on the shortcut menu select Delete.
- Select Delete
 on the toolbar after selecting the object.
- Select the object and select Delete on the keyboard.
To delete a set of mapping tables, views, synonyms, or DBFields, select the objects you want to delete, and select Delete
 on the toolbar (or select Delete on the keyboard).
 - Re-mapping (Updating) a mapping table/view/synonym
First select the mapping table/view/synonym that you want to update from the resource tree, then select the raw table/view/synonym which the mapping table/view/synonym refers to from the Choose from following to re-map panel and select Update on the toolbar.
 The Catalog Doctor sorts the tree by the validation status of each object (invalid objects are listed ahead), therefore, after you update a mapping table/view/synonym, the order of the objects will probably change. If a table was invalid and becomes valid after updating, it displays after the invalid objects.
 - Re-mapping (Updating) a DBField
Before updating a DBField, you must make sure that the mapping table/view/synonym of the DBField is valid. That is, the raw table/view/synonym that the mapping table/view/synonym refers to exists in the database.Select the DBField you want to update from the resource tree, choose the raw column you want the DBField to refer to in the bottom right panel, and then select Update
 on the toolbar.
 - Adding tables/views/synonyms
Select Add Table , Add View
  , or Add Synonym
  on the toolbar, or right-click the Tables, Views, or Synonyms node, or a table, view, or synonym and select Add Table, Add View, or Add Synonym from the shortcut menu. In the Add Table/View/synonym dialog box, select the tables/views/synonyms you would like to add and select Add. To finish adding, select Done.
 - Adding a DBField
Select a table or a synonym from the resource tree, right-click and on the shortcut menu select Insert Column. The Catalog Doctor displays the Add Column dialog box. Select the column you want and select Add. When you finish adding the columns, select Done to close the dialog box.
For Formulas and Summaries
You can use the Catalog Doctor to diagnose formulas and summaries in the following aspects:
- Finding all the formulas and summaries in the catalog
Expand the Formulas/Summaries node on the resources tree. The Catalog Doctor lists the formulas/summaries in the catalog in the resource tree and sorts them by their validity and names. If the icon of a formula/summary is marked by a cross, it means it is invalid (it fails on compiling). - Finding the compile Error message of a formula/summary
Select the formula/summary and the Catalog Doctor displays the compile error messages in the Error panel. - Replacing a mapping field with another in formulas and summaries
A frequent error is caused when the mapping fields are not found in a catalog. In this case, you need to replace the mapped field in formulas/summaries with a valid one.- Select the formula/summary that contains unknown fields in the resource tree.
- Select Replace All in the Error panel.
- In the Replace dialog box, type the field name you want to replace in the Mapping Name text box.
- Select Browse to open the Mapping Fields Browse dialog box.
- In the Tree View tab, you can select an existing field to replace the unknown field.
- The List View tab displays the mapping fields in alphabetical order and the type for each mapping field. If the mapping field is a DBField, you can see the tables/views/synonyms it belongs to. Select the field you want to use as a replacement and select OK.
- Select Replace in the Replace dialog box.
- Editing a formula/summaries
Select the formula/summary and select Edit in the Error panel. - Removing formulas/summaries
Select the formulas/summaries, then do one of the following:- Right-click and on the shortcut menu, select Delete.
- Select Delete
 on the toolbar.
 - Select Delete on the keyboard.
For Queries
You can use the Catalog Doctor to diagnose queries in the following aspects:
- Finding all the queries in the catalog
Expand the Queries node in a data source. The Catalog Doctor lists all the queries in the catalog in the resource tree. - Finding the data resources selected in a query
Expand a query and the Catalog Doctor displays all the data resources in the query. - Finding the DBFields selected from a data resource in a query
Expand a data resource in a query and the Catalog Doctor displays all the DBFields in the data resource. - Finding the formulas or computed columns in a query
The Catalog Doctor lists formulas and computed columns in a query if there are. - Editing a query
Select the query and select Edit in the Error panel (or right-click the query, and select Edit Query from the shortcut menu). - Deleting queries, DBFields, formulas, computed columns, and a data resource selected in a query
To delete the object, you can use one of the following methods:- Select an object from the resources tree, right-click and on the shortcut menu select Delete.
- Select Delete
 on the toolbar after selecting the object.
- Select the object and select Delete on the keyboard.
- Creating cached query result for a query
Select the query and select Run (or right-click the query, and select Create Cached Query Result on the shortcut menu). Then in the Save Cached Query Result dialog box, specify the file name with or without an extension and the folder where you want to save the result file and then select Save. For more information about cached query results, see Cached Query Results.
Merging Catalogs
With the Catalog Doctor, you can also merge the resources from two catalogs into one. However, before merging, you need to first specify at which level the Catalog Doctor checks the differences between these two catalogs.
To specify the checking level
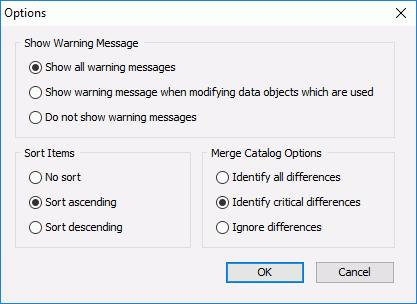
- Navigate to File > Options to open the Options dialog box.

- In the Merge Catalog Options box, specify the checking level.
- Identify all differences
The Catalog Doctor checks for differences between the two catalogs, and then displays all the resources of the report in the Merge dialog box with all conflicting resources marked. - Identify critical differences
The Catalog Doctor checks for any differences that may cause the engine to fail to run a report, and then displays all the resources of the report in the Merge dialog box with any critical conflicting resources marked. - Ignore differences
The Catalog Doctor does not show the differences between the two catalogs. Any conflicts remain in the target catalog.
- Identify all differences
- Select OK to accept the setting.
After specifying the checking level, you can start to merge catalogs.
To merge catalogs
- Open the target catalog in the Catalog Doctor.
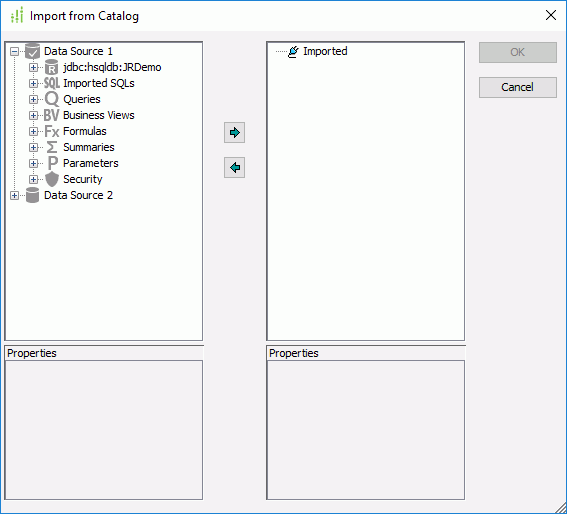
- Navigate to File > Import, and then select the catalog you want to import to open the Import from Catalog dialog box.

- Select the resources from the catalog and select Add
 to add it to the Imported box, then select OK.
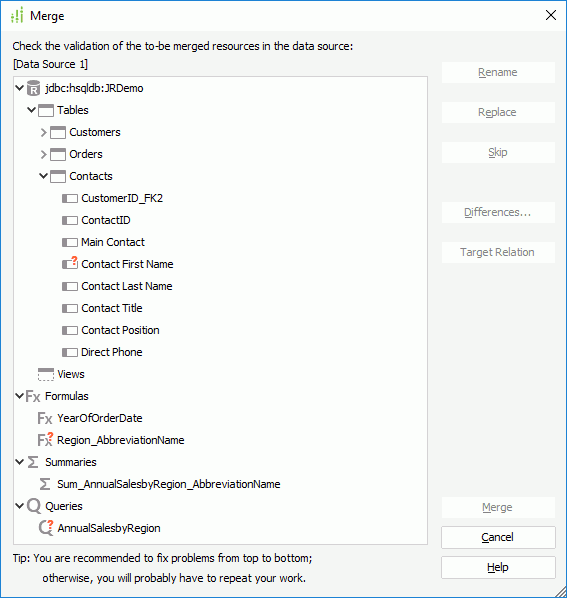
 - If you specify the checking level as Identify All Differences or Identify Critical Differences and the selected resources conflict with those in the target catalog, the Merge dialog box appears for dealing with conflicting resources. The Catalog Doctor marks the conflicting resources with red question marks.

- Select Rename to rename, or Replace to replace. You can also select Skip to skip.
- Select Differences to see the property values of the objects in the target catalog and the sources catalogs. The Catalog Doctor highlights different property values.
- Select Target Relation to see the relationship between the object and its parent node.
- Repeat the preceding steps to manage conflicting resources, and then select Merge to merge the two catalogs. If the connections in the two catalogs connect to different data sources, the Catalog Doctor prompts you to modify the existing data source in the target catalog. For safety purposes, you should create a new data source.
- Navigate to File > Save to save the changes and exit the Catalog Doctor.
- Open Designer and open the merged catalog. The resources you just imported are now available and new data sources have been created.
 Previous Topic
 Back to top