 Previous Topic
Working with Barcodes
You can create both linear barcodes such as Code 39, Code 128, EAN, and UPC, and 2D barcodes like QR Code in page reports that use query resources. This topic describes how you can create linear barcodes and QR Codes in a report respectively.
You can also create a barcode component by first inserting a label, DBField, formula, summary, parameter, or special field and then changing its display type to Barcode or QR Code.
This topic contains the following sections:
 Where you can insert a barcode in a report depends on what you have selected as its source. See Components in Query-Based Page Report for more information.
See an example: The SampleComponents catalog, included with Designer, contains reports that have examples of how you could use each component type in a report. For the barcode component example, open <install_root>\Demo\Reports\SampleComponents\Barcode.cls.
Inserting a Linear Barcode in a Report
- Position the mouse pointer at the allowed report location where you want to insert the barcode.
- Do one of the following:
- From the Components panel, drag the Barcode icon
 in the Others category to the report.
 - Navigate to Insert > Barcode.
- Navigate to Home > Insert > Barcode.
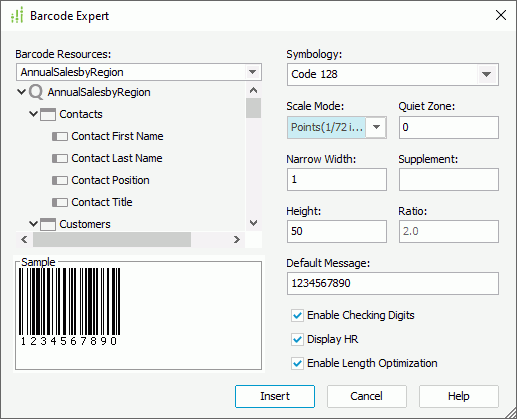
Designer displays the Barcode Expert dialog box.
- From the Components panel, drag the Barcode icon
- Select a dataset in the current page report from the Barcode Resources drop-down list to get data resources for the barcode, then specify the source of the barcode: a DBField, formula, summary, or parameter. When you select to insert the barcode into a data component, Designer disables the dataset drop-down list and you can only use resources from the current dataset to create the barcode.
- From the Symbology drop-down list, select the required barcode type . You can preview the format of the selected symbology in the Sample box. For detailed information on the symbologies of barcodes, refer to the professional barcode technical documentation.
- From the Scale Mode drop-down list, select the unit for the values of the quiet zone, narrow width, supplement, height, and ratio.
- In the Quite Zone text box, specify the space around the barcode (most symbologies require quiet zones that precede and follow the barcode).
- In the Narrow Width text box, set the barcode bar width.
- You can specify the supplement of the barcode. If you select the barcode type as Code 39, Code 128/128A/128B/128C, or Codabar, you do not need to set the supplement.
- In the Height text box, set the height of the barcode bars.
- Specify the width ratio of the thick bar to the thin bar in the Ratio text box if you select the barcode type as Code 39 or Codabar. The ratio can only be 2.0 or 3.0. Designer treats any ratio value not equal to 2.0 or 3.0 as 2.0.
- You can change the default value of the barcode in the Default Message text box, which Designer applies to the barcode in design mode.
- Select Enable Checking Digits if you want to include check digits in the barcode.
- If you select the barcode type as Code 39, Code 128/128A/128B/128C, or Codabar, you can select Display HR to display the barcode numbers together with the barcode.
- If you choose the Code 128 symbology, you can specify whether to enable optimizing the length of the barcode.
- Select Insert to close the dialog box.
- Select in the location where you want to display the barcode.
 Back to top
Inserting a QR Code in a Report
- Position the mouse pointer at the allowed report location where you want to insert the QR Code.
- Do one of the following:
- From the Components panel, drag the QR Code icon
 in the Others category to the report.
 - Navigate to Insert > QR Code.
- Navigate to Home > Insert > QR Code.
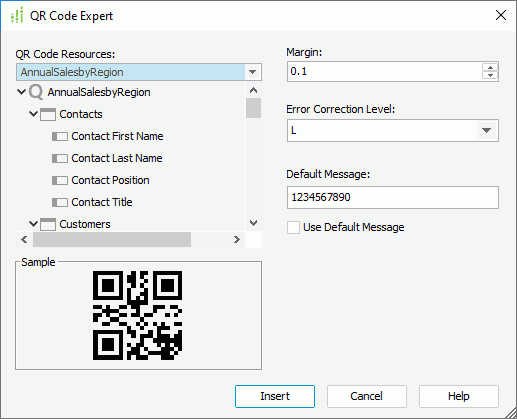
Designer displays the QR Code Expert dialog box.
- From the Components panel, drag the QR Code icon
- Select a dataset in the current page report from the QR Code Resources drop-down list to get data resources for the QR Code, then specify the source of the QR Code: a DBField, formula, summary, or parameter. When you select to insert the QR Code into a data component, Designer disables the dataset drop-down list and you can only use resources from the current dataset to create the QR Code.
- Set the margin between the image in the middle of the QR Code and the border of the QR Code.
- Select the error correction level for the QR Code. Error correction helps in making a QR Code stay readable, even when some pixels are missing. There are four correction levels. Level "L" means 7% of the code words can be recovered from a damaged symbol, level "M" means 15%, level "Q" 25%, and level "H" 30%. The higher the level is, the bigger the QR Code gets.
- You can change the default value of the QR Code in the Default Message text box, which Designer applies to the QR Code in design mode. If you also want to use this value as the value of the QR Code in the report, select Use Default Message, then Designer ignores the data field you select as the source of the QR Code.
- Select Insert to close the dialog box.
- Select in the location where you want to display the QR Code.