Previous Topic
Web Wizard Dialog Box
You can use the Web Wizard dialog box to export a report to HTML. This topic describes the options in the dialog box.
Designer displays the Web Wizard dialog box when you navigate to File > Export > To HTML.
This dialog box contains the following tabs:
Designer displays these buttons in all the tabs:
Previous
Select to retain the changes and go back to the previous tab.
Next
Select to retain the changes and go to the next tab.
Finish
Select to finish your work and close the dialog box.
Cancel
Select to close the dialog box without saving any changes.
Help
Select to view information about the dialog box.
Report Tab
Use this tab to specify the report options.
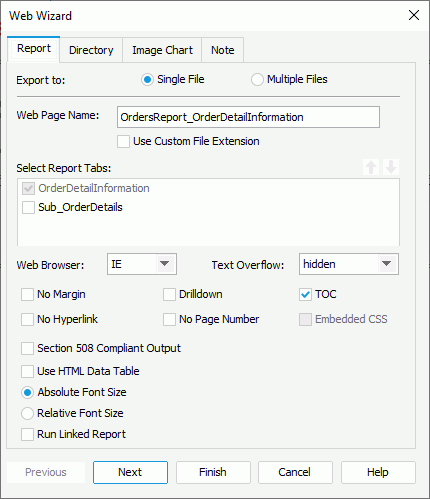
Export to
Specify whether to export the report to a single HTML file or multiple HTML files.
Web Page Name
Specify the name of the HTML file.
Use Custom File Extension
Select to use the extension you want for the HTML file. By default, Designer uses .html. Select this option and type your file name with any extension, or no extension.
Select Report Tabs
Designer displays the option when you use the dialog box for exporting a page report. Select the report tabs in the page report that you want to export. Designer exports the selected report tabs in the list order. When the report has only one report tab, Designer selects the report tab by default.
 Move Up button
Select to move the specified report tab higher in the list.
 Move Down button
Select to move the specified report tab lower in the list.
Web Browser
Select the web browser for which the HTML output adapts.
Text Overflow
Specify whether the text overflow is visible or hidden.
No Margin
Select to remove the margins that you set when designing the report in the HTML output.
Drilldown
Select to generate the drill-down files when exporting the report, which enable you to drill down on the summaries in grouped banded objects in the HTML output.
TOC
Select to include the TOC tree of the report in the HTML output to display in the Table of Contents panel of the HTML browser.
No Hyperlink
Designer enables this option when you select Single File. Select it if you do not want to include the hyperlinks for navigating previous and Next Topics on the navigation bar of the HTML output.
No Page Number
Designer enables this option when you select Single File. Select it if you do not want to include the page number information that shows the current page number and total page number on the navigation bar of the HTML output.
Embedded CSS
Designer enables this option when you select Multiple Files. Select it if you want to embed the cascading style sheet (CSS) in the HTML output; otherwise, Designer generates the .css file individually.
Section 508 Compliant Output
Select to export the accessibility attributes that you define for the report elements in the Report Inspector to HTML which is Section 508 compliant. For more information, see Exporting Reports to Accessible HTML and PDF.
When you select Section 508 Compliant Output, Designer automatically selects the Use HTML Data Table and Relative Font Size options and disables them. The HTML report output is then Section 508 compliant including HTML data table, accessible attributes, and relative font feature.
Use HTML Data Table
Select to generate the table and crosstab components as table objects in the HTML output.
Absolute Font Size
Select to generate the report using an absolute font size, which means the font size is fixed and cannot be adjusted according to the font size settings in the web browser.
Relative Font Size
Select to generate the report using a relative font size, which means the font size can be adjusted according to the font size settings in the web browser.
Run Linked Report
Select to generate the reports that you link with the report (not including the detail reports) in the HTML output.
 Back to top
Directory
Use this tab to specify the location to place the HTML output.
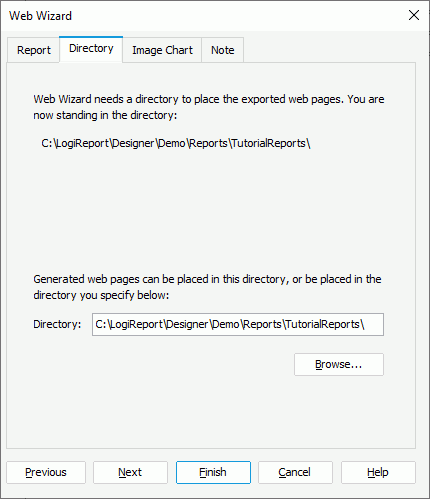
Directory
Specify the directory where you want to save the HTML output. Select Browse to locate the directory.
Image Chart
Use this tab to specify the image format to convert charts in the report.
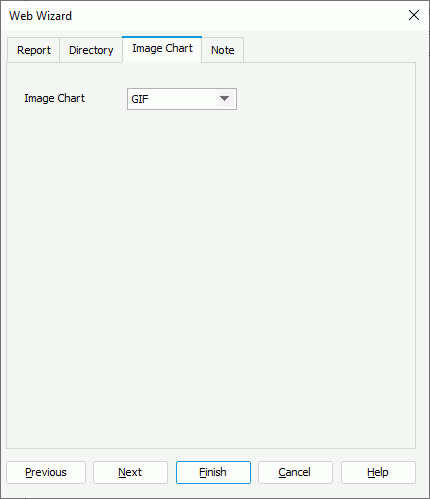
Image Chart
Select the image format using which to convert charts in the report: Auto Select, GIF, JPG (JPEG), or PNG.
If you select "Auto Select", it is up to Designer to detect the image format to JPG or GIF automatically: if the image colors are less than 256 colors, Designer applies GIF; otherwise, it is JPG.
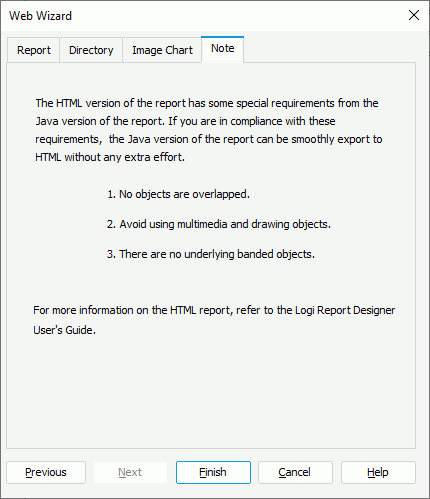
Note
Use this tab to review some important information about HTML.