 Previous Topic
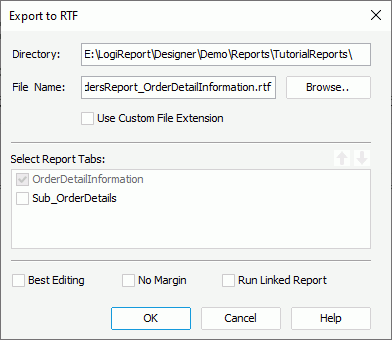
Export to RTF Dialog Box
You can use the Export to RTF dialog box to export a report to RTF. This topic describes the options in the dialog box.
Designer displays the Export to RTF dialog box when you navigate to File > Export > To RTF.
Designer displays these options:
Directory
Specify the destination directory where you want to save the RTF file.
File Name
Specify the name of the RTF file.
Browse
Select to specify the directory and file name of the RTF file with File Explorer.
Use Custom File Extension
Select to use the extension you want for the RTF file. By default, Designer uses .rtf. Select this option and type your file name with any extension, or no extension.
Select Report Tabs
Designer displays the option when you use the dialog box for exporting a page report. Select the report tabs in the page report that you want to export. Designer exports the selected report tabs in the list order. When the report has only one report tab, Designer selects the report tab by default.
 Move Up button
Select to move the specified report tab higher in the list.
 Move Down button
Select to move the specified report tab lower in the list.
Best Editing
Select to apply the flow layout when exporting the report to RTF.
No Margin
Select to remove the margins that you set when designing the report in the RTF output.
Run Linked Report
Select to generate the reports that you link with the report (not including the detail reports) in the RTF output.
OK
Select to apply your settings and close the dialog box.
Cancel
Select to close the dialog box without saving any changes.
Help
Select to view information about the dialog box.
 Back to top