 Previous Topic
Style List Dialog Box
You can use the Style List dialog box to customize the style for pointers in the same data series respectively in a gauge chart. This topic describes the options in the dialog box.
Designer displays the Style List dialog box when you select Style List in the Pointer tab of the Format Bar Gauge dialog box, Format Dial Gauge dialog box, or Format Solid Gauge dialog box, and provides you with different options in the dialog box according to the gauge type: dial/solid gauge or bar gauge.
When you use the Style List dialog box to customize the pointer style for a dial or solid gauge, Designer displays the following options in the dialog box:
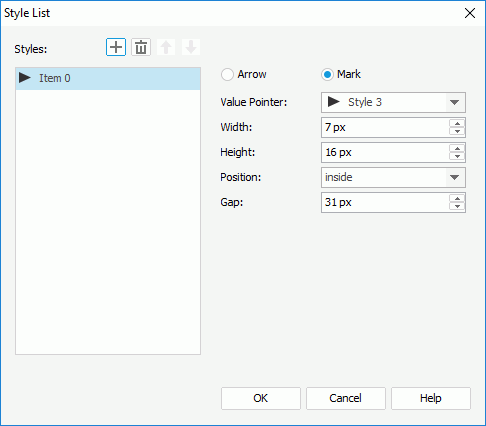
Styles
This box lists items to stand for the pointers. Select the items one by one to set the style of each pointer.
-
 Add button
Select to add a new item. -
 Remove button
Select to remove the specified item. -
 Move Up button
Select to move the specified item higher in the box. -
 Move Down button
Select to move the specified item lower in the box.
Arrow
Select to use arrow for the pointer that the specified item in the Styles box represents.
- Value Pointer
Select the style of the value pointer. Select a style from the drop-down list or select Customized and specify another image as the value pointer. - Width
Specify the width of the arrow. - Height
Specify the height of the arrow.
Mark
Select to use mark for the pointer that the specified item in the Styles box represents.
- Value Pointer
Select the style of the value pointer. Select a style from the drop-down list or select Customized and specify another image as the value pointer. - Width
Specify the width of the mark. - Height
Specify the height of the mark. - Position
Select the position of the mark relative to the arc. - Gap
Specify the distance between the pointer and the arc, in pixels.
OK
Select to apply your settings and close the dialog box.
Cancel
Select to close the dialog box without saving any changes.
Help
Select to view information about the dialog box.
 Back to top
When you use the Style List dialog box to customize the pointer style for a bar gauge, Designer displays the following options in the dialog box:
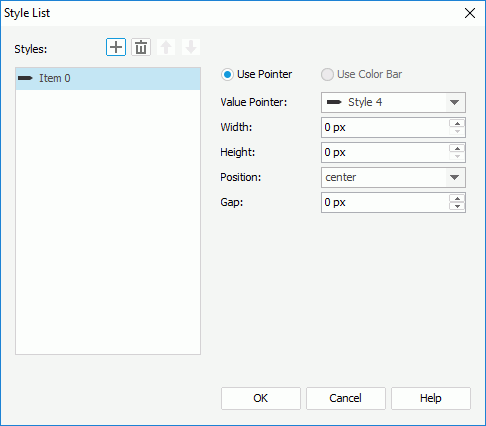
Styles
This box lists items to stand for the pointers. Select the items one by one to set the style of each pointer.
-
Add button
Select to add a new item. -
Remove button
Select to remove the specified item. -
Move Up button
Select to move the specified item higher in the box. -
Move Down button
Select to move the specified item lower in the box.
Use Pointer
Select to customize the style of the pointer that the specified item in the Styles box represents.
- Value Pointer
Select the style of the value pointer. Select a style from the drop-down list or select Customized and specify another image as the value pointer. - Width
Specify the width of the pointer. - Height
Specify the height of the pointer. - Position
Select the position of the pointer relative to the bar. - Gap
Specify the distance between the pointer and the bar, in pixels.
Use Color Bar
Designer does not enable this option for setting the pointer style.
OK
Select to apply your settings and close the dialog box.
Cancel
Select to close the dialog box without saving any changes.
Help
Select to view information about the dialog box.