 Previous Topic
Exporting Reports to Fax
Designer provides the feature of exporting reports to fax either via a fax machine or a fax server. If you want to enable this feature, you first need to configure your running environment. This topic describes how you can configure the fax settings and export reports to fax.
This topic contains the following sections:
Configuring the Fax Settings
To configure the settings for exporting reports to fax via a fax machine
- Configure the running environment first. Download Java Communications API (Version 2.0) for Win32 or Solaris, and place the following files in the specified locations.
- For Windows
File Name Location comm.jar <designer_install_root>\libjavax.comm.properties <Java_install_root>\jre\libWin32Com.dll <Java_install_root>\jre\bin - For Solaris
File Name Location comm.jar <designer_install_root>/libjavax.comm.properties <Java_install_root>/jre/liblibSolarisSerialParallel.so LD_LIBRARY_PATH
- For Windows
- Navigate to File > Options. Designer displays the Options dialog box.
- In the Category box, select Export to.
- Select the Fax tab. Designer selects Fax Machine by default.
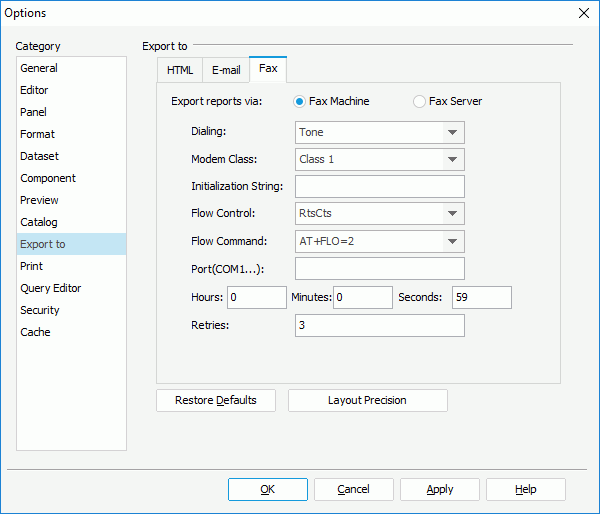
- From the Dialing drop-down list, select the dialing mode for the fax modem: Tone or Pulse.
- From the Modem Class drop-down list, select the class of the modem: Class 1, Class 2 or Class 2.0. Most modems only support Class 1, so if you select Class 2 or Class 2.0, you should make sure that your modem can support it.
- In the Initialization String text box, type in the string to initialize the modem. The string should be obtained from your modem manual.
- From the Flow Control drop-down list, select the flow control mode between DTE (Data Terminal Equipment) and DCE (Data Circuit-terminating Equipment). Specifying flow control can help the compressing data function of the modem work better.
- RtsCts
Flow control of the hardware (recommended). - Xon/Xoff
Flow control of the software. - None
No flow control specified.
- RtsCts
- From the Flow Command drop-down list, select the flow control command according to the modem being used. If the drop-down list does not contain the required command, you can leave this empty and specify the command as part of the initial string. You need to obtain the command from your modem manual.
- In the Port text box, type the port number. You need to obtain the port from your modem manual.
- Specify the maximum amount of time that the fax should wait for a response from the destination before timing out.
- When the line is busy, the reports cannot be faxed, so you can specify the maximum number of times the modem retries faxing the reports in the Retries text box.
- Select OK to accept the settings.
To configure the settings for exporting reports to fax via a fax server
- In the Options dialog box, select the Export to category.
- Select the Fax tab, then select Fax Server.
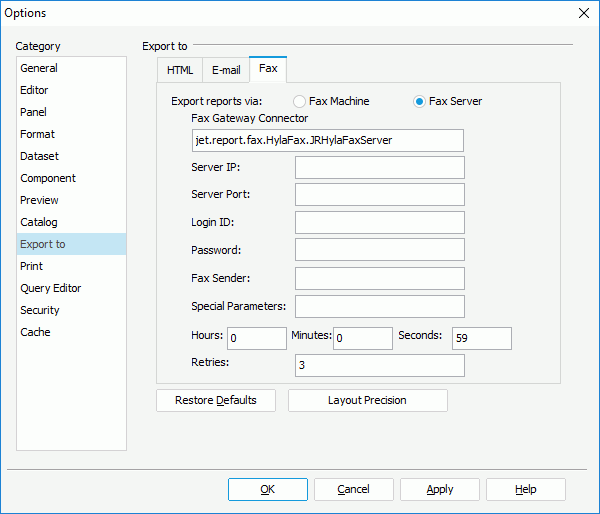
- In the Fax Gateway Connector text box, type the name of the implemented class. By default, the fax server Designer uses is based on Hylafax Server. However, if you want to export your reports via Hylafax Server, you need to download the gnu-hylafax packages according to your requirements from sourceforge.net/projects/gnu-hylafax/, for example, gnu-hylafax-util-0.0.9.2.jar, gnu-inet-ftp-0.0.9.2.jar, and gnu-hylafax-0.0.9.2.jar, and then add them to the class path of the file setenv.bat in
<designer_install_root>\bin. - In the Server IP text box, type the IP address or domain name of the fax server.
- In the Server Port text box, type the port number of the fax server.
- In the Login ID text box, type the user name for the class communicating with the fax server.
- In the Password text box, type the password for the class communicating with the fax server.
- In the Fax Sender text box, specify the user's name that is shown in the fax server manager.
- In the Special Parameters text box, specify the parameters for the fax server.
- Specify the maximum amount of time that the fax should wait for a response from the destination before timing out. For Hylafax Server, the value should not be larger than 59 seconds. It is a limitation of Hylafax Server.
- In the Retries text box, type the number of times the modem retries faxing the report.
- Select OK to accept the settings.
 Back to top
Exporting Reports to Fax
After you have configured the fax settings in the Options dialog box, you can now export your reports to fax.
- Open the page or web report you want to export.
- Navigate to File > Export > To Fax. Designer displays the Export to Fax dialog box.
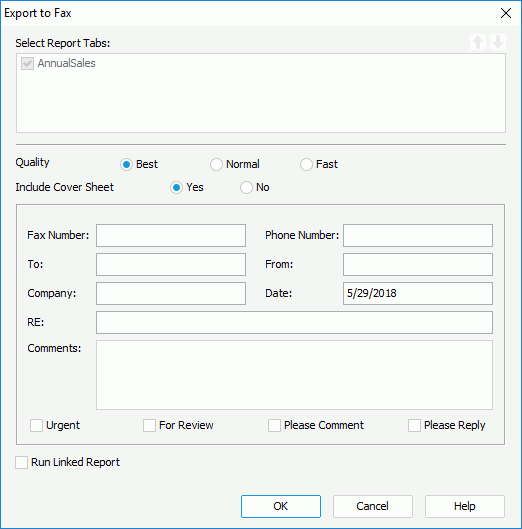
- When you are exporting a page report, in the Select Report Tabs box, select the report tabs in the page report that you want to export. Designer exports the selected report tabs in the list order. You can select a report tab and select Move Up
 or Move Down
  to change the order of the report tabs.
 - Specify the quality of the fax: Best, Normal, or Fast.
- Choose whether to send a cover sheet with the fax.
- Specify what you want to display on the cover sheet if you select to include it.
- Fax Number
Specify the fax number of the recipient. - Phone Number
Specify the phone number of the sender. - To
Specify information of the recipient. - From
Specify information of the sender. - Company
Specify information of the company. - Date
Specify the day on which the fax is sent. - RE
Specify the subject of the fax. - Comments
Specify some comments to the fax. - Urgent
Select to indicate that the fax is urgent. - For Review
Select to require only review for the fax. - Please Comment
Select to ask comments for the fax. - Please Reply
Select to ask a reply for the fax.
- Fax Number
- Select Run Linked Report if you want to generate the reports that you link with the report (not including the detail reports) in the fax. If you are only interested in the primary report, leave this option cleared. Generating linked reports at the same time, especially when the linked reports contain a large amount of data, causes performance issue.
- Select OK to start exporting.