 Previous Topic
Exporting Reports to XML
This topic describes how you can export a page or web report to an XML file.
- Open the report that you want to export.
- Navigate to File > Export > To XML. Designer displays the Export to XML dialog box.
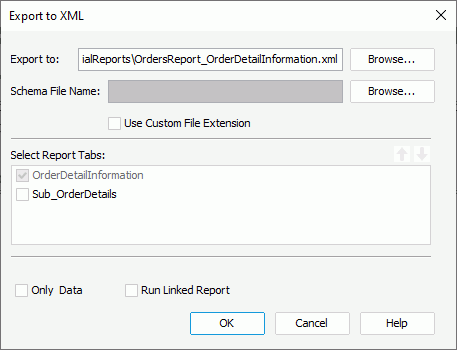
- By default, Designer saves the XML file in the same folder and same name as the report file. You can type the destination directory and file name in the Export to text box, or select Browse to specify the location and file name with File Explorer of your operating system. When the file name you specify does not contain the .xml extension, Designer automatically adds the extension to the output file. If you want to use your preferred extension (or to have no extension) for the file name of the output, select Use Custom File Extension, then you can type your file name with any extension or no extension.
- In the Schema File Name text box, specify an XSD file to export the report to an XML file based on the XSD file. If you do not specify an existing XML schema file, Designer generates a new XSD file in the directory where you specify to export the XML file with the same name as the XML file.
- When you are exporting a page report, in the Select Report Tabs box, select the report tabs in the page report that you want to export. Designer exports the selected report tabs in the list order. You can select a report tab and select Move Up
 or Move Down
  to change the order of the report tabs.
 - Select Only Data to only export data of the report. When you select Only Data, the XML output contains only the database column information, and the exported XML schema file contains only the structure information of the report; if you do no select Only Data, the XML output also contains elements controlled by formulas, and the exported XML schema file contains all the detail information from the report, including all the property values of each report object.
- Select Run Linked Report if you want to generate the reports that you link with the report (not including the detail reports) in the XML output. If you are only interested in the primary report, leave this option cleared. Generating linked reports at the same time, especially when the linked reports contain a large amount of data, causes performance issue.
- Select OK to start exporting.
The following are some tips for you when exporting a report to XML:
- The existing schema file that you specify must also be generated from the report. If you use other schema files, you get a NullPointerException exception.
- If the existing schema file that you specify contains only data, and you have cleared the Only Data checkbox in the Export to XML dialog box, the XML output file then only contains database column information. The content of the XML file is consistent with the schema file it is based on.
- If you delete an element node or an attribute node from the existing schema file, the XML output file which is based on it, cannot contain the corresponding column. In a schema file containing not only data, only the removal of an element used in a formula control property can affect an XML file which is based on it.
Example: Deleting an element node from a schema file affects the exported XML file which is based on it
The following example uses the page report Employee Information List.cls in SampleReports.cat.
- Navigate to File > Open.
- In the Open Report dialog box, select Browse to open the catalog file SampleReports.cat in
<install_root>\Demo\Reports\SampleReports, then open the sample report Employee Information List.cls. - Export the report to an XML file. You then get two files: Employee Information List_Employee Information.xml and Employee Information List_Employee Information.xsd.
- Open Employee Information List_Employee Information.xsd, and delete Employee Information List_Employee Information_ReportBody_PagePanel_PageHeaderPanel_ label4 from Employee Information List_Employee Information_ReportBody_PagePanel_PageHeaderPanel.
- Export the report to an XML file again. This time, specify the modified Employee Information List_Employee Information.xsd as the file to base it on. The newly exported Employee Information List_Employee Information.xml file does not contain information about Employee Information List_Employee Information_ReportBody_PagePanel_PageHeaderPanel_ label4.
- If you do not want to see all property values in the generated XML file, you can comment out any unwanted properties in this way:
- Open the file JRXMLTag.properties located in resource_en_US.jar in
<install_root>\lib. - Add a question mark in front of any unwanted properties to comment them out. For example, you can change Suppressed=Suppressed to ?Suppressed=Suppressed.
- When you export the report to XML, the XML output file does not contain the Suppressed property for each report object.
- Save the property file and refresh the one in resource_en_US.jar.
- In addition, when you clear the Only Data checkbox and add an "@" symbol in front of the value in JRXMLTag.properties, the property in the Element node is then moved to the Attribute node. For example, in JRXMLTag.properties, you change StartYPos=StartYPos to StartYPos=@StartYPos, you can find that the StartYPos property is under in the Attribute node.
- Open the file JRXMLTag.properties located in resource_en_US.jar in
 Back to top