 Previous Topic
Installing and Running Designer on Windows
This topic introduces how you can install, run, and uninstall Designer on Windows.
This topic contains the following sections:
Installing Designer on Windows
You can install Designer on Windows either by using the Installation Wizard or in silent mode. Silent installation frees you from participation in the installation process. It can be useful if you do installation in an automated fashion across a network, or work in an environment where the Windows desktop is unavailable for security reasons.
To install Designer on Windows using the Installation Wizard
- Download the Designer installation file for Windows from the Product Download page on Logi DevNet. Note that you must have been assigned to be the License Point of Contact to access product downloads. If you need more information, contact Customer Service.
- Double-click the installation file to run the Designer Installation Wizard. Select Yes in the prompt message dialog box.
- The Installation Wizard displays the Welcome screen. Select Next.
- In the License Agreement screen, select I accept the terms of the License Agreement, then select Next.
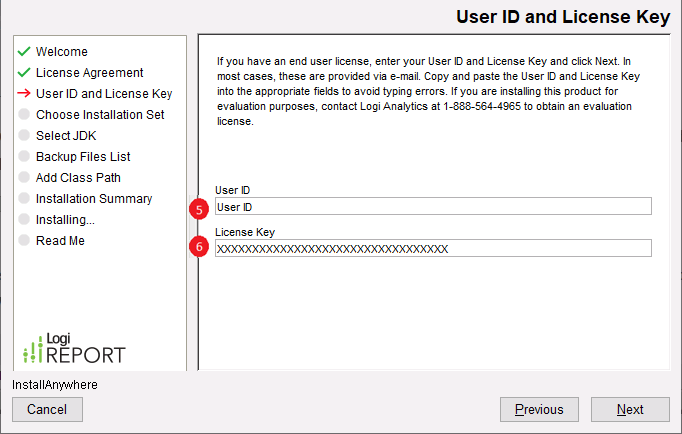
- In the User ID and License Key screen, specify the user ID and license key separately. You can find the license information in your DevNet account if you are assigned to be the License Key Point of Contact.
- Select Support > License Manager (1) from the menu bar of the Logi DevNet website.
- On the Your Logi Product Licenses page, select the down arrow icon in the Key column (2) to display the license key of your Designer.
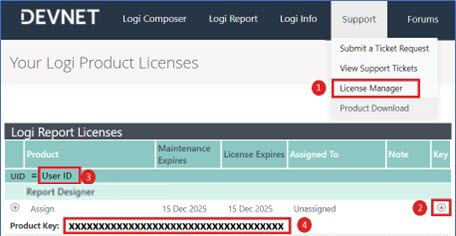
- Copy the UID (3) and Product Key (4) from the DevNet page to the User ID (5) and License Key (6) text boxes in the Installation Wizard. Select Next.
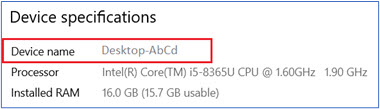
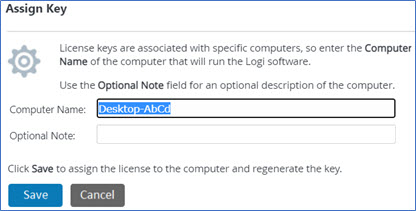
 As an optional step, you can assign your Designer license to a specific computer device, by updating the license assignment with the name of the computer the license should be assigned to.
- To find your computer name, type About in the Windows search box. The computer name value is case sensitive.
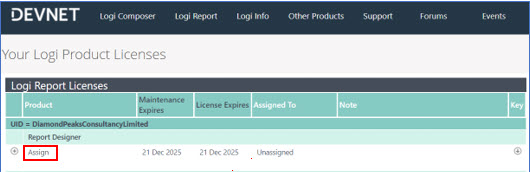
- To assign the Designer license to your computer, on the Your Logi Product Licenses page on DevNet, select Assign in the Product column, then in the prompt Assign Key window, type the computer name and select Save.
- In the Choose Installation Set screen, specify the installation directory. You can type the directory in the text box or select Browse to specify the directory. By default, Designer will be installed in
C:\LogiReport\Designer. Select Next.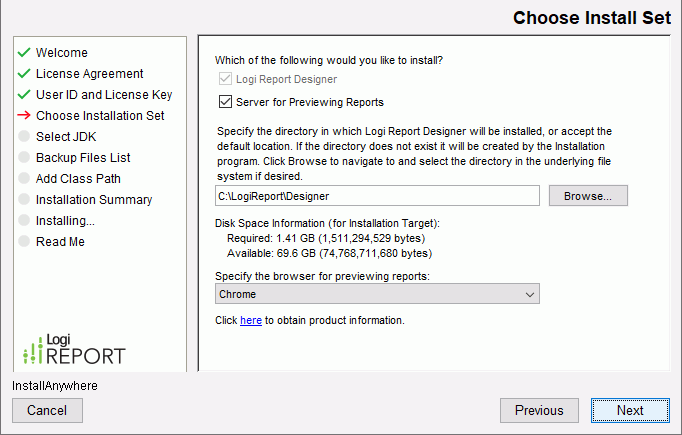 If you install Designer in a folder that already contains a Designer, the installer replaces the packages and creates new batch/script files. Meanwhile, the installer keeps a copy of the old batch/script files for your reference. You should use the batch/script files that come with the installer in order to make sure that all new packages are added to the class path and manually merge any changes you made into the new version.
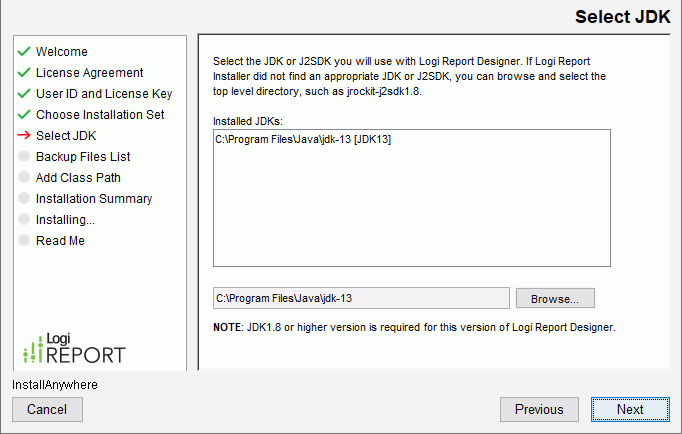
 - In the Select JDK screen, choose the JDK to use with Designer. You can select one from the Installed JDKs box or select Browse to locate a JDK. Select Next.
- In the Backup Files List screen (available only when you upgrade Designer), review the backup files. Select Next.
- In the Add Class Path screen, you can add additional class paths. This is an optional step. If you develop custom functionality using Logi Report API, you can add a class path in this screen to reference it. You can also choose to add the class paths manually into setenv.bat in
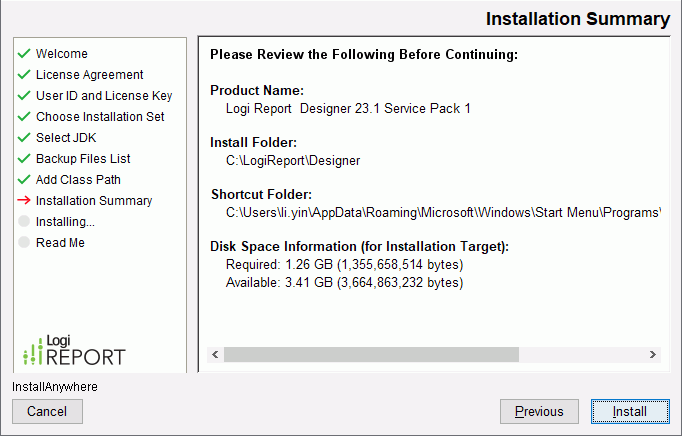
<install_root>\binafter installation. Select Next. - In the Installation Summary screen, review the installation information and select Install to install Designer.
- The Installing screen shows the installation progress.
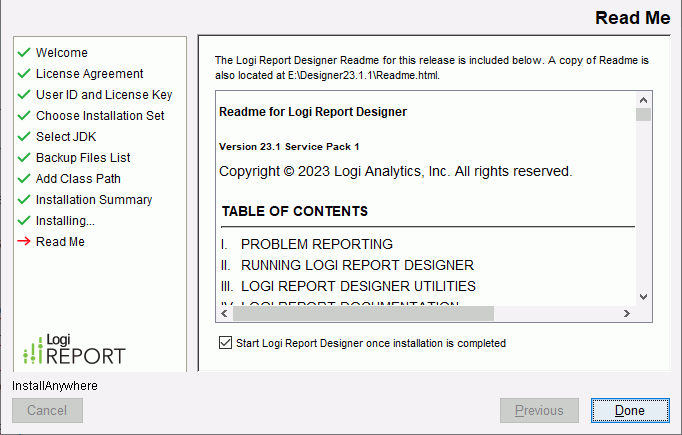
- In the end, the Read Me screen displays. Read the information, specify whether to start Designer right away, and select Done. This completes the installation of Report Designer.
- Designer starts up showing the Start Page, if you select to open it once installation is complete.
To install Designer on Windows silently
- Download the Designer installation file for Windows from the Logi Analytics product download center.
- Get the file DesignerInstall.properties for silent Designer installation from Logi Analytics Support.
- Put DesignerInstall.properties to the directory where you save the Designer installation file.
- Edit DesignerInstall.properties to suit your requirements.
- Open a console window and change the directory to the location of the installation file.
$ cd thepath - Run the following command to install Designer in the designated path:
$ designer-xxx-win64.exe -i silent -f DesignerInstall.propertiesChange designer-xxx-win64.exe to the real file name of the installation file.
When installing Designer silently, make sure you do not use overwrite installation, instead, install it to a new directory.
 Back to top
Running Designer on Windows
To run Designer on Windows, you can use the following methods:
- Double-click the shortcut for Designer on your desktop.
- Select Logi Report Designer in the Logi Report folder on the Start menu.
- Run JReport.bat/JReport.sh located in
<install_root>\bin. - Run the startup batch file from a Command Prompt window. For example, assume that you have installed Designer in
C:\LogiReport\Designer, you can type the following commands:C:\>cd LogiReport\Designer\bin
C:\LogiReport\Designer\bin>JReport.bat
Designer outputs the information about whether the startup is successful or failed to the file LogiReport.out.log located in <install_root>\logs. After you start Designer, Designer recreates and resets the content in the file.
Uninstalling Designer on Windows
You can use either of the following methods to uninstall Designer on Windows:
- Open Control Panel, and then Programs and Features to remove it.
- Run uninstaller.exe in
<install_root>\_uninst.
The uninstaller removes all files that the installer generates, while it retains any files that the program creates later. You should remove these files manually.