 Previous Topic
Example: Using Geographic Maps
This topic presents an example to demonstrate how you can add a geographic map in a library component and perform data analysis on it in a dashboard.
- Make sure SampleReports.cat is the currently open catalog file. If not, navigate to File > Open Catalog to open it from
<install_root>\Demo\Reports\SampleReports. - Navigate to Home > New > Library Component.
- In the Select Component for Library Component dialog box, select Blank and select OK.
- From the Components panel, drag the Geographic Map icon
 in the Visual category to the library component. Designer displays the Create Geographic Map dialog box.
- In the Data screen, select WorldWideSalesBV in Data Source 1, then select Next.
- In the Display screen, add the group objects Country and then State as the group-by fields to the Drill Path box.
- Select Enable Area. Designer selects Enable Marker by default.
Next, we define the marker and area properties for the Country group level.
- Select Country in the Drill Path box.
- Drag the group object Country from the Resources box to the Shape By text box, then select
 beside the text box.
 - In the Edit Shapes dialog box, select anywhere in the Data Items box and select Ctrl+A on the keyboard to select all countries, then select the icon
 in the preview box below the pattern name to apply the shape to all countries. Select OK to apply the shape.

- Drag the aggregation object Total Sales from the Resources box to the Color By text box, then select
 beside the text box.
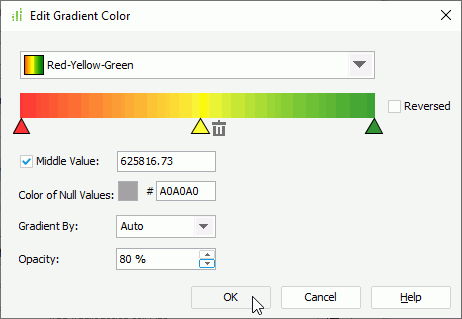
 - In the Edit Gradient Color dialog box, keep the default gradient color, select Middle Value and set its value to 625816.73, specify the opacity to 80%, then select OK to apply the gradient color.
- Drag the aggregation object Total Cost from the Resources box to the Size By text box, then select
 beside the text box to specify the zoom percentage to 370%. Select outside the size box to apply the zoom percentage.
 - Drag the group object Country from the Resources box to the Label By text box under Marker Options.
- Select
 beside the Marker Tip text box, then select <New Formula...> from its drop-down list to create a formula to control the marker tip information.
 - In the Enter Formula Name dialog box, type MarkerTipforCountry and select OK.
- In the Formula Editor dialog box, define the formula as follows:
"Country:" + " " + @"Customers.Country" + "\n" +
      "Total Cost:" + " " + ToText(@"Orders Detail.Total Cost","$#,###.00") + "\n" +
"Total Sales:" + " " + ToText(@"Orders Detail.Total Sales","$#,###.00") - Save the formula and close the Formula Editor dialog box. Designer adds MarkerTipforCountry in the Marker Tip text box automatically.
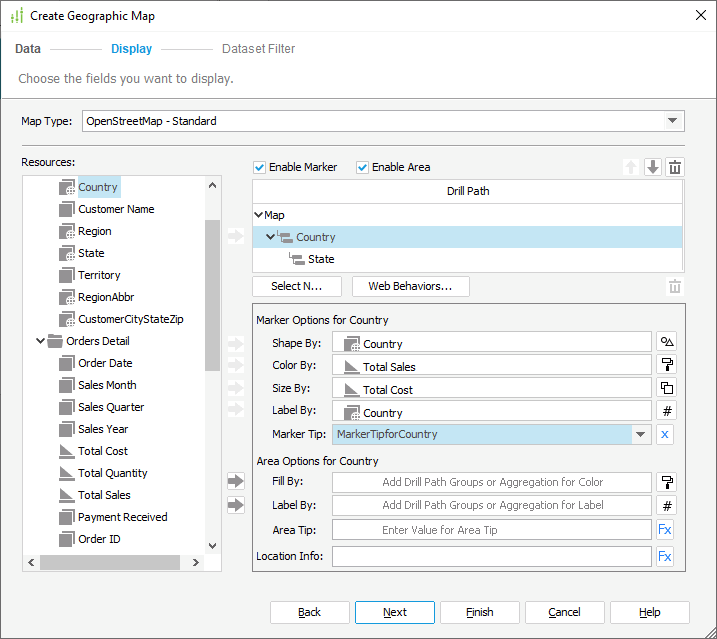
- Drag the aggregation object Total Sales from the Resources box to the Fill By text box, then select beside the text box.
- In the Edit Gradient Color dialog box, select Green-White-Orange from the gradient color drop-down list, which is the last color at the second line in the list, specify the opacity to 80%, then select OK to apply the gradient color.
Now, we specify the marker and area properties for the State group level.
- Select State in the Drill Path box.
- Drag the group object State from the Resources box to the Shape By text box.
- Select beside the Size By text box to specify the zoom percentage to 230%. Select outside the size box to apply the zoom percentage.
- Drag the aggregation object Total Sales from the Resources box to the Fill By text box, then select beside the text box.
- In the Edit Gradient Color dialog box, select Green as the gradient color, which is the second color in the color list, specify the opacity to 80%, then select OK to apply the gradient color.
- Drag the group object State from the Resources box to the Label By text box under Area Options. Repeat this to add Total Sales to the Label By text box.
- Repeat steps 15 to 18 to create another formula AreaTipforState to control the area tip information.
"Country:" + " " + @"Customers.Country" + "\n" +
"State:" + " " + @"Customers.State" + "\n" +
"Total Sales:" + " " + ToText(@"Orders Detail.Total Sales","$#,###.00") - Create the formula LocationInfoforState for the Location Info option.
@"Customers.State" + "," + @"Customers.Country"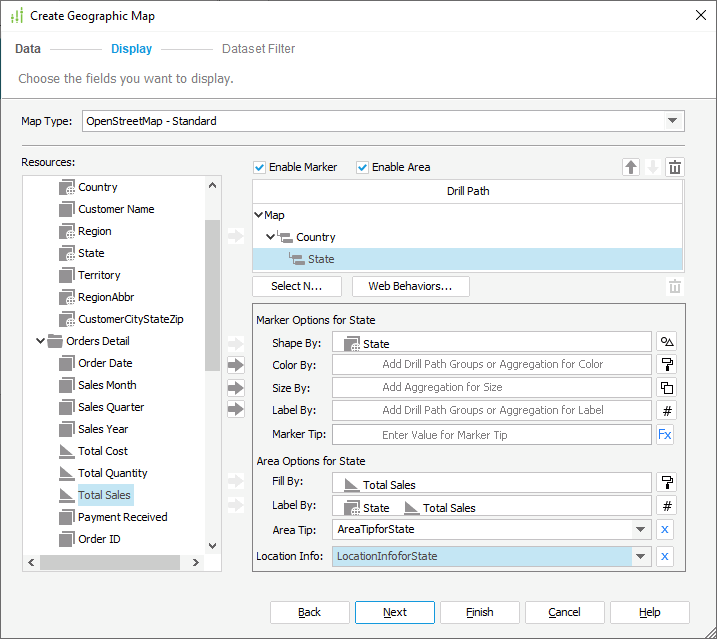
- Select Next.
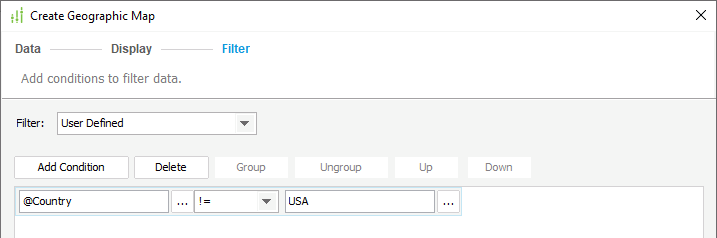
- In the Filter screen, select Add Condition to add a condition line and specify the filter condition as Country != USA.
- Select Finish to create the map.
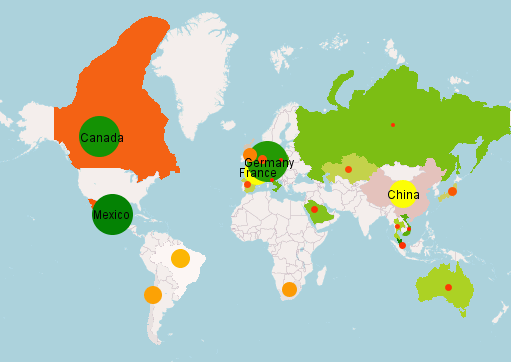
- Select the View tab to preview the geographic map. The map shows as a static map and Designer applies the settings we have defined in the Display screen of the map wizard to the map markers and areas.
- Navigate to Home > Save to save the library component as Sales Map by Country.lc.
- Publish the library component to the default location on Server together with the resources it uses.
- Create a dashboard on Server.
- In the Resources panel of JDashboard, locate the library component Sales Map by Country.lc in the Component Library node and drag it to the dashboard body.
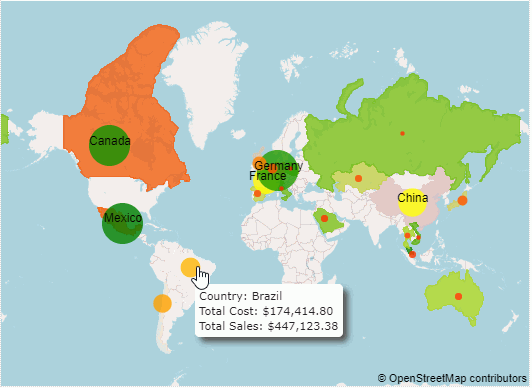
- Point to a marker, and JDashboard displays its tip information just as what we have defined in the map wizard.
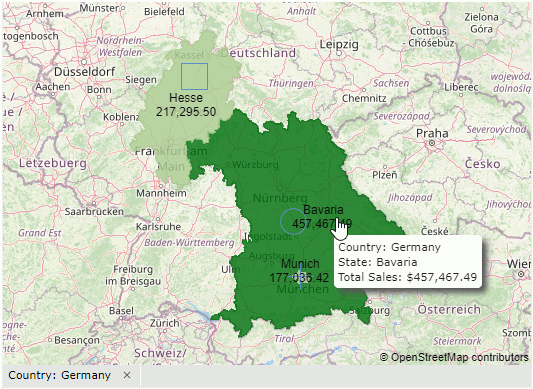
- There are two group levels in this geographic map component, first by Country and then by State, so for the higher group level, we can perform the go-down action, and for the lower group level the go-up action. Point to the marker representing Germany, select it, or right-click it and select Go Down from the shortcut menu. The geographic map jumps one group level down to show the information of states in Germany, and JDashboard displays the filter condition "Country: Germany" at the bottom of the geographic map.
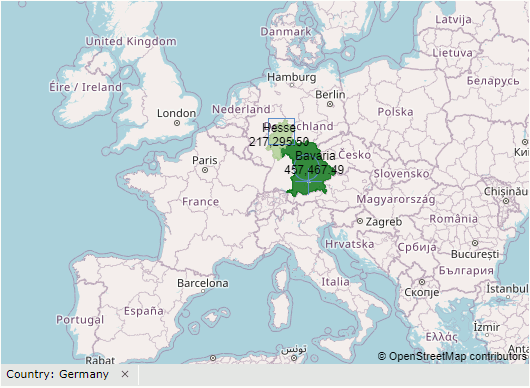
- Scroll the mouse over the geographic map to zoom it out or in. By scrolling the mouse down, we can get a wider area on the map.
 Back to top