 Previous Topic
Modifying Geographic Maps
For any geographic map in a report, you can further modify it at any time. This topic describes how you can change the data a geographic map displays and apply conditional formatting on the map markers to highlight important values.
This topic contains the following sections:
Editing a Geographic Map with Wizard
You can further modify a geographic map by accessing its shortcut menu wizard which contains a set of screens that are similar to the wizard screens that you use to create the geographic map.
- Right-click the geographic map and select Geographic Map Wizard from the shortcut menu. Designer displays the Geographic Map Wizard dialog box.
- In the Data screen, you can specify a new data source for the geographic map.
- Edit data of the geographic map.
- For a geographic map in a web report or library component, edit the data you want to display on the map in the Display screen.
- For a geographic map in a page report, edit the group settings, layout mode, and marker properties in the Group, Layout, and Marker screens respectively.
- Select Finish to accept the changes.
For more information about defining a geographic map, refer to Inserting Geographic Maps in a Report.
 Back to top
Adding Conditional Formatting to Map Markers
Each value in a group of a geographic map is bound with a marker. You can add conditional formatting to markers of each group, so the markers that meet a specified condition can automatically apply the formatting you define for the condition. This is very useful to highlight the values that users may need to act on at runtime.
To apply conditional formatting to the markers in a geographic map
- Select the geographic map and then do one of the following:
- Navigate to Format > Conditional Formatting
 .
. - Right-click the geographic map and select Conditional Formatting from the shortcut menu.
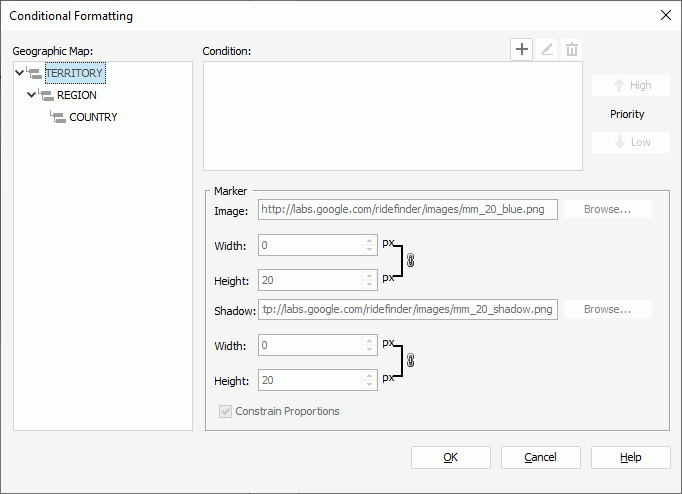
Designer displays the Conditional Formatting dialog box.
- Navigate to Format > Conditional Formatting
- Select a group level in the Geographic Map box.
- Select Add
 . Designer displays the Edit Conditions dialog box.
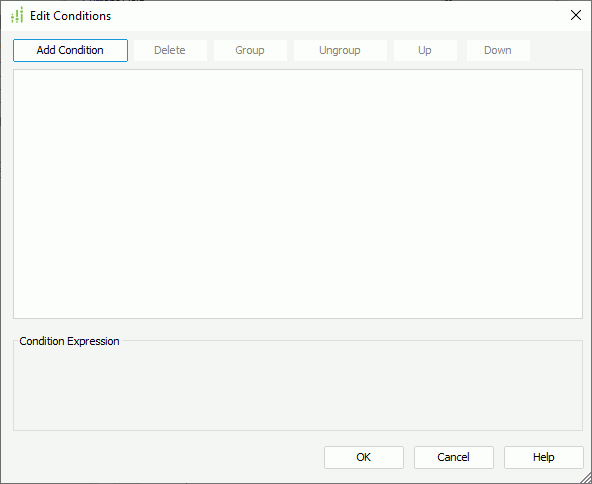
- Select Add Condition to add a condition line.
- From the field drop-down list, select the field on which the condition is based.
- Choose the operator with which to compose the condition from the operator drop-down list.
- From the value drop-down list, select the value of how to build the condition. You can also type the value by yourself. When the condition is based on a String field, you can apply an empty string as the value, by simply leaving the text box blank (value length=0).
If you would like to filter space string (one or more spaces) and empty string, create a formula with the statement
Trim(@Field)that transforms the spaces into empty string, then use the formula to replace the field itself in the condition. - Repeat the preceding steps to define more condition lines and specify the logic relationship between the condition lines: "And", "Or", "And Not", or "Or Not".
- To group some condition lines, select them and select Group, Designer then adds the selected condition lines in one group and applies them as one line of filter expression (you can also group conditions and groups together).
- To take out any condition or group from a group, select it and select Ungroup.
- To adjust the priority of the condition lines, select it and select Up or Down.
- To delete a condition line, select it and select Delete.
- Select OK to save the condition and close the dialog box. Designer displays the newly added condition and selects it in the Condition box of the Conditional Formatting dialog box.
- In the Marker box, specify the settings you want to apply to markers of the selected group level that meet the condition, including the image, the shadow image, and their width and height. If you want to change the width and height for the image/shadow image at the same time in a certain proportion, select Constrain Proportion.
- Repeat steps 3 to 10 to add more conditions and specify the marker settings for each condition.
- To edit a condition, select the condition from the Condition box, select Edit
 , then edit the condition in the Edit Conditions dialog box.
 - To adjust the priority of the conditions, select a condition and select High or Low.
- To delete a condition and the corresponding marker settings, select the condition from the Condition box and thenselect Remove
 .
.
- To edit a condition, select the condition from the Condition box, select Edit
- Select other group levels in the Geographic Map box and define conditional formatting to markers of the group levels.
- Select OK to save and apply the settings.
 For a geographic map in a web report or library component, the conditional formatting settings higher priority than the settings defined for the Shape By, Color By, and Size By options in the map wizard.