 Yin Previous Topic
Working with Tabulars
A tabular is a component designed to lay out other components. Unlike a table component which is used to display a dataset, a tabular is a set of cells that can each display a dataset in a component. This topic introduces how you can insert tabulars in a report, add components into a tabular, and manage the cells, columns, and rows of a tabular.
 You cannot use tabulars in business view-based page reports or in library components. A web report is initially a tabular with a single cell; you cannot insert another tabular into a web report.
This topic contains the following sections:
- Inserting Tabulars in a Query-Based Page Report
- Inserting Components into a Tabular
- Merging and Splitting Tabular Cells
- Resizing, Inserting, and Deleting Columns/Rows in a Tabular
See an example: The SampleComponents catalog, included with Designer, contains reports that have examples of how you could use each component type in a report. For the tabular component example, open <install_root>\Demo\Reports\SampleComponents\TabularReport.cls.
Inserting Tabulars in a Query-Based Page Report
You can insert tabulars in the report areas listed in Components in Query-Based Page Report.
To insert a tabular into a query-based page report, use either of the following methods:
- Using dialog box
- Position the mouse pointer at the destination where you want to insert the tabular.
- Navigate to Insert > Tabular or Home > Insert > Tabular. Designer displays the Insert Tabular dialog box.
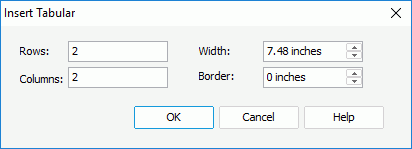
- Specify the number of rows and columns, and the border width and tabular width as required.
- Select OK to close the dialog box. If the mouse pointer is in the report body or a cell of another tabular, Designer inserts the tabular there when you select OK; otherwise, you need to select in the location where you want to insert the tabular to place the tabular there.
- By dragging and dropping
From the Components panel, drag the Tabular icon in the Grid category to the location in the report which allows the insertion of a tabular, Designer then inserts a tabular with two rows and columns by default there.
 Back to top
Inserting Components into a Tabular
The components that you can insert into a tabular cell are listed in Component Placement in Different Report Type. The most common component to place into a tabular cell is a data component, and it is usually best to only place one single data component into one tabular cell. When you insert a component whose default size is bigger than that of the tabular cell, the component fits into the cell by default. If you place multiple components into one cell, you should make sure their Position property is "static", so that the components flow one after another and do not overlap. Then at runtime,
- For tabulars in a page report, the cell expands vertically to whatever length the data component in it grows to. For example, placing a crosstab in a cell followed by a chart, the crosstab can grow in length based on the data. As long as they are in separate cells, they do not overlap.
- For the web report tabular, Report adds a scroll bar for a data component if a tabular cell cannot fully displays the data component.
For the components you insert in tabular cells, you can drag them to other cells. However, if you are working with tabulars in page reports, to move the tables, crosstabs, charts, banded objects, and tabulars in the tabular cells, you need to first change their Position property to "absolute". When moving a component around or resizing a component, if you want to enlarge its parent tabular cell with it accordingly, select and hold Shift on the keyboard at the same time, then the cell expands to the right or to the bottom if the component exceeds the right or bottom border of the cell. The expansion of the cell stops when it meets the right or bottom border of the adjacent cell.
Besides inserting components, you can also double-click a tabular cell and type text in it as you would do in a text box. When you type text into a tabular cell, Designer creates paragraphs automatically. You can format the text and paragraphs in a tabular cell easily. For example, you can change the font face, font color of the text, the indentation of any paragraph. You can even find and replace a text string with another one easily as with a word processor. For more information, see the specific topics in Text Boxes.
Merging and Splitting Tabular Cells
In a tabular, you can merge adjacent cells that form a rectangle into one cell.
To merge adjacent cells
- Select the cells and right-click on them.
- Select Merge on the shortcut menu, or navigate to Home > Merge. Designer then merges these cells into one cell.
To split a cell
- Right-click the cell and select Split on the shortcut menu, or navigate to Home > Split.
- In the Split Cell dialog box, specify how many rows/columns you want to split the cell into.
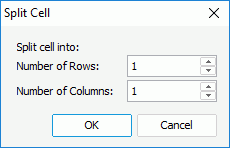
- Select OK. Designer then splits the cell according to your settings.
Resizing, Inserting, and Deleting Columns/Rows in a Tabular
To resize a column/row of a tabular
Drag the right/bottom boundary of the column/row until the column/row is the width/height you want. If the boundary is not the rightmost/last one, the column width/row height changes, but the total width/height of the tabular does not change. If you want to change both the column width/row height and the tabular width/height, select and hold Shift on the keyboard while dragging.
To insert a column/row into a tabular
- Select a cell and right-click on it.
- On the shortcut menu, select the corresponding inserting column/row item and Designer inserts a column/row according to your selection.
To delete a column/row from a tabular
- Select all the cells in this column/row and right-click on them.
- Select Delete Column/Delete Row on the shortcut menu.