 Previous Topic
Bursting Dialog Box
You can use the Bursting dialog box to edit a normal page report to become a bursting report. This topic describes the options in the dialog box.
Designer displays the Bursting dialog box when you navigate to Report > Bursting.
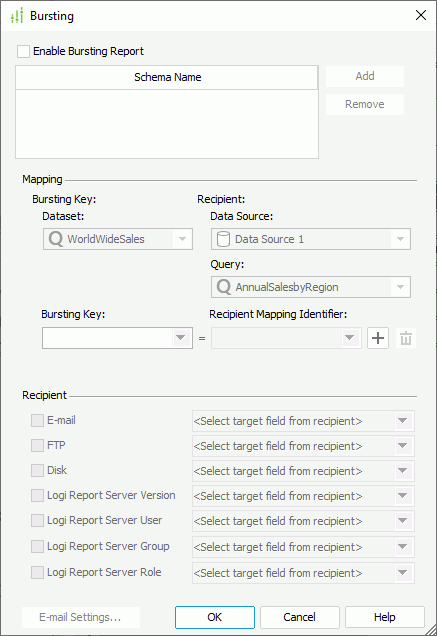
Designer displays these options:
Enable Bursting Report
Select to enable the bursting options.
Schema Name
This box lists the names of the bursting schemas for the report. Bursting schema defines how to split data and who receives a subset of the split data.
When you select a schema name, Designer displays the schema's bursting information in the Mapping and Recipient sections. By selecting a schema name, you can rename it.
Add
Select to create a new bursting schema for the report. You need define the schema's Mapping and Recipient information.
Remove
Select to remove a specified schema from the Schema Name box.
Mapping
You can specify the relationship between the bursting key and recipient for the selected schema in this panel.
- Bursting Key
- Dataset
Select the dataset used in the report based on which to set the bursting key. You can make multiple bursting schemas for a report based on the same or different datasets in the report. - Bursting Key
Select the data fields in the specified dataset according to which to split report data.
- Dataset
- Recipient
- Data Source
Select the data source that contains the recipient query. - Query
Select the query from the selected data source which retrieves recipient addresses. You can make multiple bursting schemas for a report based on different recipient queries in the report. - Recipient Mapping Identifier
Select a unique data field to map to each bursting key field. The available values are data fields in the specified query of the same data type as the bursting key.
- Data Source
-
 Add button
Select to add a line to map another pair of bursting key and recipient. -
 Remove button
Select to delete the specified mapping line.
Recipient
You can define the formats of the recipient addresses for the selected schema in this panel.
- E-mail
Select and specify the data field that defines email addresses from the drop-down list. - FTP
Select and specify the data field that defines FTP addresses from the drop-down list. - Disk
Select and specify the data field that defines file system directories from the drop-down list. - Report Server Version
Select and specify the data field that defines resource directories in the resource system of Server from the drop-down list. - Report Server User
Select and specify the data field that defines user addresses in the security system of Server from the drop-down list.- User E-mail
Select to send the report to email addresses. - User Private Folder
Select to send the report to the users' My Reports folders in the resource tree.- Sub Path
Specify the subfolder in the My Reports folder where to send the report.
- Sub Path
- User E-mail
- Report Server Group
Select and specify the data field that defines group addresses in the security system of Server from the drop-down list.- User E-mail
Select to send the report to email addresses. - User Private Folder
Select to send the report to the group members' My Reports folders in the resource tree.- Sub Path
Specify the subfolder in the My Reports folder where to send the report.
- Sub Path
- User E-mail
- Report Server Role
Select and specify the data field that defines role addresses in the security system of Server from the drop-down list.- User E-mail
Select to send the report to email addresses. - User Private Folder
Select to send the report to the role members' My Reports folders in the resource tree.- Sub Path
Specify the subfolder in the My Reports folder where to send the report.
- Sub Path
- User E-mail
E-mail Settings
Designer enables this button when you select E-mail or Report Server User/Group/Role > User E-mail in the Recipient section. Select it to open the E-mail Settings dialog box to specify more email information.
OK
Select to apply your settings and close the dialog box.
Cancel
Select to close the dialog box without saving any changes.
Help
Select to view information about the dialog box.
 Back to top