 Previous Topic
Data Format Dialog Box
You can use the Data Format dialog box to specify the data format of the values in a chart. This topic describes the options in the dialog box.
Designer displays the Data Format dialog box when you select the ellipsis  to specify the data format for objects in a chart in the Report Inspector, and provides you with different options in the dialog box according to the different objects in the chart for which you specify to set the format.
When you use the Data Format dialog box to specify the data format for objects except the category axis (the X axis) in a chart, Designer displays the following options in the dialog box:
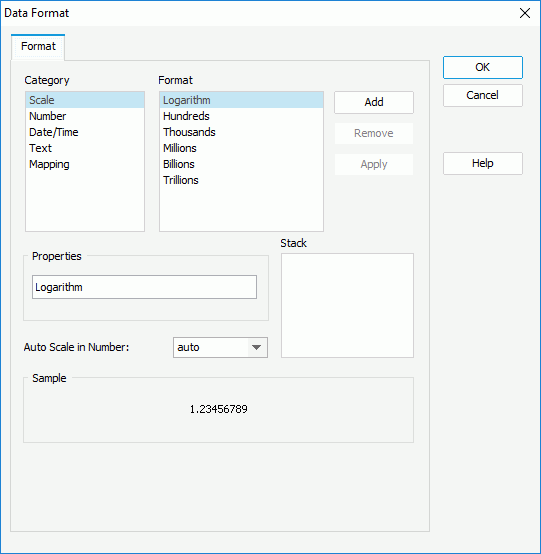
The two boxes list the category types and the formats of each category that Designer provides by default. Select a category and a format for this category, then select Add to add it as the format of the category. You can add only one format for each category.
| Category | Format | Description (Sample) |
|---|---|---|
| Scale | Divides the value by hundreds, thousands, and so on. | |
| Logarithm | Calculates ten to the power of the value. | |
| Hundreds | Divides the value by one hundred. | |
| Thousands | Divides the value by one thousand. | |
| Millions | Divides the value by one million. | |
| Billions | Divides the value by one billion. | |
| Trillions | Divides the value by one trillion. | |
| Number | Re-formats the number value (original example: 123456) | |
| 0 | Formats a decimal number to an integer (123456). | |
| #,##0 | Formats a decimal number to a digit grouped integer (123,456). | |
| #,##0;-#,##0 | Formats a decimal number to a digit grouped integer. A minus sign is used as the negative prefix (123,456/-123,456). | |
| 0.00 | Formats a decimal number to a fixed-point number retaining 2 digits after decimal separator (123456.00). | |
| #,##0.00 | Formats a decimal number to a digit grouped number retaining 2 digits after decimal separator (123,456.00). | |
| #,##0.00;-#,##0.00 | Formats a decimal number to a digit grouped number retaining 2 digits after decimal separator. A minus sign is used as the negative prefix (123,456.00/-123,456.00). | |
| 0.00E00 | Formats a decimal number to a number in scientific notation. The mantissa is often in the range 1.0 <= x < 10.0, and the number of digit characters after the exponent character (E) gives the minimum exponent digit count (1.23E04). | |
| ##0.0E0 | Formats a decimal number to a number in scientific notation. The minimum number of integer in the mantissa is 1, and the number of digit characters after the exponent character (E) gives the minimum exponent digit count (12.34E3). | |
| $0 | Format a decimal number to an integer, prefixed with the currency symbol "$" ($123456). | |
| $#,##0 | Formats a decimal number to a digit grouped integer, prefixed with the currency symbol "$" ($123,456). | |
| $#,##0;-$#,##0 | Formats a decimal number to a digit grouped integer, prefixed with the currency symbol "$". A minus sign is used as the negative prefix ($123,456/-$123,456). | |
| $0.00 | Formats a decimal number to a fixed-point number retaining 2 digits after decimal separator, prefixed with the currency symbol "$" ($123456.00). | |
| $#,##0.00 | Formats a decimal number to a digit grouped number retaining 2 digits after decimal separator, prefixed with the currency symbol "$" ($123,456.00). | |
|
$#,##0.00; |
Formats a decimal number to a digit grouped number retaining 2 digits after decimal separator, prefixed with the currency symbol "$". A minus sign is used as the negative prefix ($123,456.00/-$123,456.00). | |
| $0.00E00 | Formats a decimal number to a number in scientific notation, prefixed with the currency symbol "$". The mantissa is often in the range 1.0 <= x < 10.0, and the number of digit characters after the exponent character (E) gives the minimum exponent digit count ($1.23E$04). | |
| $##0.0E0 | Formats a decimal number to a number in scientific notation, prefixed with the currency symbol "$". The minimum number of integer in the mantissa is 1, and the number of digit characters after the exponent character (E) gives the minimum exponent digit count ($12.34E$3). | |
| 0% | Formats a decimal number to percentage: multiplied by 100 and shown as an integer percentage (12%). | |
| 0.00% | Formats a decimal number to percentage: multiplied by 100 and shown as a fixed-point number percentage retaining 2 digits after decimal separator (12.34%). | |
|
|
||
| Date/Time | Re-formats the date/time value (for example, Wednesday, December 25, 00:00:00 GMT-08:00 2002) | |
| G | Formats a date to era designator (AD). | |
| yyyy | Formats a date to year (2002). | |
| yy | Formats a date to year in short form (02). | |
| yyyy G | Formats a date to year, tagged with era designator (2002 AD) | |
| MM | Formats a date to month in year, shown in number format (12). | |
| MMM | Formats a date to month in year, shown in the abbreviated form (Dec). | |
| MMMMMMMM | Formats a date to month in year, shown in the full form (December). | |
| dd/MM/yy | Formats a date to a simple date form (25/12/02). | |
| dd-MMM-yy | Formats a date to a simple date form (25-Dec-02). | |
| dd-MMM | Formats a date to a simple date form (25-Dec). | |
| MMM-yy | Formats a date to a simple date form (Dec-02). | |
| MMM yyyy | Formats a date to a simple date form (Dec 2002). | |
| dd | Formats a date to day in month (25). | |
| DDD | Formats a date to day in year (359). | |
| ww | Formats a date to week in year (52). | |
| W | Formats a date to week in month (4). | |
| EEE | Formats a date to day in week, in short form (Wed). | |
| EEEEEE | Formats a date to day in week (Wednesday). | |
| HH | Formats a date to hour in day, 0~23 (00). | |
| kk | Formats a date to hour in day, 1~24 (24). | |
| KK a | Formats a date to hour in am/pm, 0~11, with am/pm marker (00 AM) | |
| hh a | Formats a date to hour in am/pm, 1~12, with am/pm marker (12 AM) | |
| mm | Formats a date to minute in hour (00). | |
| hh:mm a | Formats a date to hour in am/pm, 1~12, minutes in an hour, with am/pm marker (12:00 AM). | |
| ss | Formats a date to second in minute (00). | |
| hh:mm:ss | Formats a date to hour in am/pm 1~12, minutes in an hour, and second in minute (12:00:00). | |
| hh:mm:ss a | Formats a date to hour in am/pm 1~12, minutes in an hour, and second in minute, with am/pm marker (12:00:00 AM). | |
| mm:ss | Formats a date to minute in hour and second in minute (00:00). | |
| MMMMM dd yyyy G (EEEEEE) hh:mm:ss aa z | Formats a date to a full form date, which contains month in year (shown in full form), days in a month, year, era designator, day in week (shown in the full form), hour in a day, 1~12, minutes in an hour, second in minute, am/pm marker, and time zone (December 25 2002 AD (Wednesday) 12:00:00 AM GMT-08:00). | |
|
|
||
| Text | Specifies the length of the value. | |
| Default Length | Uses the length of the string Default Length, which is 14, as the length of the string. Designer cuts any letters that exceed this length. You can modify this string, adding or deleting letters to increase or decrease the length limit. For example, type "Teddy", the label may probably be "Wed D", which originally could be "Wed December 25 2002". If you want to show all, you can type "Teddy is a lovely bear!", where the length is longer than the length of the string "Wed December 25 2002". | |
| Mapping | Maps new value to one or more values. | |
| One-to-one Mapping | Maps a new value to one value. Type the argument number that you want to replace, and then specify the new value in the Map To box. For example, if you want to replace the second data label on the X axis, which is "Thu Jul 04 2002", with a new string "US National Day", just type 2 in the Argument# box, type US National Day in the Map To box, and then select Add to add it to the Stack box. If you want to map more values, repeat this procedure. | |
| Range Mapping | Maps a new value to a range of values. Type the argument numbers to define the range you want to map together, and then specify the new value in the Map To box. For example, if you want to replace the data labels from the second one to the fifth with a new name "My Holiday", just type 2 in the first Argument# box and 5 in the second Argument# box, then type My Holiday in the Map To box, and finally select Add to add it to the Stack box. If you want to map ranges that are not consecutive, repeat this procedure. | |
| Text Mapping | Changes the data in the axis data label to a customized string. For example, if you want to change "Chen" in the first data label of the X axis to "Logi Analytics", type Chen in the Original Text box, type Logi Analytics in the Map To box, and then select Add to add it to the Stack box. You can only change the data one by one. Make sure that your spelling in the Original Text box is exactly the same as the data shown in the axis label. | |
| Prefix | Adds a string before the text in the data label of the axis. For example, if you want to add "NA" before the text in the data label of the X axis, type NA in the Map To box, and select Add to add it to the Stack box. | |
| Suffix | Adds a string behind the text in the data label of the axis. For example, if you want to add "NA" behind the text in the data label of the X axis, type NA in the Map To box, and select Add to add it to the Stack box. | |
|
|
||

Properties
This text box shows properties of the format that you select in the Format box. If the default formats Designer provides for a category cannot meet your requirement, you can define your own format in the text box and select Add to add it as the format of the category.
Specify whether to automatically scale the Number values that fall into the two ranges:
- When 1000 <= value < 10^15, Designer applies the following quantity unit symbols of the International System of Units to scale the values: K (10^3), M (10^6), G (10^9), and T (10^12).
- When 0 < value < 0.001 or value >= 10^15, Designer uses scientific notation to scale the values.
By default, Designer selects "auto" for the option, meaning, Designer applies the setting that you specify for the same property on the chart in the Report Inspector for the values. If you select "true", Designer applies the specified format to the integer part of the values after scaling them; however, if the specified format conflicts with the logic of Auto Scale in Number, for example, the values display in percentage, Designer ignores the Auto Scale in Number setting. Select "false" if you do not want to scale the values.
Sample
This box displays a sample for the selected format.
Stack
This box lists all the formats that you select from different categories.
Add
Select to add a format to the Stack box.
Remove
Select to remove the specified format from the Stack box.
Apply
Select to apply the specified format to the object.
OK
Select to apply your settings and close the dialog box.
Cancel
Select to close the dialog box without saving any changes.
Help
Select to view information about the dialog box.
 Back to top
When you use the Data Format dialog box to specify the data format for the category axis (the X axis) in a chart, Designer displays the following tabs in the dialog box (to open the dialog box, locate Chart Object in the Report Inspector, select the ellipsis beside the value text box of the Category Format property in the Data group):
Designer displays these buttons in all the tabs:
OK
Select to apply your settings and close the dialog box.
Cancel
Select to close the dialog box without saving any changes.
Help
Select to view information about the dialog box.
Major Label Tab
Use this tab to specify the data format of the major tick mark labels on the axis.
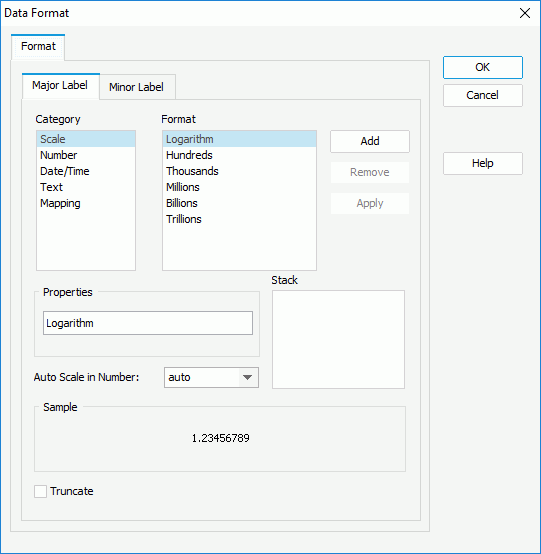
Category & Format
These two boxes list the category types and the formats of each category that Designer provides by default. Select a category and a format for this category, then select Add to add it as the format of the category. You can add only one format for each category.
Properties
This text box shows the properties of the format that you select in the Format box. If the default formats Designer provides for a category cannot meet your requirement, you can define your own format in the text box and select Add to add it as the format of the category.
Auto Scale in Number
Specify whether to automatically scale the Number values that fall into the two ranges:
- When 1000 <= value < 10^15, Designer applies the following quantity unit symbols of the International System of Units to scale the values: K (10^3), M (10^6), G (10^9), and T (10^12).
- When 0 < value < 0.001 or value >= 10^15, Designer uses scientific notation to scale the values.
By default, Designer selects "auto" for the option, meaning, Designer applies the setting that you specify for the same property on the chart in the Report Inspector for the values. If you select "true", Designer applies the specified format to the integer part of the values after scaling them; however, if the specified format conflicts with the logic of Auto Scale in Number, for example, the values display in percentage, Designer ignores the Auto Scale in Number setting. Select "false" if you do not want to scale the values.
Sample
This box displays a sample for the selected format.
Stack
This box lists all the formats that you select from different categories.
Add
Select to add a format to the Stack box.
Remove
Select to remove the specified format from the Stack box.
Apply
Select to apply the specified format to the major tick mark labels.
Truncate
Select to truncate the label text that is longer than 10 characters and only show the first 7 characters.
Minor Label Tab
Use this tab to specify the data format of the minor tick mark labels on the axis.
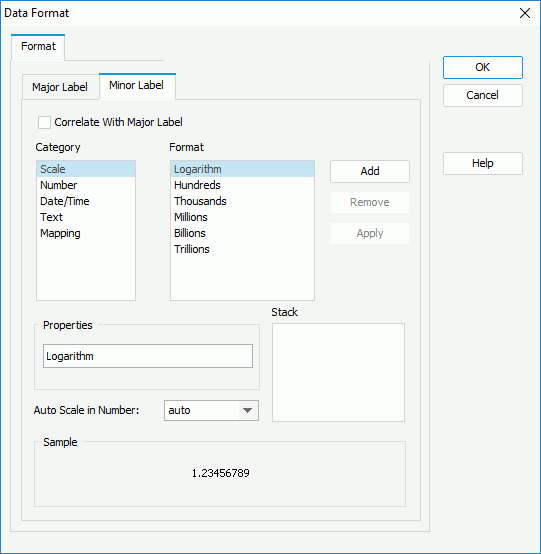
Correlate with Major Label
Select to apply the data format that you specify for the major tick mark labels to the minor tick mark labels. Clear it if you want to apply separate data format for the minor tick mark labels.
Category & Format
These two boxes list the category types and the formats of each category that Designer provides by default. Select a category and a format for this category, then select Add to add it as the format of the category. You can add only one format for each category.
Properties
This text box shows the properties of the format that you select in the Format box. If the default formats Designer provides for a category cannot meet your requirement, you can define your own format in the text box and select Add to add it as the format of the category.
Auto Scale in Number
Specify whether to automatically scale the Number values that fall into the two ranges:
- When 1000 <= value < 10^15, Designer applies the following quantity unit symbols of the International System of Units to scale the values: K (10^3), M (10^6), G (10^9), and T (10^12).
- When 0 < value < 0.001 or value >= 10^15, Designer uses scientific notation to scale the values.
By default, Designer selects "auto" for the option, meaning, Designer applies the setting that you specify for the same property on the chart in the Report Inspector for the values. If you select "true", Designer applies the specified format to the integer part of the values after scaling them; however, if the specified format conflicts with the logic of Auto Scale in Number, for example, the values display in percentage, Designer ignores the Auto Scale in Number setting. Select "false" if you do not want to scale the values.
Sample
This box displays a sample for the selected format.
Stack
This box lists all the formats that you select from different categories.
Add
Select to add a format to the Stack box.
Remove
Select to remove the specified format from the Stack box.
Apply
Select to apply the specified format to the minor tick mark labels.