 Previous Topic
Data Label Editor Dialog Box
You can use the Data Label Editor dialog box to edit data labels in the range groups of a chart. This topic describes the options in the dialog box.
Designer displays the Data Label Editor dialog box when you select Edit Data Labels in the Data Label subtab of the Range tab in the Format Category (X) Axis dialog box.
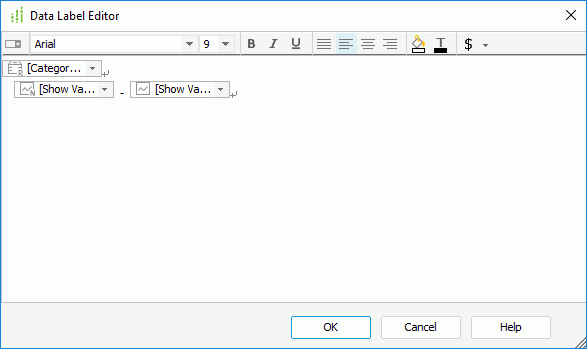
Designer displays these options:
Toolbar
You can use the following toolbar buttons to edit properties of the data labels.
-
 Insert Drop-down List
Select to insert a drop-down list into the editor. -
 Font Face
Specify the font face of the text in the selected data labels. -
 Font Size
Specify the font size of the text in the selected data labels. -
 Style
Style
Specify the style group applied to the selected data labels. -
 Bold
Bold
Select to apply bold formatting to the text in the selected data labels. -
 Italic
Select to italicize the text in the selected data labels. -
 Underline
Select to add a horizontal line under the text in the selected data labels. -
 Justify
Select to adjust the horizontal spacing so that the content is aligned evenly along both the left and right margins in the selected data labels. -
 Left
Left
Select to align the content of the selected data labels to the left border of the data labels. -
 Center
Select to align the content of the selected data labels in the center of the data labels. -
 Right
Right
Select to align the content of the selected data labels to the right border of the data labels. -
 Background Color
Select to specify the background color of the selected data labels in the color palette. -
 Foreground Color
Select to specify the foreground color of the selected data labels in the color palette. -
 Format Box
Select to specify the data format of the values in the selected data label.- Auto Scale in Number
Designer displays this option when the selected data label is Number data type. You can use it to specify whether to automatically scale the values of the data label that fall into the two ranges:- When 1000 <= value < 10^15, Designer applies the following quantity unit symbols of the International System of Units to scale the values: K (10^3), M (10^6), G (10^9), and T (10^12).
- When 0 < value < 0.001 or value >= 10^15, Designer uses scientific notation to scale the values.
By default, Designer selects "auto" for the option, meaning, Designer applies the setting that you specify for the same property on the chart in the Report Inspector for the values. If you select "true", Designer applies the specified format to the integer part of the values after scaling them; however, if the specified format conflicts with the logic of Auto Scale in Number, for example, the values display in percentage, Designer ignores the Auto Scale in Number setting. Select "false" if you do not want to scale the values.
- Auto Scale in Number
Data label editing box
You can edit the data labels you want to display on the range groups in this box. The box works like a special text box. A line in the box is a chart iterator, which is a special paragraph with markers or text.
To edit the data labels, select the information to show for each data label from the corresponding data label drop-down list. Select to insert more data labels if the existing ones cannot meet your requirement. To delete a data label, select it and select Backspace on the keyboard.
To insert an iterator after an existing iterator, select in the existing iterator to select it, then select Enter on the keyboard. You can edit the content in a selected chart iterator, such as adding, deleting, or modifying markers and text segment in it. To edit properties of an iterator, select it, right-click on the blank space and select Chart Iterator from the shortcut menu to edit the iterator in the Chart Iterator dialog box.
OK
Select to apply your settings and close the dialog box.
Cancel
Select to close the dialog box without saving any changes.
Help
Select to view information about the dialog box.
 Back to top