 Previous Topic
Edit Link Dialog Box
You can use the Edit Link dialog box to edit the link on an object. This topic describes the options in the dialog box.
Designer displays the Edit Link dialog box when you select an object in a report on which you have added a link, right-click it and select Edit Link from the shortcut menu, and provides you with different options in the dialog box according to the type of the link (some types are available to specific report types only):
Designer displays these options for all the link types:
Conditional Link
Select to create a conditional link. Using a conditional link, you can link the object to different targets based on different conditions.
-
 Add button
Select to add a new condition in the Edit Conditions dialog box. -
 Edit button
Select to edit the specified condition. -
 Remove button
Select to delete the specified condition. -
 Move Up button
Select to move the specified condition higher in the condition box. -
 Move Down button
Select to move the specified condition lower in the condition box. - Others
If you select this option, you can define to which target to link the object when none of the conditions you have specified is met.
Link Type
Select the type of the link target for the object if it is not a conditional link or for the object under the selected condition if it is a conditional link.
More
Designer displays this button for the Report, Master/Detail Report, and Content link types. Select it to get more link options.
OK
Select to apply your settings and close the dialog box.
Cancel
Select to close the dialog box without saving any changes.
Help
Select to view information about the dialog box.
Report Link Type
You can use this link type to link the object to a report.
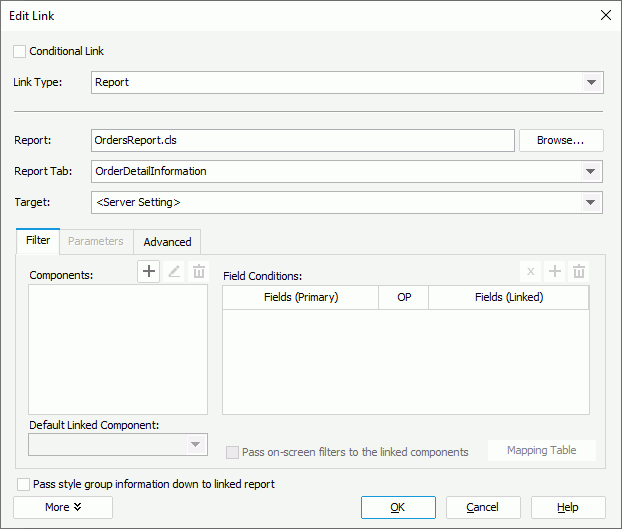
Designer displays these options for the Report link type:
Report
Specify the target report. Select Browse to select the report in the Select a Report dialog box.
Report Tab
Designer displays this option when the trigger object is in a page report. Select the linked report tab from the drop-down list.
Target
Select the window or frame to load the linked report at runtime. Server applies the target only when users trigger the link in Page Report Studio and Web Report Studio; when users trigger the link in JDashboard, except for Same Frame, Server treats all the other targets as New Window.
- <Server Setting>
Select to load the linked report according to setting on Server: for page report, it is specified by the Pop Up New Window for Links option in the Profile > Configure Profile > Page Report Studio > Properties > Default tab; for web report and library component, by the Target of Detail Table Report and Links option in the Profile > Configure Profile > Web Report Studio > Properties tab. - Same Frame
Select to load the linked report into the same frame as the primary report. - Whole Window
Select to load the linked report into the full browser window. - New Window
Select to load the linked report into a new window. This window is not named. - Parent Frame
Select to load the linked report into the parent frame of the frame in which the primary report is. - Other Frame
Select to load the linked report into some other specified frame. If the frame name does not exist, Server loads the linked report into a new window.
Filter tab
You can use this tab to specify the filter conditions based on which to set up the link relationship between the primary report and the linked report.
- Components
This box lists the components in the linked report that you select to link with the primary report.- Add button
Select to add a component in the linked report to interlink with the primary report. - Edit button
Select to edit the component in the linked report to interlink with the primary report. - Remove button
Select to delete the specified component.
- Default Linked Component
Select the component to display by default in the linked report when the link is triggered in the exported results - Field Conditions
This box lists the filter conditions that you set between the primary report and the linked report.- Fields (Primary)
This column shows the fields in the primary report that you select to set up the conditions. - OP
This column shows the operators that you select to compose the conditions. You can use the following operators: "=", "<>", "<", ">", "<=", ">=", and "IN". - Fields (Linked)
This column shows the fields that you select in the linked report to set up the conditions.  Mapping Table button
Select to open the Mapping Table dialog box to customize mappings between Current Field/Category/Series of the primary report and Corresponding Field of the linked report.- Add button
Select o add a new condition line. - Remove button
Select to delete the specified conditions.
- Fields (Primary)
- Pass on-screen filters to the linked components
Select to apply the on-screen filters which refer to the filters created via filter controls in the primary report to the selected components of the linked report.- Mapping Table
Designer enables this button when the trigger component in the primary report and the selected component in the linked report use different datasets. Select it to open the Mapping Table dialog box to define the mappings based on which to pass on-screen filters in the primary report to the linked report.
- Mapping Table
Parameters tab
Designer enables the tab when the linked report uses parameters. You can use it to assign values to the parameters of the linked report automatically.
- Parameter from Linked Report
This column shows the parameters in the linked report to which you select to assign values. - Field from Primary Report
This column shows the fields in the primary report the values of which you want to assign to parameters of the linked report. When you select a parameter field, you can choose to assign its current value or initial value to the parameter of the linked report.- Current Value
Select to assign the most recently specified value of the primary report parameter to the parameter of the linked report. - Initial Value
Select to assign the original value of the primary report parameter to the parameter of the linked report.
- Current Value
Advanced tab
You can use this tab to pass the values of the filter objects such as filter controls in the primary report to those in the linked report. Designer disables the tab when the trigger object is in a library component.
- Primary Report Property/Object
This column shows the filter objects in the primary report the values of which you select to pass to those in the linked report. Select the ellipsis in each cell to select a filter object in the primary report.
 - Linked Report Property/Object
This column shows the filter objects in the linked report which you select to apply the values passed from filter objects in the primary report. Select the ellipsis in each cell to select a filter object in the linked report. You need to make sure that values of the filter object in the primary report can be applied to the filter object in the linked report in the same line. -
Add button
Select to add a new line to pass values between the filter objects in the primary report and the linked report. -
Remove button
Select to delete the specified lines.
Pass style group information down to linked report
Select to apply the style group of the primary report to the linked report.
 Back to top
Master/Detail Report Link Type
Designer displays the Master/Detail Report link type only when the object is in a page report that uses query resources. You can use this link type to link the object to a detail report.
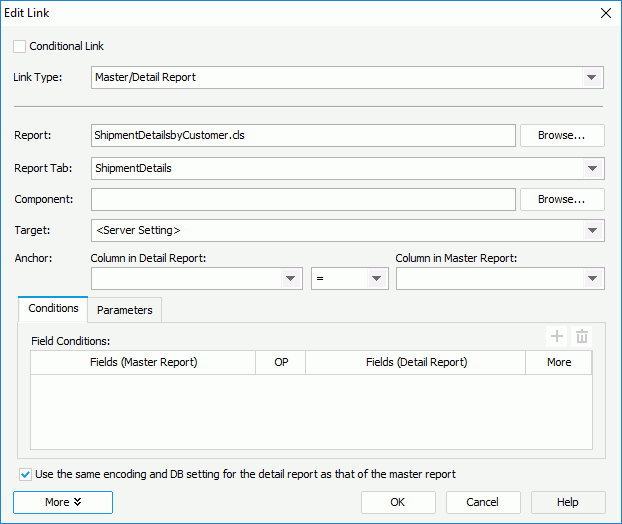
Designer displays these options for the Master/Detail Report link type:
Report
Specify the report in which the detail report tab is. Select Browse to select the report in the Select a Report dialog box.
Report Tab
Select the target detail report tab from the drop-down list.
Component
Specify the component in the detail report tab to interlink with the master report. Select the ellipsis  to add the components. You can add more than one component as long as the components are based on the same dataset.
Target
Select the window or frame where to load the detail report at runtime.
- <Server Setting>
Select to load the detail report according to setting of the Pop up New Window for Links option in the Profile > Configure Profile > Page Report Studio > Properties > Default tab on Server. - Same Frame
Select to load the detail report into the same frame as the master report. - Whole Window
Select to load the detail report into the full browser window. - New Window
Select to load the detail report into a new window, which is not named. If you select this target, Server opens the detail report independently when you trigger the link at runtime, meaning, Server does not apply the join and filter conditions that you set between the master report and detail report. - Parent Frame
Select to load the detail report into the parent frame of the frame in which the master report is. - Other Frame
Select to load the detail report into some other specified frame. If the frame name does not exist, Server loads the detail report into a new window.
Anchor
Specify the relationships between the master report and the detail report.
- Column in Detail
Select the field in the detail report that you want to use to link the detail report with the master. - OP
Select the operator to set up the relationship. You can use the following operators: "=", "<>", "<", ">", "<=", and ">=". - Column in Master
Select the field in the master report to set up the relationship.
Conditions tab
You can use this tab to specify the filter conditions between the master report and the detail report.
- Fields (Master Report)
This column shows the fields that you select in the master report to set up the conditions. - OP
This column shows the operators that you select to compose the conditions. You can use the following operators: "=", "<>", "<", ">", "<=", and ">=". - Fields (Detail Report)
This column shows the fields that you select in the detail report to set up the conditions. - More
This column shows the relationships between two conditions. It can be "AND" or "OR". -
Add button
Select to add a new condition line. -
Remove button
Select to delete the specified conditions.
Parameters tab
Designer enables this tab when you have applied at least one parameter in the filters of the queries that the detail report uses. You can use it to assign values to the parameters of the detail report automatically.
- Parameters (Detail Report)
This column shows the parameters in the detail report to which you select to assign values. - Column (Master Report)
This column shows the fields in the master report the values of which you select to assign to parameters of the detail report.
Use the same encoding and DB setting for the detail report as that of the master report
Select to apply the encoding and DB settings of the master report to the detail report.
URL Link Type
You can use this link type to link the object to a location specified by a URL.
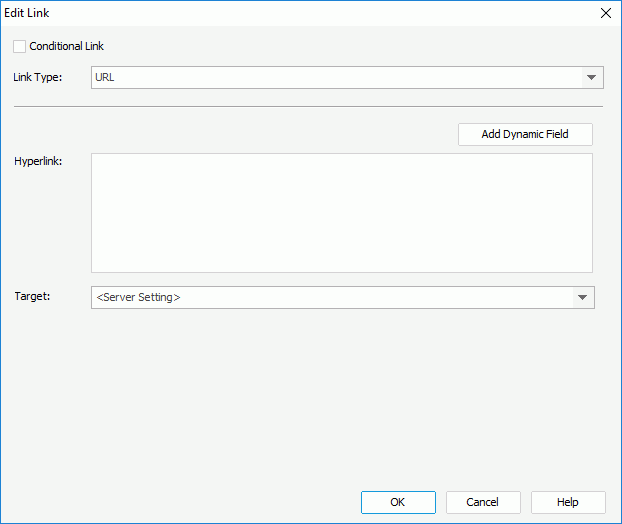
Designer displays these options for the URL link type:
Hyperlink
Specify the URL of the location to link with the object.
- Add Dynamic Field
Select to open the Select Field dialog box to insert a field into the URL.
Target
Select the window or frame to load the location specified by the URL at runtime. Server applies the target only when users trigger the link in Page Report Studio and Web Report Studio; when users trigger the link in JDashboard, except for Same Frame, Server treats all the other targets as New Window.
- <Server Setting>
Select to load the location specified by the URL according to setting on Server: for page report, it is specified by the Pop Up New Window for Links option in the Profile > Configure Profile > Page Report Studio > Properties > Default tab; for web report and library component, by the Target of Detail Table Report and Links option in the Profile > Configure Profile > Web Report Studio > Properties tab. - Same Frame
Select to load the location specified by the URL into the same frame that contains the link. - Whole Window
Select to load the location specified by the URL into the full browser window. - New Window
Select to load the location specified by the URL into a new window. This window is not named. - Parent Frame
Select to load the location specified by the URL into the parent frame of the frame that contains the link. - Other Frame
Select to load the location specified by the URL into some other specified frame. If the frame name does not exist, Server loads the location into a new window.
E-mail Link Type
You can use this link type to link the object to an email address.
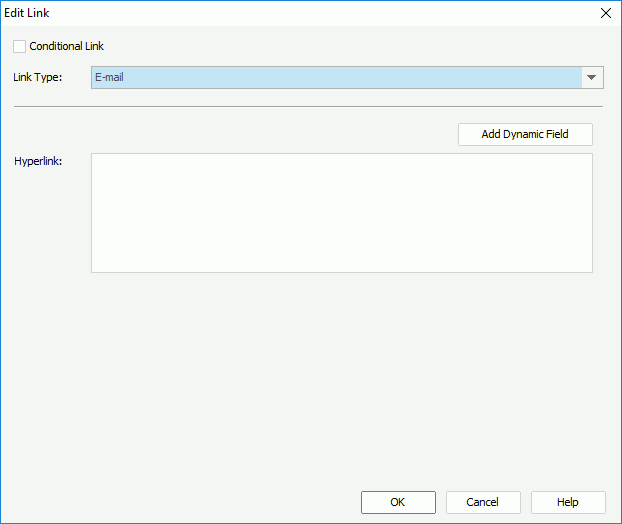
Designer displays these options for the E-mail link type:
Hyperlink
Specify the email address to which you want to link the object.
- Add Dynamic Field
Select to open the Select Field dialog box to insert a field into the email address.
Content Link Type
You can use this link type to link the object to a Blob data type field.
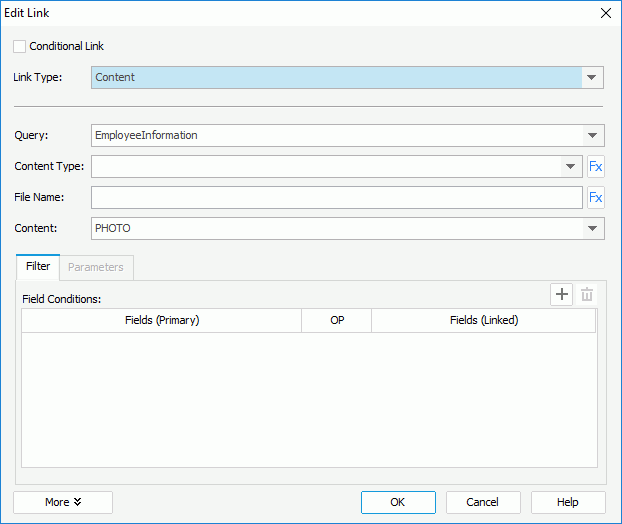
Designer displays these options for the Content link type:
Query
Select the data resource which contains the required Blob data type field.
Content Type
Select the content type for the Blob type data. Select  if you want to bind the content type with a field in the selected data resource, or use a formula to control the type.
File Name
Specify the file name for the linked Blob type data. Select if you want to specify a field or formula to control the name.
Content
Select the Blob data type field in the specified data resource.
Filter tab
You can use this tab to specify the link conditions between the data resource used by the current report and the data resource that contains the linked Blob content.
- Field Conditions
This box lists the filter conditions that you add between the two data resources.- Fields (Primary)
This column shows the fields that you select from the data resource used by the current report. - OP
This column shows the operators to compose the conditions. It can be "=", "<>", "<", ">", "<=", ">=", or "IN". - Fields (Linked)
This column shows the fields that you select in the data resource containing the linked Blob content, which are of the same data type as the selected fields in the data resource used by the current report. - Add button
Select to add a new condition line. - Remove button
Select to delete the specified conditions.
- Fields (Primary)
Parameters tab
Designer enables the tab when the data resource that contains the linked Blob content uses parameters. You can use it to assign values to the parameters automatically.
- Parameters
This column shows the parameters in the data resource containing the linked Blob content, to which you select to assign values. - Value
This column shows the fields the values of which you select to assign to the parameters. You can select from all the fields in the data resource used by the current report, which are of the same data type as the parameters in the data resource containing the linked Blob content.