 Previous Topic
Export to PDF Dialog Box
You can use the Export to PDF dialog box to export a report to PDF. This topic describes the options in the dialog box.
Designer displays the Export to PDF dialog box when you navigate to File > Export > To PDF.
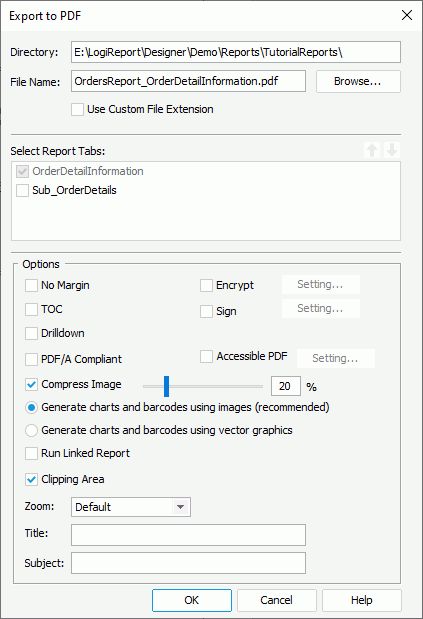
Designer displays these options:
Directory
Specify the destination directory where you want to save the PDF.
File Name
Specify the file name of the PDF.
Browse
Select to specify the directory and file name of the PDF with File Explorer.
Use Custom File Extension
Select to use the extension you want for the PDF. By default, Designer uses .pdf. Select this option and type your file name with any extension, or no extension.
Select Report Tabs
Designer displays the option when you use the dialog box for exporting a page report. Select the report tabs in the page report that you want to export. Designer exports the selected report tabs in the list order. When the report has only one report tab, Designer selects the report tab by default.
 Move Up button
Select to move the specified report tab higher in the list.
 Move Down button
Select to move the specified report tab lower in the list.
No Margin
Select to remove the margins that you set when designing the report in the PDF output.
TOC
Select to include the TOC tree of the report in the PDF output to display in the Table of Contents panel of the PDF browser.
Drilldown
Select to generate the drilldown files when exporting reports, enabling you to drill down on the summaries in grouped banded objects in PDF outputs.
Encrypt
Select to encrypt the PDF. Select Setting to configure the encrypt settings in the Encrypt dialog box.
Sign
Select to add digital sign to the PDF. Select Setting to configure the sign settings in the Sign Digital ID dialog box.
PDF/A Compliant
Select to generate a PDF/A compliant document for the report.
Accessible PDF
Select to generate an accessible PDF for the report. Select Setting to specify tag order of the report objects in the accessible PDF.
Compress Image
Select to compress the size of the images or pictures in the report to the specified proportion of its original size.
Generate charts and barcodes using images (recommended)
Select to export charts, barcodes, web controls, and UDOs in the report to common pictures, which look dimmed and the file size may be relatively large. However, when you select Compress Image and this option at the same time, the transparency property of the charts, UDOs, and barcodes cannot take effect.
Generate charts and barcodes using vector graphics
Select to export charts, barcodes, web controls, and UDOs in the report to vector graphics, which are not anamorphic when you zoom in or out.
Run Linked Report
Select to generate the reports that you link with the report (not including the detail reports) in the PDF output.
Clipping Area
Select to cut the content that is beyond a specific area.
Zoom
Select the zooming of the report content in the PDF output.
- Default
It means no zoom setting. After the PDF is opened in the Adobe Acrobat, the zoom setting follows that in the Adobe. - Actual Size
Select to keep the report content in its original size. It is the same as 100%. - Fit Page
Select to scale the report content in a page to fit the entire page within the window both horizontally and vertically. If the required horizontal and vertical scale ratios are different, the smaller of the two is used. - Fit Width
Select to scale the report content in a page to fit the width of the page within the window. - Fit Height
Select to scale the report content in a page to fit the height of the page within the window. - Fit Visible
Select to scale the report content in a page to fit the width of its bounding box within the window.
Title
Specify the text you want to use for the Title property of the PDF.
Subject
Specify the text you want to use for the Subject property of the PDF.
OK
Select to apply your settings and close the dialog box.
Cancel
Select to close the dialog box without saving any changes.
Help
Select to view information about the dialog box.
 Back to top