Exporting Reports to PDF
This topic describes how you can export a page or web report as PDF.
- Open the report that you want to export.
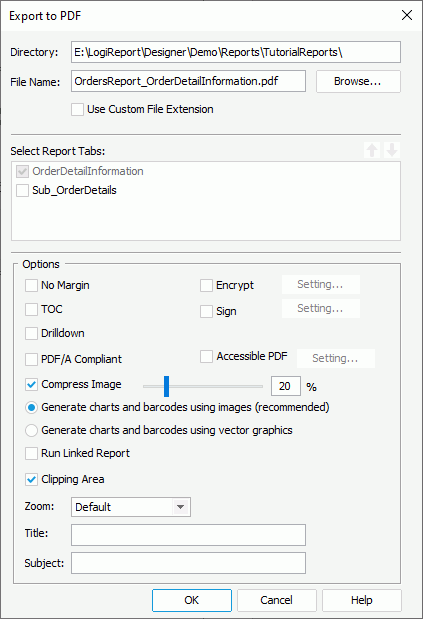
- Navigate to File > Export > To PDF. Designer displays the Export to PDF dialog box.

- By default, Designer saves the PDF in the same folder and same name as the report file. You can type the destination directory and file name for the output in the Directory and File Name text boxes, or select Browse to specify the location and file name with File Explorer of your operating system. When the file name you specify does not contain the .pdf extension, Designer automatically adds the extension to the output file. If you want to use your preferred extension (or to have no extension) for the file name of the output, select Use Custom File Extension, then you can type your file name with any extension or no extension.
- When you are exporting a page report, in the Select Report Tabs box, select the report tabs in the page report that you want to export. Designer exports the selected report tabs in the list order. You can select a report tab and select Move Up
 or Move Down
  to change the order of the report tabs.
 - Select No Margin to remove the margins in the PDF output, which you set at report design time.
- Select TOC to include the TOC tree of the report in the PDF output.
- If you are exporting a page report that uses query resources, when the report contains grouped banded objects and you have added summaries (including group level formulas) to the groups, you can select Drilldown to generate the drilldown files for the fields of each group, so that when you view the PDF output, you can drill down on a summary to get the details about the corresponding group the same as you do when previewing the report in Report format. However, you should make sure that you have not hidden or suppressed the summaries; otherwise, you are not able to get the drilldown files.
- Select PDF/A Compliant to generate a PDF/A compliant document for the report. When you select this option, Designer automatically disables the Encrypt option and selects and disables the Accessible PDF option, that is because, encryption is forbidden as defined by the PDF/A Standard and a PDF/A compliant document is by default an accessible PDF. You can also add files as attachments to a PDF/A compliant document.
- Select Accessible PDF if you want to generate an accessible PDF for the report. You can select Setting to specify tag order of the report objects in the accessible PDF.
- By default, Designer compresses images in the report by 20% of the original size in the PDF output. You can customize the proportion or clear Compress Image to keep the original size.
- Specify in which way to generate charts, web controls, UDOs, and barcodes in the report.
The recommended way is using images to generate them.
- Generate charts and barcodes using images
Select this option if you want Designer to export charts, barcodes, web controls, and UDOs in the report to common images, which look dimmed and the file size may be relatively large. However, when you select both Compress Image and this option, the transparency property of these objects cannot take effect. - Generate charts and barcodes using vector graphics
Select this option if you want Designer to export charts, barcodes, web controls, and UDOs in the report to vector graphics, which is anamorphic when it is zoomed out or zoomed in.
- Generate charts and barcodes using images
- Select Run Linked Report if you want to generate the reports that you link with the report (not including the detail reports) in the PDF output. If you are only interested in the primary report, leave this option cleared. Generating linked reports at the same time, especially when the linked reports contain a large amount of data, causes performance issue.
- By default, Designer clips the content that is beyond its parent container in the PDF output. If you want to fully display the content, clear Clipping Area.
- In the Zoom combo box, specify the zooming of the report content in the PDF output. You can select an item from the drop-down list or type a percentage in the text box. A valid percentage is greater than 0 and no larger than 6400% (you can type the value with or without the percent symbol). Designer treats any invalid input as "Default" (no zoom setting).
- In the Title and Subject text boxes, type the text you want to use for the Title and Subject properties of the PDF.
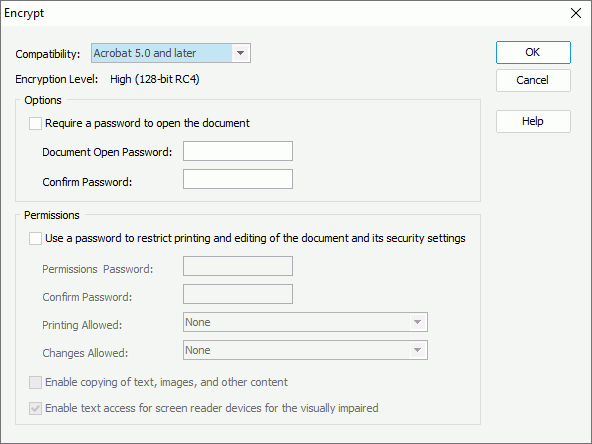
- If you want to encrypt the PDF to prevent users from opening, printing, and editing it without authorization, select Encrypt, then in the Encrypt dialog box:

- From the Compatibility drop-down list, select the encryption type. "Acrobat 3.0 and Later" means using a low encryption level (40-bit RC4), while "Acrobat 5.0 and Later" uses a high encryption level (128-bit RC4).
- In the Options box, select Require a password to open the document if you want the PDF is password protected, then specify the password in the Document Open Password text box and confirm it in the Confirm Password text box.
- If you want to use a permission password to restrict users from printing and editing the PDF, select Use a password to restrict printing and editing of the document and its security settings, then specify the password and confirm it accordingly. The permission password should be different from the one used for opening the PDF.
- By default, Designer selects None in the Printing Allowed drop-down list, which means the PDF cannot be printed. If you want users to print the file, select the required option from the list.
- Low Resolution
Select to let users print the PDF at no higher than 150-dpi resolution. Printing may be slower because each page is printed as a bit-mapped image. Designer displays this option only when you select Acrobat 5.0 and Later in the Compatibility drop-down list. - High Resolution
Select to let users print the PDF at any resolution, directing high-quality vector output to PostScript and other printers that support advanced high-quality printing features.
- Low Resolution
- From the Changes Allowed drop-down list, select what editing actions you want to grant users on the PDF (by default, Designer selects None in the list, which means users cannot make any change to the PDF, including filling in signature and form fields).
- Inserting, deleting, and rotating pages
Select to allow users to insert, delete and, rotate pages, and create bookmarks and thumbnail pages in the PDF. This option is available only when you select Acrobat 5.0 and Later in the Compatibility drop-down list. - Filling in form fields and signing
Select to allow users to fill in forms and add digital signatures in the PDF. This option doesn't allow users to add comments or create form fields. - Commenting, filling in form fields and signing
Select to allow users to fill in forms and add digital signatures and comments in the PDF. - Any except extracting pages
Select to allow users to change the PDF using any method listed in the Changes Allowed menu, except removing pages.
- Inserting, deleting, and rotating pages
- Select Enable copying of text, images and other content to allow users to select and copy the content of the PDF.
- When you select Acrobat 5.0 and Later in the Compatibility drop-down list, Designer displays the Enable text access for screen reader devices for the visually impaired option and selects it by default. If you do not want to enable the use of screen readers for visually impaired users on the PDF, you can clear the option.
- Select OK to finish configuring the encryption settings for the PDF.
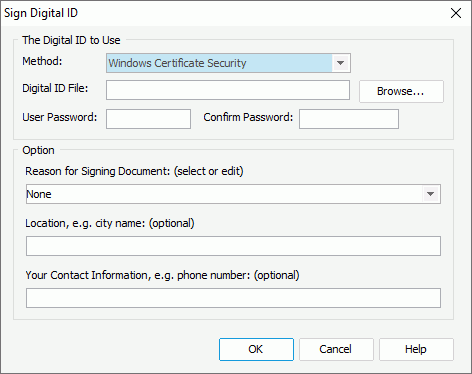
- To configure the signature for the PDF, select Sign, then in the Sign dialog box:

- From the Method drop-down list, select the signing digital signature method: Windows Certificate Security, Default Certificate Security, or VeriSign Digital Signatures. The methods are provided by Adobe Acrobat.
- Select Browse to select the digital ID file. You can also type the file path in the Digital ID File text box manually.
- Specify the password for the digital ID file and confirm the password respectively.
- From the Reason for Signing Document drop-down list, select the reason for signing the file. You can also specify the reason by yourself by typing it in the text box.
- Specify the location and your contact information if you want.
- Select OK to accept the changes.
- Select OK to start exporting.
![]()
- Before exporting a page report tab or a web report that uses True Type Fonts, you should select the report tab name or the web report in the Report Inspector, and then set Embedded Fonts equal to all true type fonts that you have used in the report tab or web report. Otherwise, the PDF output may not display correctly.
- When you export a report to PDF, in which there is an object beyond its container, Designer ignores the overstepped part in the PDF output, but Designer can still export the overstepped part of objects in a paragraph to PDF.
- If you find that the page size of the PDF output in Adobe Acrobat is different from that printed under the same zooming, you can check the Resolution setting in Adobe Acrobat, because different resolutions result in different page size on the screen.
Adding PDF Attachment to a Report
You can add external files as attachments to the labels and fields (including DBFields, formula fields, parameter fields, summary fields, and special fields) in your report, then when you export the report to a PDF/A compliant document, Designer embeds the files as attachments of the PDF document. Users can open the files from the Attachments panel in Adobe Acrobat using the applications that handle the file format of the attachments.
To add PDF attachment to a label/field
- In the Report Inspector, select the label or field from the report object tree.
- Select the ellipsis
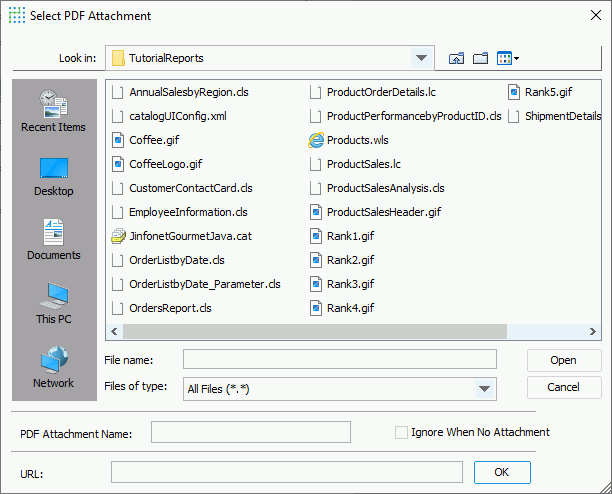
 in the value cell of the PDF Attachment property in the PDF property group. Designer displays the Select PDF Attachment dialog box.
- Select the file you want to attach to the label/field.
- If you want to use a file from your local system, use the Look in drop-down list to browse for the file.
- If you want to use a file via URL, type the URL in the URL text box.
- In the PDF Attachment Name text box, edit the name of the attachment if you want, which by default is the name of the file you select.
- Select Ignore When No Attachment to ignore the attachment when it cannot be found. If you do not select this option and Designer cannot load the file during exporting the report to a PDF/A compliant document, the export process will fail.
- Do either of the following:
- Select Open when you use a local file. If the file is not in the current catalog directory, Designer prompts you to copy it to the directory.
- Select OK when you get a file via URL. When you save the report, Designer saves the URL information into the report template.
 If you are in an intranet, to successfully access a file via URL, you need to add the
 -DproxyHostand-DproxyPortoptions to the CLASSPATH environment variable of Designer's startup file JReport.bat in<install_root>\binto specify the intranet information.
- You can customize how you want to display the annotation for the attachment in the PDF document using the Annotation properties.
- Set the Annotation Type property to display the annotation either using an icon or in text.
- Set the Annotation Background and Annotation Foreground properties to specify the foreground and background color of the annotation.
- Specify the Annotation Relative X, Annotation Relative Y, Annotation Height, and Annotation Width properties to define the position, size, and dimensions of the annotation.
- Use the Customized Annotation Icon/Predefined Annotation Icon, Annotation Tooltip properties to specify the annotation icon and tool tip when you select the Built-in Icon or Customized Icon annotation type.
- Use the Annotation Text, Annotation Font Face, Annotation Font Size, Annotation Text Strikethrough, and Annotation Text Underline properties to specify the annotation text and customize the font face, size, and formatting of the text when you select the Text annotation type.
 Previous Topic
 Back to top