 Previous Topic
Select Time Interval Dialog Box
You can use the Select Time Interval dialog box to specify how to create the group elements based on the specified DBField whose data type is Timestamp/DateTime in a business view. This topic describes the options in the dialog box.
Designer displays the Select Time Interval dialog box when you drag a DBField of the Timestamp/DateTime data type from the Resource Objects panel to the Business View panel in the Business View Editor dialog box.
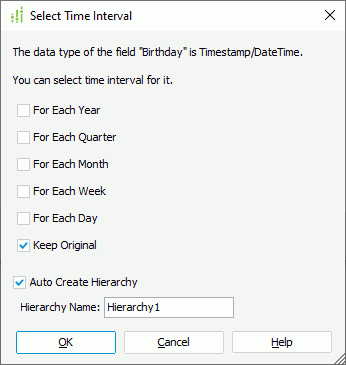
Designer displays these options:
For Each Year
Select to create a group element that uses the expression Year(@MappingName) to retrieve years of the DBField as its values. The data type of the group element is Integer.
For Each Quarter
Select to create a group element that uses the expression Quarter(@MappingName,Integer) to retrieve quarters of the DBField as its values. The data type of the group element is Integer.
For Each Month
Select to create a group element that uses the expression Month(@MappingName) to retrieve months of the DBField as its values. The data type of the group element is Integer.
For Each Week
Select to create a group element that uses the expression WeekOfYear(@MappingName) to retrieve weeks of the DBField as its values. The data type of the group element is Integer.
For Each Day
Select to create a group element that uses the expression Day(@MappingName) to retrieve days of the DBField as its values. The data type of the group element is Integer.
Keep Original
Select to create a group element based on the DBField itself.
Auto Create Hierarchy
Select to create a hierarchy which contains the specified group elements. Designer disables this option when you do not select any of the above options.
- Hierarchy Name
Specify the name of the hierarchy.
OK
Select to create the specified group elements in the business view and close the dialog box.
Cancel
Select to quit adding the specified DBField as group element to the business view and close the dialog box.
Help
Select to view information about the dialog box.
 Back to top