Refresh Object Properties
This topic describes the properties of a Refresh Object in a library component.
You can use the Refresh Object to customize the auto refresh action for each business view the data component in a library component applies.
| Property Name | Description |
|---|---|
| General | |
| Business View Name | Shows the name of the business view related with the refresh object. Read only. |
| Data Source Name | Shows the name of the catalog data source containing the business view. Read only. |
| Name | Shows the name of the refresh object, which by default is the name of the business view. Read only. |
| Query Name | Shows the name of the query on which the business view is created. Read only. |
| Refresh | |
| Enable Auto Refresh | Specifies whether to automatically refresh the data components that use the business view at runtime based on the defined interval.
Data type: Boolean |
| Incremental Fetch | Designer enables this property when you set Enable Auto Refresh to "true". You can use it to specify whether to fetch incremental data only when an auto refresh takes place and specify the condition to filter the incremental data. Data type: Boolean
|
| Interval | Designer enables this property when you set Enable Auto Refresh to "true". You can use it to specify the time interval between two auto refreshes, which can range from 0 to 86400 seconds. Type a numeric value to change the interval.
Data type: Integer |
| Unique Key | Designer enables this property when you set Incremental Fetch to "true". You can use it to specify the unique key that you want to use to delete duplicated data from the incremental data filtered by incremental condition. Data type: Array |
| Value Number | Designer enables this property when you set Incremental Fetch to "true". You can use it to specify the number of records that can display in the data components using the business view. Report Engine removes the earliest records when records exceed the specified number. Type a numeric value to change the number. Data type: Integer |
Customizing the Auto Refresh Action for a Library Component
If you want the data components that use the same business view in a library component automatically refresh themselves at runtime based on a defined interval, you can set the Enable Auto Refresh property to "true" and specify the interval between two auto refreshes using the Interval property.
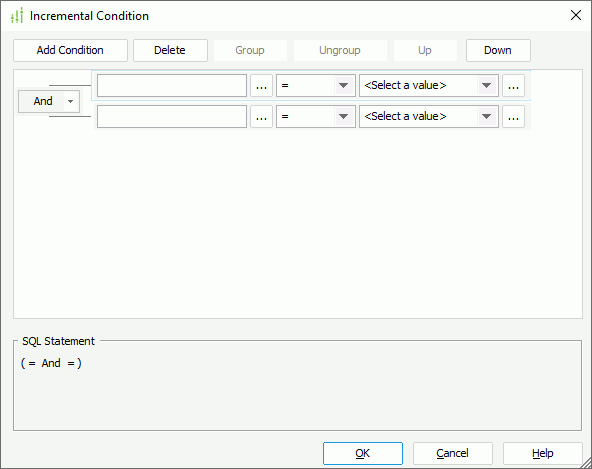
Report also supports fetching incremental data only when an auto refresh takes place. To achieve this:
- Set the Incremental Fetch property to true, then select the ellipsis
 in the value cell of the property. Designer displays the Incremental Condition dialog box.

- Specify the condition to filter the incremental data.
- Select Add Condition to add a condition line.
- Select the ellipsis
 next to the field text box, then in the View Element Resources dialog box, locate the element you want to filter and double-click it, or select the element and select OK. You can also type the name of the view element as @ElementName in the text box.
 - From the operator drop-down list, select the operator with which to compose the filter expression.
- In the value drop-down list, specify how to filter the business view element.
- Select the ellipsis
 next to the value drop-down list, then in the Values dialog box, switch to the Value tab. Designer lists all values of the selected element. Double-click the value you want and close the dialog box. However, if you choose to type the element name in step b, you need to select the element in the Fields tab of the Values dialog box once again to get its value list. You can also select the User Name special field or a parameter in the Fields tab as the value to filter the element dynamically (for the usage of parameters in filter conditions, see the example in Dynamically filtering queries), or select a formula to use its return value in the filter.
 - If you are familiar with the values of the selected view element, you can clear the text <Select a value> and type the value by yourself in the text box (when the selected operator requires multiple values, you need to specify the values manually). When you type the value, if multiple values are required, you should separate them with ","; if a value contains the character "," or "\", type the character as "\," or "\\".
- You can also select any of the following from the value drop-down list as the value:
- MaxExistValue
Select to use the maximum data value in the specified business view element from the last refresh time as the value to filter the business view element. - MinExistValue
Select to use the minimum data value in the specified business view element from the last refresh time as the value to filter the business view element. - LastRefreshTime
Select to use the previous refresh time as the value to filter the business view element.
- MaxExistValue
- Select the ellipsis
- Repeat the preceding steps to define more condition lines and specify the logic relationship between the condition lines: "And" or "Or".
- To group some condition lines, select them and select Group, Designer then adds the selected condition lines in one group and applies them as one line of filter expression (you can also group conditions and groups together).
- To take out any condition or group from a group, select it and select Ungroup.
- To adjust the priority of the condition lines, select it and select Up or Down.
- To delete a condition line, select it and select Delete.
- Select OK to save the incremental condition.
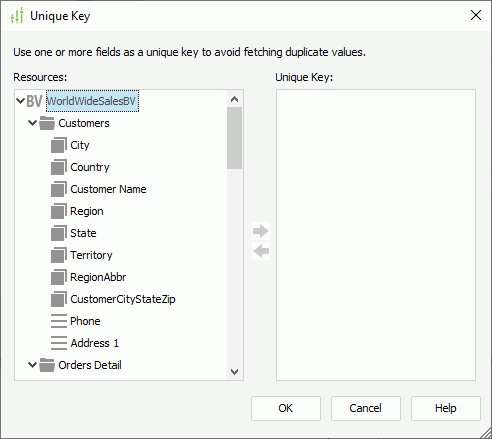
- To add a unique key to delete duplicated data from the incremental data filtered by incremental condition, select the ellipsis
 in the value cell of the Unique Key property. Designer displays the Unique Key dialog box.

- From the Resources box, select the business view element to use as the unique key and select Add
 to add it to the right box. You can add more than one element.
 - Select OK to save the unique key. Once you define a unique key, each time when the data components that use the business view automatically updates themselves at runtime, Report Engine filters the data that has the same unique key value as the previously loaded records and only adds data with different unique key value to the data components. For instance, if you add the fields Country and Product ID as the unique key for a business view, when a record with the product ID 1 in USA has already been loaded into the data components, Report Engine adds no more records of this product ID in USA to the data components because they have the same unique key value. The most common usage is with a time field, so that when a time is part of the unique key, you can find the data components updated each time new records are added to the database with more recent times.
- In the value cell of the Value Number property, type the number of records that can display in the data components using the specified business view. Report Engine removes the earliest records when records exceed the specified number.
When users add the library component in a dashboard at runtime, the data components in the library component that use the specified business view automatically refresh themselves based on the predefined conditions. Users can also customize the auto refresh action in JDashboard.
 Previous Page
 Back to top