Customizing Field Display Names for Datasets in a Report
For datasets created on query resources in a page report, you can customize display names of the data fields in the datasets, so that when users run the page report in Page Report Studio and perform operations such as Sort and Filter on data components in the page report, they will be able to work with intuitive field names. You can also specify the actions in which the customized display names will participate for each data component in the page report. This topic describes how you can customize field display names for datasets in a query-based page report.
- Open the page report.
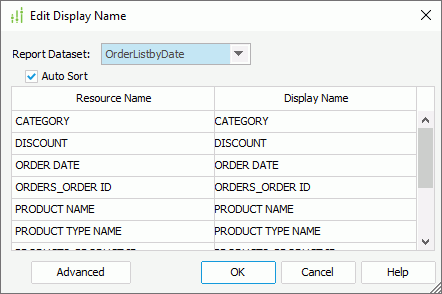
- Navigate to Report > Edit Display Name. Designer displays the Edit Display Name dialog box.

- From the Report Dataset drop-down list, which contains all datasets used in the page report, select a dataset and Designer displays all the data fields in the dataset in the mapping name box.
- To make the resource names sort automatically, select Auto Sort.
- Specify the display names for the data fields in the Display Name column. You can also select a formula as the display name of the data field. If you set the display name of any data field to be blank, the field will not be shown in the lists where display names are used in Page Report Studio.
- Select another dataset and repeat the preceding steps to edit the display names of data fields in it.
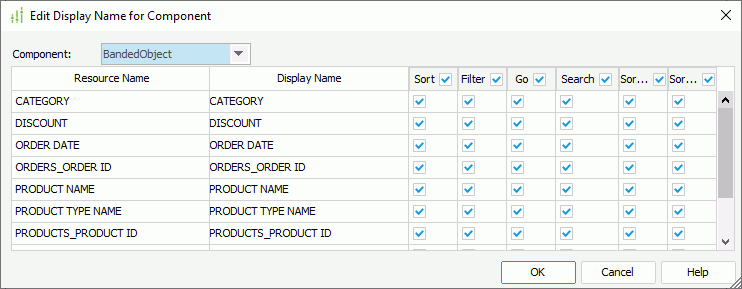
- You can select Advanced to further customize the display names for data components in the page report using the Edit Display Name for Component dialog box.

- From the Component drop-down list, select the data component in the page report that you want to customize.
 You can also right-click a data component that uses a query resource in a page report and then select Edit Display Name from the shortcut menu to display the Edit Display Name for Component dialog box (if you open the dialog box in this way, Designer only lists the component that you right-click on in the Component drop-down list).
 - In the action columns, select the corresponding checkboxes to indicate whether to enable the actions for the data fields. Select the checkbox on the action column header if you want to enable the action for all data fields. If any action is not supported on the selected data component, Designer disables the corresponding column. When you select an action for a data field, users see the field's display name instead of mapping name in the corresponding dialog box or submenu in Page Report Studio. If you clear the check box for any field in any action column, the field will not be available for the action. Moreover, if you set the display name of any field to be blank, all actions will be disabled for the field, meaning, users will not be able to perform all these actions on the field in Page Report Studio.
- Select OK to accept the changes.
 Previous Topic
 Back to top