 Previous Topic
Specifying Parameter Values for a Dashboard
This topic describes how you can specify parameter values to a dashboard/library component, save and customize parameter values, and share parameters between library components.
This topic contains the following sections:
- Specifying Parameter Values to a Dashboard
- Specifying Multiple Values for a Parameter
- Saving Default Parameter Values
- Saving Parameter Values for Reuse
- Specifying Parameter Values to a Library Component
- Sharing Parameters Between Library Components
Specifying Parameter Values to a Dashboard
When you run a dashboard that contains parameters, JDashboard applies the default values of the parameters automatically to the dashboard by default, which can be the default values specified in the parameters' definition or the default values you save for the dashboard when Use User Defined Default Parameter Values in the JDashboard profile is selected.
To change the parameter values:
- Select the Enter Parameter Values button
 on the toolbar. JDashboard displays the Enter Parameter Values dialog box.
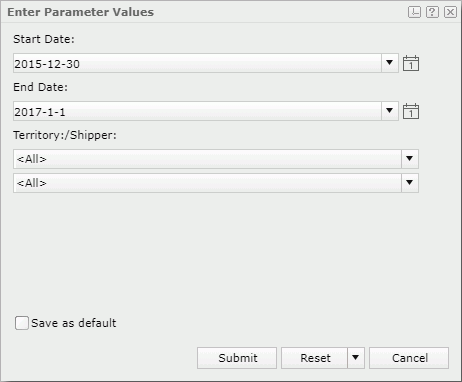
- Edit the parameter values according to your requirement.
The way to specify a parameter value varies according to the type and properties of the parameter. Here are several ways you can use to specify parameter values:
- In the parameter value combo box, select the down arrow
 and then select a value from the drop-down list. To ensure performance, Server lists at most 500 values by default.
When encrypting a parameter's values, Server disables the value drop-down list. In this case, if Server displays Hide Parameter Value, you can clear it to enable the drop-down list to view and select a value.
- Type the value manually in the parameter value text box if the parameter enables type-in values but not multiple values.
- Select in the parameter value combo box to specify multiple values if the parameter enables multiple values.
- Select or clear the checkbox to specify a Yes or No value.
- Select the Calendar icon
 to specify a date and time value.
- In the parameter value combo box, select the down arrow
- If you want to save the specified values as the default values for the parameters, see Save as default.
- To reset the parameter values, make use of the Reset button.
- When Save as default is available in the dialog box, the Reset button contains a text part and a triangle icon. You can choose to reset the values to either of the following by selecting the triangle. If you select the text part of the button directly, JDashboard will reset the values to those you applied last time.
- Last Values
The values you applied last time. - User Defined Default Values
The default values you saved last time.
- Last Values
- When Save as default is unavailable in the dialog box, the Reset button contains only the text part. Selecting it will reset the values to those you applied last time.
- When Save as default is available in the dialog box, the Reset button contains a text part and a triangle icon. You can choose to reset the values to either of the following by selecting the triangle. If you select the text part of the button directly, JDashboard will reset the values to those you applied last time.
- Select Submit to apply the specified parameter values.
 You should not use blank as the thousands separator in Number-typed parameter values under French locale, otherwise Server does not correctly recognize your input because of a JVM bug. For more information, see http://bugs.sun.com/view_bug.do;jsessionid=c8cdaf911b20fffffffffd9fc6340b30d670?bug_id=4510618.
Tip: If you want to make the Enter Parameter Values dialog box display when running dashboards that contain parameters, you can select the JDashboard profile property Show Enter Parameter Values Dialog.
Specifying Multiple Values for a Parameter
For a parameter that enables multiple values (the parameter's Allow Multiple Values property is true), you can specify one or more values to it.
- Select in the value combo box of the parameter. Server displays the Enter Values dialog box.
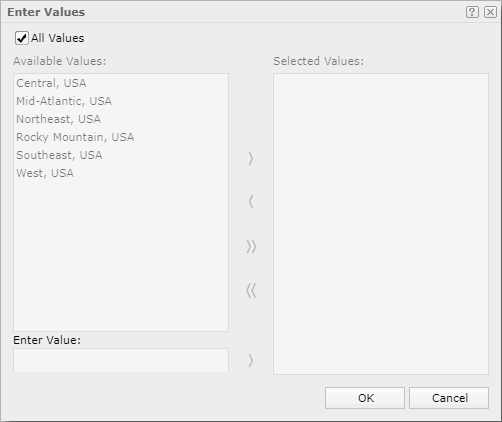
- If the parameter's Enable the "All Values" Option property is true, All Values is available. JDashboard selects it by default. It means to apply all values to the parameter. When you inserted the parameter as a field into a report and selected All Values, the field shows the string All. If you do not want to apply all values to the parameter, clear All Values, then specify the values you want as follows.
- Select the values you want in the Available Values box and select the Add button
 to add them to the Selected Values box; to add all the listed values, select the Add All button
  . To ensure performance, by default, JDashboard displays at most 500 values in the Available Values box.
 For values you do not want, select them in the Selected Values box and then select the button
 to remove them; to remove all values you added, select the button
  .
. - When the parameter's Allow Type-in of Value property is true, the Enter Values text box is available. You can type a value manually and select the button next to add it to the Selected Values box. When the parameter is bound with a column, but the display column is different from the bound column, make sure the value you type is that of the bound column. After you type text, JDashboard filters the values in the Available Values box and display those containing the text. To return to the original list, clear the input text. If the parameter is of the Date, DateTime, or Time type, you can also select the Calendar icon to specify a date and time value.
- When the parameter's Allow Type-in of Value property is false, the Search box is available for you to search for values among the available values: type text and JDashboard lists the values containing the text in the Available Values box while highlighting the text in the values. To cancel the search, clear the input text.
- Select OK to select the specified values for the parameter.
Saving Default Parameter Values
By default, when any user runs a dashboard with parameters, the parameter values saved with the dashboard applies, which means that all users see the same parameter result. However, you can customize the default parameter values of a dashboard for your own. To do this, in the Enter Parameter Values dialog box specify the parameter values you want as the default values, select Save as default, and then select Submit.
When using the Save Default Parameter Values feature, you need to be aware of the following:
- After saving default parameter values for a dashboard, when you run the dashboard if any of the parameters cannot find a matched validated value from the saved default values, all the parameters will use their default values specified in the parameters' definition as the initial values.
- If you change the parameter sharing setting in a dashboard, JDashboard will cancel the saved default values and use the default values specified in the parameters' definition.
- JDashboard remembers the last-time saved data of a dashboard and displays the exact result the next time you open the dashboard. In the case you set USA as the default parameter value and then filter the data with Canada and save the dashboard, the next time the dashboard will run with Canada, though Server still keeps the saved default parameter value as USA. If you want to run the dashboard with USA, navigate to the My Profile > Customize Profile page and then select Customize Profile. Server displays the Customize Profile dialog box. Select Enable Customize Properties, and then select Use User Defined Default Parameter Values in the JDashboard tab.
Saving Parameter Values for Reuse
When specifying parameter values for dashboards, you may want to save the specified parameter values for reuse next time. Report provides two ways of saving. One is that you decide when and which parameter values to save for a report, the other is that Server automatically saves the parameter values that you applied or submitted each time for a report. When the saved number in either way reaches the maximum, Server removes the oldest record. Server calculates the number on a user-dashboard basis. Take a dashboard with two parameters for an example, supposing the maximum number is 3. Each user can save at most three groups of parameter values for the dashboard, with each group containing the values of the two parameters.
To switch on the function of saving parameter values, you need to configure the server profile: select Yes to the Enable Saving Parameter Values option, then select in which way to save the values: Manually or Automatically, and specify a maximum number to limit the saved value groups via the Maximum Number of Auto Complete Parameters List option for each user-dashboard pair.
Manually saving parameter values
When you have chosen to manually save parameter values, Server displays the Use Saved Values button  in the Enter Parameter Values dialog box. By selecting this button, you will get the following:
- Value list
The value list contains all the parameter value groups you have saved for the dashboard. Select a group to apply all the values in the group to the corresponding parameters. You can also remove any of the unwanted value group by selecting it from the list and then selecting the delete button next to the value list.
 -
 Save Values button
Select the button to save the current displayed parameter values as a value group for reuse afterwards. To do this, type a name for the group in the text box which shows Save current values into list and then select the button. Server adds the saved value group into the value list.
Using automatically saved parameter values
When you have chosen to automatically save parameter values, each time a user submits a group of parameter values to a dashboard, Server saves the group automatically. The next time the same user runs the dashboard, Server displays the auto saved parameter values in the parameters' value lists for selection in the Enter Parameter Values dialog box.
 Back to top
Specifying Parameter Values to a Library Component
You can access the configuration panel of a library component to specify its parameter values. To do this, select the button  on the component title bar and select Edit Setting from the drop-down menu. Server displays the configuration panel. Specify the values in the panel and select OK to apply them to the library component. You can select Cancel to close the configuration panel.
You can select Show the panel by default in the panel to show the configuration panel before rendering the library component each time the dashboard runs or refreshes. For example, if a library component uses parameters, and you would like to specify parameter values before loading the component rather than first loading the component and then changing the parameter values to run the component the second time to get the result you want, you can select this option to display the panel before rendering the component by default.
Sharing Parameters Between Library Components
A dashboard can have multiple library components and all these components are independent from each other. When several components contain parameters which have same values and come from the same catalog, by default Server regards these parameters as separate parameters each connecting to its own component. To submit a value to all these components, you need to submit the value for each of the parameters. However, by sharing the parameters, you only need to provide a value for one of them as a representative of all the parameters. The parameters do not need to have the same name but do need to share the same values. You only need to submit values to this parameter once and all the components use the specified values. By sharing parameters, the same parameters only send the query once to the database, to improve the dashboard performance.
What parameters you can share
You can share the following two types of parameters coming from different library components in the same dashboard:
- The same parameters
The parameters with the same name and coming from the same catalog.For example, a parameter @Category comes from the catalog A.cat, and in a dashboard two library components LC1 and LC2 use it. So, in the dashboard they are two parameters marked as LC1.@Category and LC2.@Category. These two parameters are the same parameter and you only need to specify one value for them.
- The same meaning parameters
The parameters that are not the same parameters but have the same parameter type and value data type. For cascading parameters, they also have the same hierarchies, and each hierarchy has the same parameter value type, then you can share them as parameters with the same meaning even though the names are different.For example, there are two parameters @Province and @State which have the same parameter type and value type so they can both have the same meaning. For the cascading parameters like (@Country, @Province) and (@Country, @State) which have the same hierarchies and each hierarchy has the same parameter value type so they also can have the same meaning.
The rule for merging the values of the shared parameters
Within a sharing group, if all the shared parameters enable type-in values, the merged value result is the union of the values of all the parameters. The merged value names are distinct. However, if any of the shared parameters does not allow type-in values, the merged value result is the intersection of all the values.
Unexpected results after sharing parameters
Sometimes there may be unexpected parameter sharing that does no harm to the report system and report data, but the dashboard may be unexpected.
After you share parameters, Server merges their values. The merged values result may be bigger or smaller than the value lists of some of the shared parameters, which might lead to some values no longer supported by some components or some values can never be available to some components.
For example, in the case of the two parameters @Province and @State, if you shared them the list of values are all states and provinces. However, one library component may use a query that limits the data to US only, thus if the user selects a Canadian province from the list the component has no data.
How to share parameters
- Select the Options button
 on the toolbar and then select Share Parameter from the option list. JDashboard displays the Share Parameters Setting dialog box.
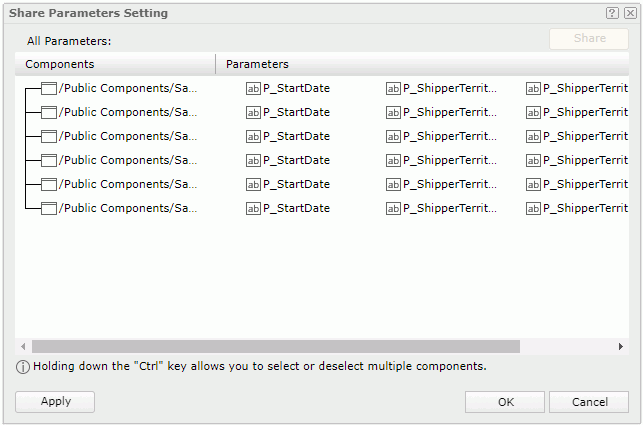
- Select the parameters you would like to share by holding the Ctrl key. If the selected parameters support being shared, JDashboard enables the Share button. Select the button. JDashboard adds the parameters into one sharing group.
To add another parameter into a sharing group, select the parameter and any parameter in the sharing group while holding Ctrl, then select Share.
To remove parameters from a sharing group, select the parameters and then select Cancel Share which JDashboard displays in the place of the Share button.
- Select OK to finish.