 Previous Topic
Image Properties
Make updates using the Image Properties dialog box to edit the properties of an image. This topic describes how to update image properties.
This topic contains the following sections:
You see these elements on both tabs:
OK
Select to apply any changes you made here and close the dialog box.
Cancel
Select to close the dialog box without saving any changes.
Help
Select to view information about the dialog box.
General Tab Properties
Use this tab to view and configure general image settings.
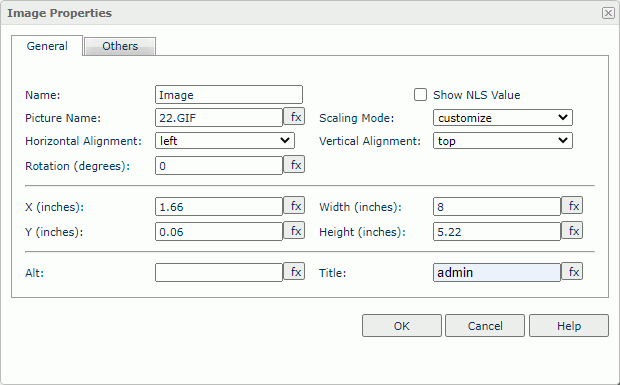
Name
You can update the default image name that is displayed in the report.
Show NLS Value
Select to show the translated name for the display name of the object in the Name text box if you have enabled the NLS feature and translated it, and when you have not modified the display name of the object.
Picture Name
The image file name.
Scaling Mode
Specify the scaling mode of the image, which controls the image behavior when you adjust the size of the area for displaying the image.
- actual size
Select to show the image in its actual size. If the display area is smaller than the image, Server hides part of the image. - fit image
Select if you want the image to fill the display area and keep the original perspective ratio under the limitation of Max Ratio. - fit width
Select if you want the image to fit the display area width under the limitation of Max Ratio. - fit height
Select if you want the image to fit the display area height, under the limitation of Max Ratio. - customize
Select if you want to specify the width and height of the image in the size fields.
Horizontal Alignment
Select left, right, or center for the horizontal alignment of the image in its container.
Vertical Alignment
Select top, bottom, or center for the vertical alignment of the image in its container.
Rotation
Type a degree to rotate the image at a specified angle. You can type a negative number to rotate the image anticlockwise.
 As you rotate the image, it is possible that parts of the image will exceed the image area. Report does not display the parts of the image that go beyond the image area.
X
Specify the X coordinate of the image.
Y
Specify the Y coordinate of the image.
Width
Specify the width of the display area.
Height
Specify the height of the display area.
Alt
Specify the alternate text of the image. Report will display the alternate text when it cannot display the image.
Title
Specify the tip information about the image, which displays when you hover over the image.
 Back to top
Others Tab Properties
Use this tab to view and configure miscellaneous settings.
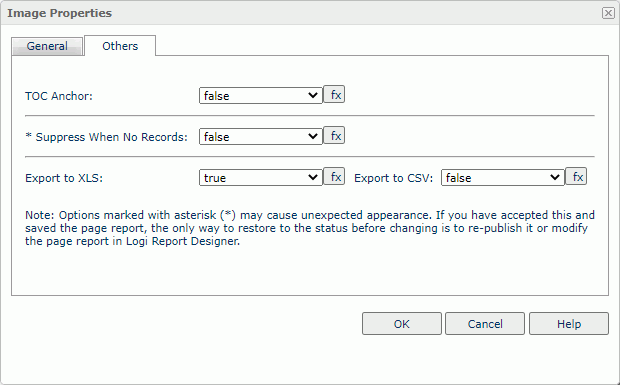
TOC Anchor
Select true if you want to add the object to the TOC tree in the TOC Browser.
Suppress When No Records
Select true if you want to hide the object in the report when no record returns to its parent data component.
Export to XLS
Select true if you want to export the object when you save the report as an XLS file (make sure to check Data Format in the Export dialog box).
Export to CSV
Select true if you want to export the object when you save the report as a TXT file with Delimited Format.