Using Dynamic Resources and Local Parameters in Web Report
This topic describes how you can create dynamic formulas, user defined functions, dynamic aggregations, crosstab formulas, and local parameters in web reports.
When you add fields to a report or use parameters to define filter conditions in a report, sometimes you may find that the predefined view elements in the business view or the given parameters in the current catalog cannot meet your requirements. In those cases, you can create dynamic resources (including dynamic formulas, dynamic aggregations, and crosstab formulas) and local parameters in the report and use them to get the data you want. Then when you save the report, Server saves the dynamic resources and local parameters along with the report as its resources.
Dynamic resources and local parameters are report level resources, which means they are only available to the report for which you created them.
In addition, when there are changes in a business view, Server administrators can recompile the dynamic resources in reports that use the business view as the data source so that the dynamic resources can work normally.
You need a Report Live license for Server to use this feature. For more product information, including new purchases and upgrades, contact US Sales or UK Sales.
This topic contains the following sections:
- Creating and Using Dynamic Formulas
- Creating and Using Dynamic Aggregations
- Creating and Using Crosstab Formulas
- Creating and Using Local Parameters
Creating and Using Dynamic Formulas
You should have some knowledge of the formula syntax before you can successfully compose a formula without errors. To learn about the syntax, see Formula Syntax in the Report Designer Guide.
To create a dynamic formula:
- In the Resources panel of Web Report Studio or the Resources box in the Web Report Wizard, expand the Dynamic Resources > Formulas node, then select <Add Formula…>. Server displays the Formula Editor.
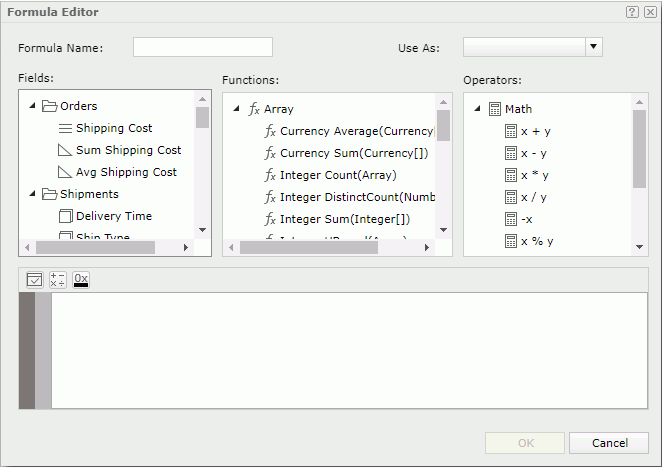
- Type a name for the formula in the Formula Name text box.
- By default, Report decides whether it can use the formula as an aggregation object, and if not, uses it as a detail object. You can specify to use the formula as a detail, group, or an aggregation object, by selecting the corresponding view element type from the Use As drop-down list on the toolbar.
Whether you can use a dynamic formula as a certain type depends on the following rules:
- You can use any formula as Detail.
- You can use any formula that references a DBField excluding an aggregation as Group.
- You can use a formula that refers only to aggregations as Aggregation. For example, there are two aggregations Sum_Total and Sum_Quantity, and you can create a formula
@"Sum_Total" / @"Sum_Quantity"and use it as an aggregation. - You can use a formula that follows the custom aggregation expression as Aggregation. For more information, see Custom Aggregation in the Report Designer Guide.
- Compose the formula by selecting the required fields, functions including built-in functions and user defined functions, and operators from the Fields, Functions, and Operators boxes respectively. You can also write the formula by yourself in the editing box.
For more information, see Appendix 1: Formula Functions and Appendix 2: Formula Operators in the Report Designer Guide.
- To insert an operator into your formula, you can also select the Add Operators button
 and then select an operator.
 - To insert the HEX code of a color into your formula, select the Color Converter button
 , and then select a color or select More Colors to specify a color in the Color Picker dialog box.
 - Select the Check button
 to check whether the syntax of your formula is correct.
 - Select OK to create the formula.
Once you create a dynamic formula, you can then drag it from the Resources panel to the position you want in the report for data analyzing, add it as a report field when working with the report wizard, or use it to create expressions in the Formula Editor.
If you want to further edit an existing dynamic formula, remove any that you do not want any longer, or change the formula type as Group, Detail, or Aggregation, right-click the formula in the Resources panel of Web Report Studio and then select the corresponding command on the shortcut menu. You cannot delete dynamic formulas when you have used them in the report.
Using User Defined Functions
When you create dynamic formulas to use in a report, if the built-in functions do not satisfy your requirements, you can make use of the User Defined Function feature to create any functions as you want. Then when you save the report, Report saves the functions into the report as its resources the same as dynamic formulas. User defined functions can also call other user defined functions.
To create a user defined function:
- In the Resources panel of Web Report Studio or the Resources box in the Web Report Wizard, navigate to Dynamic Resources > User Defined Functions, then select <Add Function…>. Server displays the User Defined Function Editor.
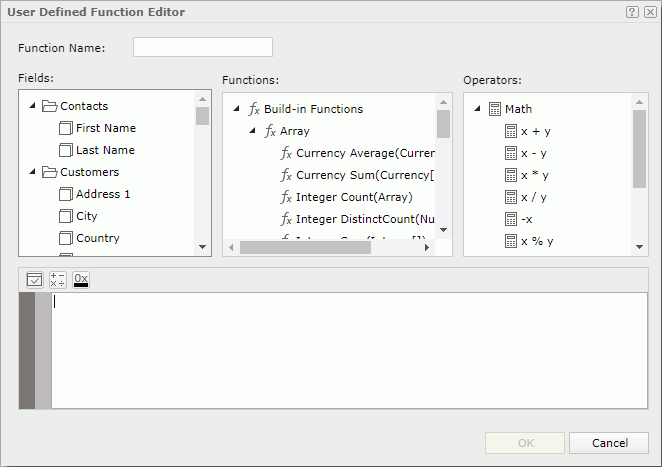
- Type a name for the function in the Function Name text box.
- Compose the function by double-clicking the required fields, functions including built-in functions and other user defined functions, and operators from the Fields, Functions, and Operators boxes. You can also write the function by yourself in the editing box.
The function syntax is:
arguments: VariableType1 VariableName1, VariableType2 VariableName2, ...;
For example,
arguments: integer age, string name;An argument works the same as a local variable except that you cannot assign any value to it, like
arguments: integer age=10;. - To insert an operator into your formula, you can also select the Add Operators button
 and then select an operator.
 - To insert the HEX code of a color into your formula, select the Color Converter button
 , and then select a color or select More Colors to specify a color in the Color Picker dialog box.
 - Select the Check button
 to check whether the syntax of your function is correct.
 - Select OK to create the function.
Server displays the function under the User Defined Functions node in the Functions box of the Formula Editor, Crosstab Formula Editor, and User Defined Function Editor. You can call it in a dynamic formula, a crosstab formula, or another user defined function by double-clicking it.
Suppose a user defined function named function1 is: arguments: integer age, string name;, you can call it as follows:
@function1(25, "John Smith");@'function1'(25, "John Smith");@"function1"(25, "John Smith");
If you want to further edit or remove an existing user defined function, right-click the function in the Resources panel of Web Report Studio and then select the corresponding command on the shortcut menu. You cannot delete user defined functions when you have used them in the report.
Creating and Using Dynamic Aggregations
In Web Report Studio, you can also create dynamic aggregations by mapping them to the available resources such as group objects, detail objects in the current business view, and the dynamic formulas that you have created in the report.
To create a dynamic aggregation:
- In the Resources panel of Web Report Studio or the Resources box of the Web Report Wizard, navigate to Dynamic Resource > Aggregations, then select <Add Aggregation…>. Server displays the Add Aggregation dialog box.
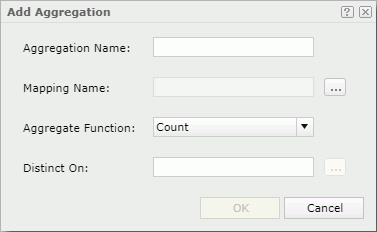
- In the Aggregation Name text box, type the display name of the dynamic aggregation. Or you can leave the name blank. Then when you finish selecting the mapping name and the aggregate function, Server automatically provides a name here.
- Select the ellipsis button
 next to the Mapping Name text box. Server displays the Select Resource dialog box.
 - Select the field on which the dynamic aggregation is based.
- From the Aggregate Function drop-down list, select the aggregate function. When you selected DistinctSum, you should select the ellipsis button
 next to the Distinct On text box. Server displays the Select Fields dialog box.
Select one or more group and detail objects according to whose unique values you want to calculate DistinctSum.
next to the Distinct On text box. Server displays the Select Fields dialog box.
Select one or more group and detail objects according to whose unique values you want to calculate DistinctSum.For more information, see Aggregate Functions in the Report Designer Guide.
- Select OK to create the dynamic aggregation.
Server adds the dynamic aggregation in the Resources panel. You can then drag it from to the position you want in the report for data analyzing, add it as a report field when working with the report wizard, or use it to create expressions in the Formula Editor. And if you want to edit any dynamic aggregation or delete it, right-click the aggregation and select Edit or Delete on the shortcut menu. You cannot remove dynamic aggregations when you have used them in the report.
Creating and Using Crosstab Formulas
Crosstab formulas are a type of extended formulas. You can insert crosstab formulas into crosstabs as aggregations and use them to control the property values of crosstab fields. Crosstab formulas are private resources on the crosstab level, which you cannot use beyond their crosstabs.
To support more powerful and flexible calculation logic in crosstabs, crosstab formula extends the basic Formula Syntax in the following aspects:
- A crosstab formula can reference another crosstab formula within the same crosstab. The format is
@@<Crosstab_Formula_Name>, for example,@@CTF1, where CTF1 is the name of a crosstab formula. In this case, you can write the crosstab formula expression as@(@@CTF1). - A crosstab formula can reference summary expression that follows the syntax of custom aggregation expression. For example,
@(Sum(@Sales))@(@Country:"USA",@Year:CHILDREN, Sum(@Sales))@(@Country:"USA",@Year:CHILDREN, @@CTF1)For more information, see Custom Aggregation in the Report Designer Guide.
![]()
- You cannot use global variables in crosstab formulas.
- You cannot reference detail fields and record level pass one formulas in crosstab formulas, except for referencing them in summary expression.
- You cannot use the Array functions as
array_function (field_variable, groupby)in crosstab formulas (array_function here refers to any Array function defined in Report). For example, Report does not allowMaximum(@dbfield, "group_field")andAverage(@formula, @parameter)in crosstab formulas.
To create a crosstab formula:
- Do either of the following to access the Crosstab Formula Editor:
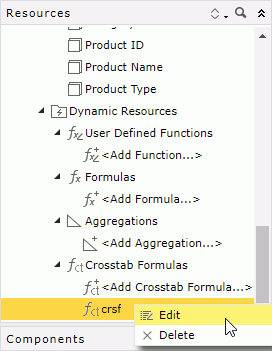
- In the Resources panel of Web Report Studio, navigate to Dynamic Resources > Crosstab Formulas. Then, select <Add Crosstab Formula…>, or right-click a crosstab formula and select Edit from the shortcut menu.
- In the Web Report Wizard > Bind Data > Resources box for crosstab, navigate to Custom Aggregations > Crosstab Formulas, and then select <Add Crosstab Formulas…>.
- In the Inspector panel when you set property values of a field in a crosstab, select the formula button
 in the value cell, select the arrow button to display the value drop-down list, and then select <Create Crosstab Formula>.
- In the Edit Conditions dialog box when you are editing conditional formatting on a field in a crosstab, select the Toggle to Formula button
 next to the value text box of a condition line, select the arrow button to display the value drop-down list, navigate to Dynamic Resources > Crosstab Formulas, and then select <Add Crosstab Formula…>.
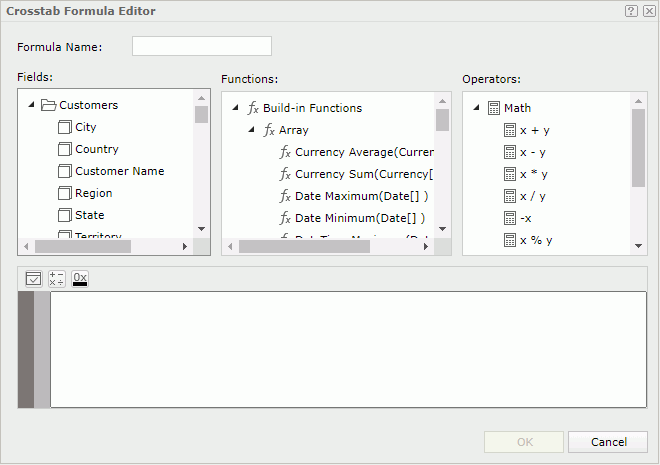
- Type a name for the crosstab formula in the Formula Name text box.
- Compose the formula by selecting the required fields, functions including built-in functions, user defined functions, and crosstab formulas, and operators from the Fields, Functions, and Operators boxes respectively. You can also write the formula by yourself in the editing box.
For more information, see Appendix 1: Formula Functions and Appendix 2: Formula Operators in the Report Designer Guide.
- To insert an operator into your formula, you can also select the Add Operators button
 and then select an operator.
 - To insert the HEX code of a color into your formula, select the Color Converter button
 , and then select a color or select More Colors to specify a color in the Color Picker dialog box.
 - Select the Check button
 to check whether the syntax of your formula is correct.
 - Select OK to create the crosstab formula.
Once you create the crosstab formula, you can then add it in the crosstab as an aggregation, use it to control property values of the fields in the crosstab in the Inspector panel or a dialog box, and use it to perform conditional formatting on the fields in the crosstab.
If you want to further edit or remove an existing crosstab formula, right-click it in the Resources panel of Web Report Studio and then select the corresponding command on the shortcut menu. You cannot edit or remove crosstab formulas when you have used them in the report.
Creating and Using Local Parameters
When you use parameters to compose the filter conditions to apply to a report, if the given parameters in the current catalog cannot meet your requirements, you can create local parameters to use in the report. You can also add the local parameters to the parameter controls and parameter form controls, or reference them in dynamic formulas in the report.
To create a local parameter and use it in a filter:
- When you filter a dataset in the Dataset Filter dialog box, or a data component using the Filter dialog box, select the parameter button
 and then select <Add Parameter…> from the Local Parameters node of the value drop-down list.
 Server displays the Add Parameter dialog box.
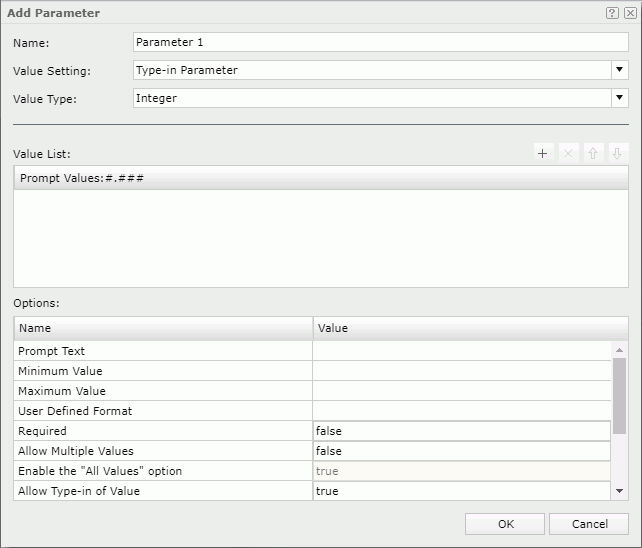
- In the Name field, type a name for the parameter.
- Select a parameter type from the Value Setting drop-down list.
- In the value section, specify the parameter values. The section varies with the type you select from the Value Setting drop-down list.
- For Type-in Parameter:
- Select the data type of the parameter values from the Value Type drop-down list.
- Select the Add button
 to add a value line, double-click in it, and then type a value of the specified data type.
If the parameter is of Date, DateTime, or Time type, you can also select the Calendar icon
 to set a date and time value using the calendar.
 - Repeat the preceding step to add more values.
- To adjust the order of the values, select the Up button
 or Down button
 .
. - To remove any unwanted value, select it in the list, and then select the Remove button
 .
. - To make a value the default selected value for the parameter, select it from the list.
- For Bind with Single Column
Report provides a mechanism that links each value of the display field with the exact value of the bound field for a parameter, thus when you select a value of the display field, Report actually sends the value of the bound field to the query and filters the query result. This can help you bind the parameter to a data field in order to provide a list of values for report users to select which probably makes more sense. Report uses the selected value of the bound field as the parameter value. For example, it might be confusing if you provide a list of customer ID numbers for the report users to select at runtime, since the ID numbers would probably mean nothing to them. In cases like this, it is better for you to display values of other fields, which would make more sense. For this case, you might prefer to display customer names instead of ID numbers. When the report user selects a customer name from the list, Report passes its ID number to the query as the parameter value so that the search criteria can be fulfilled.- From the Source drop-down list, select the business view in the current data source from which you want to get data for the parameter. All the group and detail objects in the specified business view will be available for retrieving values for the parameter.
- Select a field from the Bind Column drop-down list, to filter the query when running a report with the parameter.
- If you want the values of another field to display for the report users to choose from, select that field from the Display Column drop-down list.
- For Bind with Cascading Columns:
- From the Data Source drop-down list, select the business view in the current data source from which you want to get data for the parameter. All the group and detail objects in the specified business view will be available for retrieving values for the parameter.
- Select the Add button
 to add a parameter line.
 - Select the arrow button
 in the Bind Column cell and then select a field from the drop-down list.
 - If you want the values of another field to display for the report users to choose from, select the arrow button
 in the Display Column cell and select that field from the drop-down list.
 - Select in the Parameter cell to create the parameter. Report automatically adds a name for the parameter.
- Repeat steps b to e to create more parameters. Make sure that the selected Bind Column fields are of cascading relationship one level by one level down. In this way, you can create a group of cascading parameters.
- To adjust the order of the parameters, select the Move Up button
 or Move Down button
 .
. - To remove any unwanted parameter from the cascading group, select it, and then select the Remove button
 .
.
- For Type-in Parameter:
- In the Options box, set the properties of the parameter.
- Select OK to create the parameter. Server adds the parameter to the Local Parameters node in the Parameters list.
- To further edit the parameter, right-click it in the list and select Edit from the shortcut menu. Then in the Edit Parameter dialog box, edit the parameter as you want.
- To remove the parameter, right-click it in the list and select Delete on the shortcut menu.
- Finish defining the filter condition using the parameter.
- Select OK to apply the settings. Server lists the parameter in the Parameters panel. You can specify the parameter value in the panel to dynamically set the filter condition.
![]()
- You can only use JDK (not JRE) to compile formulas and user defined functions that you created in Web Report Studio and save them with no errors into a web report.
- Currently, you cannot use global variables in dynamic formulas and user defined functions.
- If you refer to any field in a formula or user defined function, add a prefix @ before the reference name for that field. If the field name contains spaces, quote the reference name with double-quotation marks (""). For example, if the field name is Customer Name, then the reference name will be @"Customer Name".
- When formulas and user defined functions reference display names or mapping names, the names should not contain any of the following characters if you do not quote the names by double-quotation marks "":
"~", "`", "!", "@", "#", "$", "%", "^", "&", "*", "(", ")", "-", "+", "=", "{", "}", "[", "]", "|", "\\", ":", ";", "\", " ' ", "<", ",", ">", ".", "?", "/"
Examples:
- Expression @Customer#; will cause a syntax error. But @"Customer#" is OK.
- If a field has the display name Category.Aggregation, quote it as "Category.Aggregation" or "Category"."Aggregation".
 Previous Topic
 Back to top