 Previous Topic
Creating, Opening, and Saving Catalogs
A report can only exist within a catalog folder that contains a catalog file, therefore, you must create and open a catalog before you create or edit a report. This topic describes how you can create, open, and save catalogs and add data sources in the catalogs.
This topic contains the following sections:
Creating a Catalog
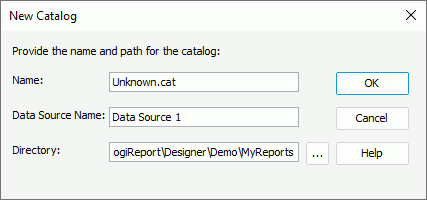
- Navigate to File > New Catalog. Designer displays the New Catalog dialog box.
 Designer may prompt you to save changes to the current open catalog. You can open only one catalog at a time.
 - In the Name text box, type the name for the catalog. The name must include the extension (.cat or .cat.xml).
- In the Data Source Name text box, type the name for the data source to be created along with the catalog (when you create a catalog, you create a data source in the catalog at the same time by default). You can include spaces in the name but do not use special characters.
- In the Directory text box, specify the path to save the catalog. You can also select the ellipsis
 to browse to and select the directory. The directory you specify must not already contain a catalog file.
 - Select OK to create the catalog. Designer displays the Catalog Manager. You can then set up the required connections to connect the catalog data source with your databases. You can connect a data source in a catalog with multiple connections.
Catalogs that contain a large number of reports can become very large and difficult to maintain, so it is best to create a new catalog for each category of report types you create. For example, you may have reports for sales, accounts receivable, customer information, inventory management, and so on. If you include all of these types of reports in a single catalog, it becomes more difficult to maintain and keep track of which data objects belong to which group of reports. A better way is to create a separate catalog for each group of reports. You can use the operating system commands to copy and rename catalog files as long as you ensure you only have one catalog file per folder. A process you may use is to first create a base catalog with only connection information and tables used by all applications. You can then copy and rename this to create as many catalog folders and catalog files as you need for your reporting requirements.
 Back to top
Adding Data Sources in a Catalog
Designer supports the Multiple Data Sources feature, which means in one catalog you can add as many data sources as you need and connect them with many different types of data. However, if you want to mash up data that come from multiple connections into a single query or business view, the database connections must be all in the same data source in the catalog.
To add another data source to a catalog
- Do either of the following:
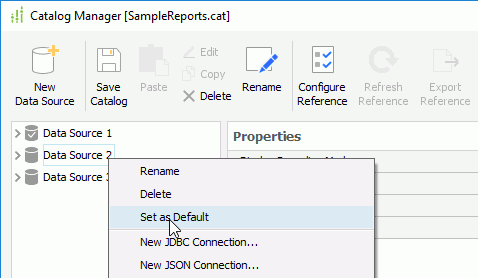
- In the Catalog Manager, select a data source node, then select New Data Source on the toolbar.
- In the Designer main window, navigate to Home/File > New > Data Source.
Designer displays the New Data Source dialog box.
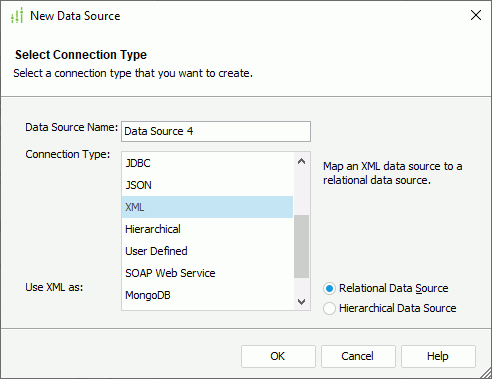
- In the Data Source Name text box, specify the name of the new data source.
- In the Connection Type box, select the type of the first connection to create in the new data source.
- Select OK. Designer displays the corresponding connection wizard. Set up the connection as required.
Setting the Default Data Source for a Catalog
When a catalog contains multiple data sources, you need to specify which data source is the default one for the catalog (by default, the data source created along with the catalog is the default data source of the catalog). To change the default data source, right-click the data source that you want to use as the default data source, then select Set as Default on the shortcut menu. A catalog must have one and only one default data source.
Opening a Catalog
You can open a catalog explicitly by using the Open Catalog command, or you can open it implicitly by opening one of the reports in the catalog.
To open a catalog explicitly
- Navigate to File > Open Catalog. Designer may prompt you to save changes to the current open catalog. You can open only catalog at a time.
- In the Open Catalog File dialog box, browse to and select the catalog you want to open and then select Open. Designer displays the Catalog Manager, listing the data resources in the specified catalog. You can manage the resources using the manager.
Saving a Catalog
To save a catalog, select Save Catalog on the Catalog Manager toolbar. You have specified the type, name, and location when you created the catalog.
You can also select either of the following in the File ribbon to save a catalog:
- Save Catalog
Select to save the open catalog. - Save Catalog As
Select to save the open catalog in the specified alternate format. Options are .cat or .cat.xml. The .cat.xml file can be in the same directory as the .cat file. When you open the catalog in Designer, you can select either the .cat or the .cat.xml file, and Designer updates the open one only. When you publish reports to Server, be sure to publish the updated catalog file, because the out of date file will likely produce errors when users run reports with the outdated catalog. It is best practice to keep only one version of the catalog once you decide which format you want to use to publish.
A directory can contain only one catalog file other than the .cat and .cat.xml of the same catalog. To merge multiple catalog files, see Merging Catalogs.
Sharing Catalog Files Among Multiple Report Developers
By default, Designer saves the report file and resources referenced by this report in the current catalog. You can also save a report or other resource to a catalog other than the one in which you have created them. Designer then merges all the catalog resources related to this report into the catalog in the specified folder. This can enable a team of report developers to share resources. Each report developer can work on a local version of the catalog, and then use the Save To command to have his catalog merged into a universal catalog. The universal catalog must have the same name as the current catalog. The Save To command saves not only the report files, but also the resources (query, formulas, parameters, and so on) that are referenced by this report. When there is a conflict, the report developer must decide which version to keep or modify his catalog to rename the conflicting resources and try the Save To again.
For more information about how to share catalog files, see Merging Catalogs and Saving a Report to a Different Catalog.