Managing Data Resources in a Catalog
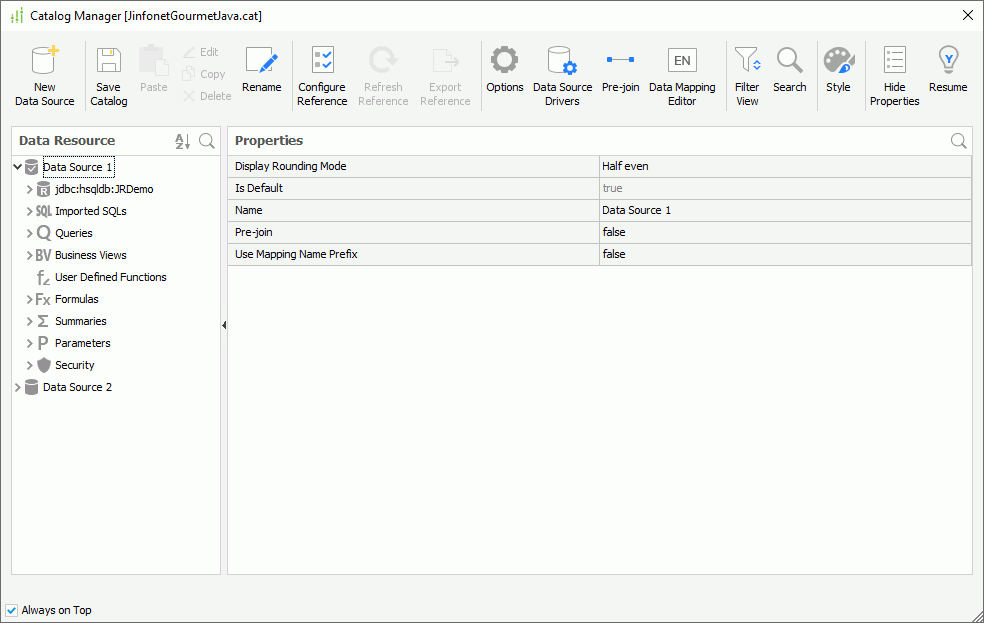
The Catalog Manager of Designer provides a hierarchical view of the data resources in the current catalog. This topic describes how you can use the manager to add, remove, and modify the data resources in a catalog.

This topic contains the following sections:
- Adding Data Resources
- Editing Data Resources
- Duplicating Data Resources
- Renaming Data Resources
- Deleting Data Resources
- Specifying Data Resource Properties
- Filtering Data Resources
- Searching for Data Resources
- Sorting Data Resources
Adding Data Resources
Although there are a variety of data resources in a catalog, the ways you create them are fairly similar.
- In the Catalog Manager, expand the catalog data source where you want to add the resource.
- Select the data resource node of the type that you want to create, then right-click it and select Add/New XXX from the shortcut menu, or select the appropriate command on the Catalog Manager toolbar. Designer then displays the corresponding dialog box for you to define the resource.
For example, if you want to create a summary, right-click the Summaries node and select New Summary. Designer the New Summary dialog box for you to create the summary.
Select the following links for more information about adding/creating different data resources in a catalog:
- Adding Tables/Views/Synonyms to a Catalog
- Adding Imported SQLs to a Catalog
- Adding Stored Procedures to a Catalog
- Creating Queries in a Catalog
- Creating Business Views in a Catalog
- Creating Parameters in a Catalog
- Creating Formulas in a Catalog
- Predefining Summaries in a Catalog
Editing Data Resources
Select the data resource you want to edit, then select Edit on the Catalog Manager toolbar, or right-click the data resource and select Edit XXX from the shortcut menu. In the dialog box Designer displays, edit the resource according to your requirements.
In most cases, you can also edit a data resource by using its right-click Edit XXX menu command from the Data panel.
Duplicating Data Resources
Select the data resource you want to duplicate and select Copy on the Catalog Manager toolbar. To paste it, select Paste on the toolbar.
Renaming Data Resources
Select twice on the name of the data resource you want to rename, when the name text box becomes editable, type the new name and select outside the name text box to confirm the change.
You can also rename data resources by editing the Name property in the Properties sheet.
![]() Renaming a data resource impacts other resources that use it. You can configure the reference table to monitor the reference relationships between resources.
Renaming a data resource impacts other resources that use it. You can configure the reference table to monitor the reference relationships between resources.
Deleting Data Resources
Select the data resource you want to delete and select Delete on the Catalog Manager toolbar, or right-click the data resource and select Delete from its shortcut menu.
Specifying Data Resource Properties
When you select a data resource and select Show Properties on the Catalog Manager toolbar, Designer displays the property list of the data resource in the Properties sheet on the right. See Catalog Data Object Properties for detailed explanation about the properties of each data resource type.
Setting Default Property Values for a Data resource
You can set the default values for the properties of data resources in the Catalog Manager, so that you do not need to specify them each time you insert them into your report. The data resources that can have default values are formulas, parameters, summaries, table/view columns, SQL columns, stored procedure columns, and user-defined data source columns. Query columns do not support this feature. Data resources used in a business view inherit their properties from the underlying objects.
To set default values for a data resource
- Select the data resource, select Show Properties on the Catalog Manager toolbar, or right-click the data resource and select Properties from the shortcut menu.
- The property values in the Properties sheet are the default values for the data resource. You can change the property values here, and the next time you insert the data resource into a report, Designer will use the values you specify here as the default values.
Filtering Data Resources
You can filter the data resources in the Catalog Manager to show only the required resources.
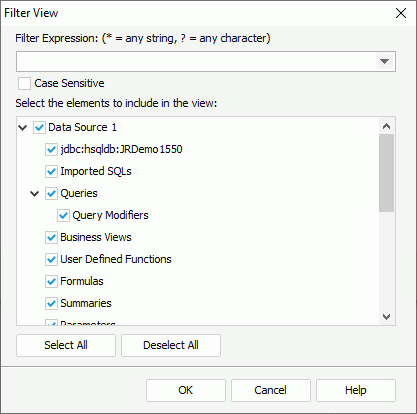
- In the Catalog Manager, select Filter View on the toolbar. Designer displays the Filter View dialog box.

- Provide a filter condition in the Filter Expression text box. Use "*" to stand for any string, and use "?" to stand for any character. You can also leave this text box blank.
- Select Case Sensitive if you want Designer to distinguish between uppercase and lowercase characters when filtering.
- In the Select the elements to include in the view box, select the resource types you want to keep in the Catalog Manager resource tree. Select Select All/Deselect All to select/clear all the resource types.
- Select OK to filter the resources. The filter result is the union of the resources that match the filter condition and the selected resource types.
Searching for Data Resources
When there are many resources in a catalog, sometimes you may find that it is difficult to locate a resource. The Catalog Manager provides you with the search function which enables you to search resources in the leaf nodes of the catalog data resource tree.
You can search for data resources using either the quick way or advanced way.
To perform quick search
- Select the Search icon
 at the upper right corner of the Data Resource panel in the Catalog Manager.
 - In the search box that appears, type the text you want to search for. Designer then lists the resources containing the matched text in the data resource tree.
- You can also specify the following search settings after selecting the drop-down icon
 in the search box.
 - Highlight All
Select to highlight all matched text. - Match Case
Select to search for text that meets the case of the typed text. - Match Whole Word
Select to search for text that looks the same as the typed text.
- Highlight All
- To close the search box and cancel the search, select the Delete icon
 in it. Designer then lists all resources in the tree.
To perform advanced search using dialog box
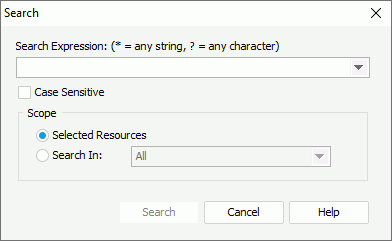
- In the Catalog Manager, select Search on the toolbar. Designer displays the Search dialog box.

- Provide a search condition in the Search Expression text box. Use "*" to stand for any string, and use "?" to stand for any character.
- Select Case Sensitive if you want Designer to distinguish between uppercase and lowercase characters when searching.
- Specify the search scope.
- Selected Resources
Select to search from the leaf nodes of the resource that you have selected in the Catalog Manager resource tree when you open the dialog box. - Search In
Select to search from the leaf nodes of the selected catalog data source. To search from all data sources, select All.
For example, if you want to find the DBField Customer Name in the Queries node, select the node in the Catalog Manager, then in the Search dialog box, type Customer Name in the Search Expression text box and select the scope as Selected Resource.
- Selected Resources
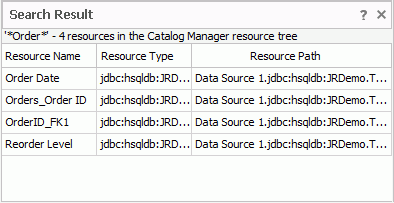
- Select Search to start searching. Designer lists all the matched results in the Search Result panel which has three columns: Resource Name, Resource Type, and Resource Path. You can sort the search results alphabetically by selecting any column header. When you select an item in the Search Result panel, Designer highlights the corresponding resource in the Catalog Manager.

Sorting Data Resources
Resources in the leaf nodes of the catalog data resource tree can be sorted for easy management. To do this, select the Sort icon  at the upper right corner of the Data Resource panel in the Catalog Manager, then from the drop-down menu, choose how to sort the resources:
- Ascending
Select to sort the resources in the ascending order. - Descending
Select to sort the resources in the descending order. - No Sort
Select to keep the original order of the resources as in the database if the resources are from database and apply no sort order to the resources that you create by yourself.
Designer determines the default sort order of the resources according to the Sort option in the Catalog category of the Options dialog box. If you do not select Sort in the Options dialog box, Designer selects No Sort by default in the drop-down menu. In addition, the change of sort order is a one-off action which Designer does not remember after you close the catalog, meaning, each time when you open the Catalog Manager for a catalog, Designer always applies the default sort order.
![]() You cannot sort the logical folder nodes for categorizing the resources and elements in a business view hierarchy.
You cannot sort the logical folder nodes for categorizing the resources and elements in a business view hierarchy.
 Previous Topic
 Back to top