 Previous Topic
Working with RLS and CLS at Data Source Scope
A security policy with Record Level Security (RLS) and Column Level Security (CLS) at data source scope refers to a security entry in the data source of a catalog. It enables you to control user access to different subsets of data, and ensures that people only see what they are supposed to see: certain records and/or report columns. This topic describes how you can define RLS and CLS at data source scope, meaning creating security entries in a catalog, and apply the security entries to reports.
If you want to implement the same security policy in a group of reports, you can simply apply the same security entry to the reports, without having to repeatedly build the security information for each report. The predefined security entries work within a data source range, that is you can apply them to reports that are in the same catalog data source. You can also use a security entry that contains RLS only to control parameter values at runtime.
This topic contains the following sections:
Creating Security Entries in a Catalog
To add a security entry to a data source in a catalog, take the following steps:
- Open the required catalog.
- In the Catalog Manager, select the data source to which you want to add the security policy.
- Right-click Security Entry under the Security node and then select New Security Entry from the shortcut menu.
- In the Enter Security Name dialog box, provide a name for the security policy and select OK. Designer displays the Security dialog box.
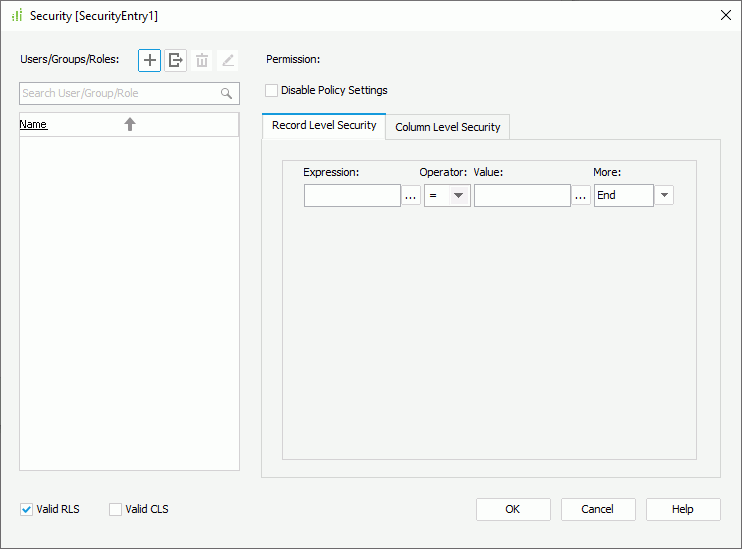
- In the Users/Groups/Roles panel, add the principals to define the security policy.
- Select Add
 and select Import from Report Server from the drop-down menu, then in the Import from Report Server dialog box, specify the settings for connecting to a started Server to import users, roles, and groups.
You should be an administrator user of the Server to perform the importing.
and select Import from Report Server from the drop-down menu, then in the Import from Report Server dialog box, specify the settings for connecting to a started Server to import users, roles, and groups.
You should be an administrator user of the Server to perform the importing.
- You can also select Add and select Add User, Add Role, or Add Group from the drop-down menu to add principals manually in Designer or import them from an XML file. However, if you choose the two methods to add users, roles, and groups, in order for the security policies specified on them to take effect on Server, you should make sure there are the same users, roles, and groups on Server, and then import them to Designer with the Merge option. In this way, Designer can update the users, roles, and groups to those on Server while reserving the security settings.
- To edit a user/role/group, select it and select Edit
 . In the corresponding edit dialog box, edit it as required. Changes to Server users, roles, and groups made in Designer cannot take effect on Server.
 - To delete a user/role/group, select it and select Remove
 .
.

- You cannot reassign a user from Server to (or remove it from) a role from Server; similarly, you cannot reassign a role from Server (or remove it from) a user from Server. Therefore, if you obtain both the users and roles from Server, you are not able to change their parental relationships.
- You cannot assign a role from Server to a local user created on Designer, while you can assign a user from Server to a local role.
- During importing, if any existing users, roles, or groups that come from Server have the same names as those on Server, Designer refreshes them with new information from Server, such as the role or group information and parental relationships. However, Designer reserves their permission settings, specially, when you have assigned a user from Server to any roles defined in Designer, Designer reserves these roles in its member list.
- Select Add
- Select a user/role/group in the principal box.
- To apply record level security, select Valid RLS; to apply column level security, select Valid CLS. By default, Designer selects the Valid RLS checkbox but defines no condition in the Record Level Security tab, which means all the users, groups, and roles do not have any permissions.
- Leave Disable Policy Settings cleared.
- In the Record Level Security tab, specify the security conditions for the selected user/role/group. If you do not add a condition, the user/role/group is not able to view any records, unless it inherits permissions from its other roles and groups.
- Select the ellipsis
 next to the Expression text box to specify the field on which to build the condition in the Expressions dialog box. You can also type the name of the field manually in the text box (the format should be @FieldName or @"Field Name" when the field name contains blank space).
 - From the Operator drop-down list, set the operator with which to compose the condition.
- Select the ellipsis next to the Value text box to specify the value of how to compose the condition using the Expressions dialog box. You can select the User Name special field or a parameter in the Expressions dialog box as the value to compose the condition dynamically (the usage of parameter in a security condition is similar to that of in a query filter condition). You can also specify the value manually if you are familiar with the values of the specified field. When you type in the value, you need to:
- Quote String values with single quotes.
- Use the format of your database for Date values.
- Separate multiple values with ",".
- Type "," or "\" contained in the value as "\," or "\\".
- If you want to append a new condition line, select
 and select AND or OR from the drop-down menu. To add a new group, select beside the condition line which shows "End" or "End Group", then select New Group and specify the relationship between two adjacent groups.
The following table lists the options you can use for adding condition lines and groups:
Option Description AND Select to apply the logical operator "AND" between two adjacent expressions. If this line is the last line in the expression list, when you select this option, Designer appends a new line to the end of the list as well. OR Select to apply the logical operator "OR" between two adjacent expressions. If this line is the last line in the expression list, when you select this option, Designer appends a new line to the end of the list as well. Insert Row Select to insert a new line after the current line. Delete Row Select to delete the current line. New Group Select to add a new expression group to the list. You can specify the relationship between two groups as one of the following: - AND
Select to apply the logical operator "AND" between two adjacent groups to retrieve records that satisfy both condition groups. - OR
Select to apply the logical operator "OR" between two adjacent groups to retrieve records that satisfy either one of the condition groups. - AND NOT
Select it to retrieve records which satisfy the first condition group but not the second. - OR NOT
Select it to retrieve records which satisfy the first condition group, or which do not satisfy the second condition group.
- AND
- Select the ellipsis
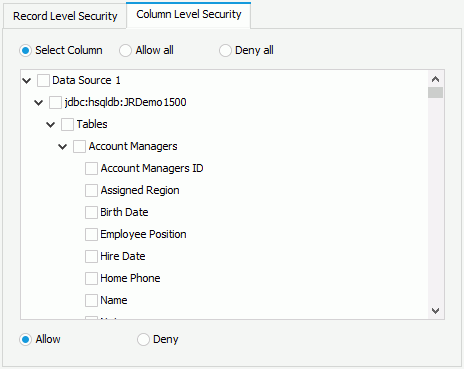
- In the Column Level Security tab, make a choice:
- Select Select Column and then select the DBFields, formulas, parameters, or summaries. You can set the selected columns to be shown or hidden from the user/role/group by selecting Allow or Deny. Whether the principal can see the cleared columns depends on whether the parent groups/roles allow them.
- Choose Allow all to show all the columns to the user/role/group.
- Choose Deny all to hide all the columns from the user/role/group.
- Repeat steps 6 to 10 to customize another principal's RLS and CLS conditions.
- Select OK to create the security policy.
For any security entry, you can further edit it, rename it, or delete it according to your requirement. To do this, right-click the security entry in the Catalog Manager resource tree and select the corresponding option on the shortcut menu.
You can also export the security entries, together with the business view security defined in a catalog to a security file using the Export Security command on the File menu. Designer saves the security file in the same location as the current catalog by default. The Server administrators can then use the security file to create dynamic security for catalogs on Server (for more information , see Dynamic Security in the Report Server Guide).
Importing/Exporting Security Information from/to External XML Files
You can import or export your security information from/to external XML files (*.acl.xml) when editing security in Designer.
- To import the security information from an XML file, select Add in the User/Group/Role panel and select Import from File from the drop-down menu. In the Open an xml file dialog box, select the XML file that contains the required security information, and then select Open.
- To export the security information to an XML file, select Export
 in the User/Group/Role panel. In the Save dialog box, specify the name of the file and the location where to save it, and then select Save.
The following diagram shows the security information the XML file can contain:
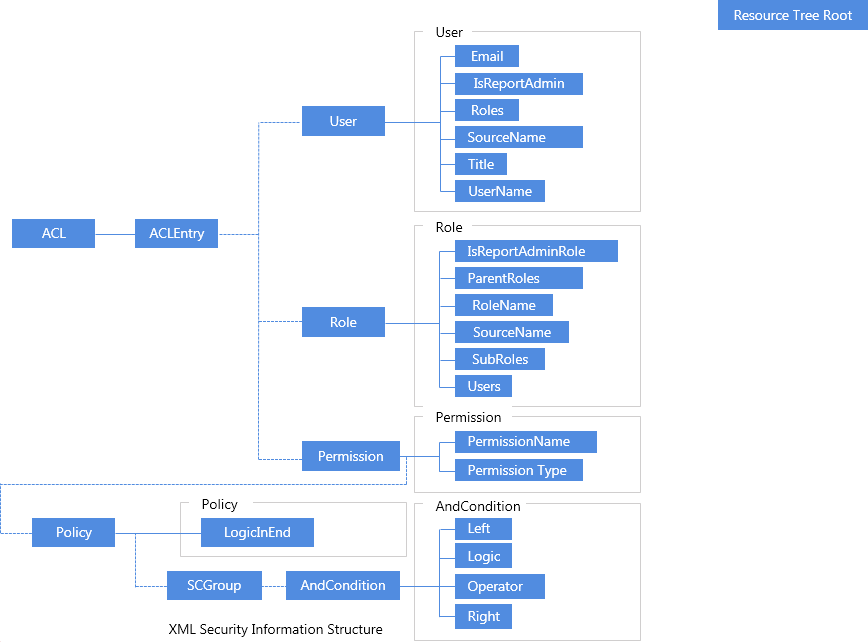
You can create your own XML security information files according to the preceding structure. However, the best way to generate an XML security information file is using the Security dialog box. With this dialog box, you can edit the security information, and then export it to an external XML file.
For example, if you create a simple security policy as follows:
| USER | |
| User Name: | d_d_u1 |
| Belongs to Role: | d_d_r1 |
| Permissions: | (@"Customer ID">=5 AND @"Customer ID"<=10) AND @"YTD Sales"<=65000 |
| ROLE | |
| Role Name: | d_d_r1 |
| Belongs to User: | d_d_u1 |
The corresponding XML code would be:
<
ACL
version
="
1.2
"
xmlns:xsi
="
http://www.w3.org/2001/XMLSchema-instance
"
>
<
ACLEntry
>
<
User
>
<
Roles
>
d_d_r1
</
Roles
>
<
UserName
>
d_d_u1
</
UserName
>
<
SourceName
>
UserDefined
</
SourceName
>
</
User
>
<
Permission
>
<
PermissionType
>
RLS
</
PermissionType
>
<
PermissionName
>
visible
</
PermissionName
>
<
Policy
>
<
SCGroup
>
<
AndCondition
>
<
logic
>
AND
</
logic
>
<
Left
>
@"Customer ID"
</
Left
>
<
operator
>
>
=</
operator
>
<
Right
>
5
</
Right
>
</
AndCondition
>
<
AndCondition
>
<
logic
>
AND
</
logic
>
<
Left
>
@"Customer ID"
</
Left
>
<
operator
>
<
=</
operator
>
<
Right
>
10
</
Right
>
</
AndCondition
>
</
SCGroup
>
<
SCGroup
>
<
AndCondition
>
<
logic
>
End
</
logic
>
<
Left
>
@"YTD Sales"
</
Left
>
<
operator
>
<
=</
operator
>
<
Right
>
65000
</
Right
>
</
AndCondition
>
</
SCGroup
>
</
Policy
>
</
Permission
>
</
ACLEntry
>
<
ACLEntry
>
<
Role
>
<
RoleName
>
d_d_r1
</
RoleName
>
<
Users
>
d_d_u1
</
Users
>
<
SourceName
>
UserDefined
</
SourceName
>
</
Role
>
<
Permission
>
<
PermissionType
>
RLS
</
PermissionType
>
<
PermissionName
>
visible
</
PermissionName
>
<
Policy
>
<
/
Policy
>
</
Permission
>
</
ACLEntry
>
</
ACL
>
Applying Security Entries to Reports
You can apply a security entry to a page report or library component by setting the Security Policy Name property on its datasets. However, because Designer does not support Column Level Security (CLS) on library components at present, you can only get the security entries that do not contain CLS in the value list of library component's Security Policy Name property.
To apply a security entry to a page report or library component
- Navigate to File > Open to open the page report or library component.
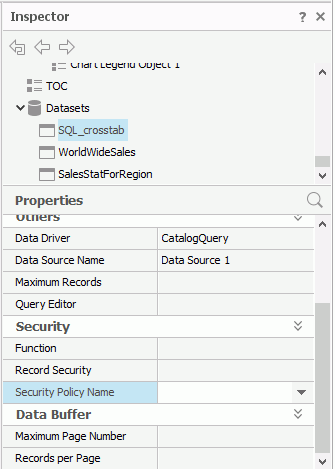
- In the Report Inspector, select the name of a dataset used in the page report or library component under the Datasets node for page report or Data Source node for library component.
- In the Security section of the Properties sheet, select a required security entry for the Security Policy Name property.
- You can repeat the preceding steps to apply security entries to other datasets in the page report or library component.
After you publish the page report or library component to Server, when different users sign in to Server and run it, they see the data they are supposed to see only. However, as Server may not be able to recognize the user-defined users, groups, and roles in a security entry, if your security policy contains such users, groups, or roles, you need to first create them respectively on Server, and then in Designer, synchronize the security information with Server by means of importing security information from Server using the Merge option.
Furthermore, for page reports, you can set and apply the security entries for the primary reports and subreports individually, which results in that different combinations cause different results. The following table shows the relationships between the security policy settings and the viewing results.
| Primary Report | Subreport | Users in Policy | Users NOT in Policy |
|---|---|---|---|
| Ð | Ð | Neither the primary report nor the subreport applies security policy. Users can therefore view all records in both reports. | |
| Ï | Ð | Can view specified records in the primary report and all records in the subreport. | Can view no records in the primary report and all records in the subreport. |
| Ð | Ï | Can view all records in the primary report and specified records in the subreport. | Can view all records in the primary report and no records in the subreport. |
| Ï | Ï | Can view specified records in both the primary report and the subreport. | Can view no records in either the primary report or the subreport. |
Ï - Security policy has been set and applied.
Ð - Security policy has not been set and applied
 Back to top