Previous Topic
Using Customized Controls in Tables
Customized control is a user-defined web action dialog box for performing the sort and filter operations. It works only in page report tables that use query resources. This topic introduces how you can define and manage customized controls in a table.
You can define the size, position, and content of a customized control, trigger it from an object in a page report table, publish the report to Server, then at runtime, users can trigger the customized control which is shown as a dialog box to perform the specified web actions.
In Designer, the report designer can store the definition of a customized control into a file with the extension .wctrl to the customized control library which is the Customized Control folder under the installation root. Server saves customized controls in the database.
Customized controls do not take part in report layout and are not exported in the report output.
This topic contains the following sections:
- Defining a Customized Control in a Table
- Managing Customized Controls
- Sample of Customized Control Content
Defining a Customized Control in a Table
- Right-click a column header label or group-by field as the trigger in a page report table, then select Display Type from the shortcut menu.
- In the Web Behaviors box of the Display Type dialog box, choose a trigger event from the Events column, then select in the Actions column and select the ellipsis
 . Designer displays the Web Action List dialog box.
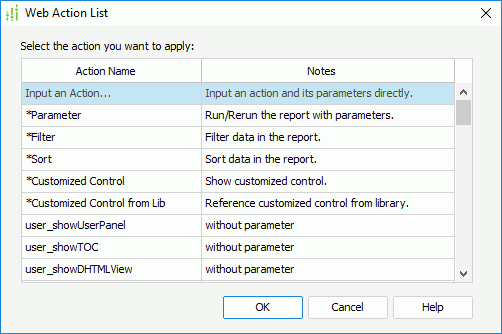
- Select Customized Control to create a customized control, or select Customized Control from Lib to reference a customized control file from the library, and then select OK.
- If you select Customized Control, Designer displays the Customized Control – Web Action Builder dialog box.
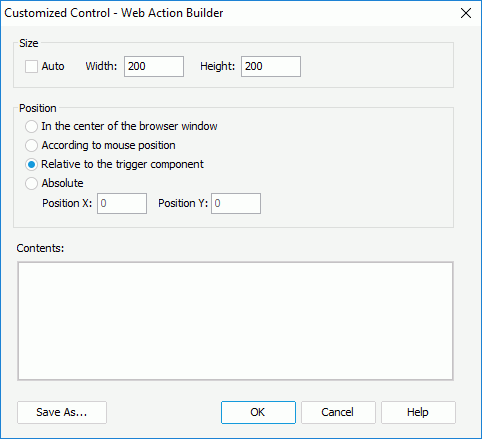
- In the Size box, specify the width and height of the customized control in the browser window at runtime. To automatically size the customized control according to its content, select Auto.
- In the Position box, specify the position of the customized control in the browser window at runtime:
- In the center of the browser window
Select to place the customized control in the center of the browser window at runtime. - According to mouse position
Select to place the customized control where the mouse is selected. The option is useful when the event is concerned with mouse action. - Relative to the trigger component
Select to place the customized control where the trigger object is. - Absolute
Select it and specify the absolute X and Y positions of the customized control in pixels.
- In the center of the browser window
- In the Contents text box, type the HTML fragment with JavaScript code. Select here for a sample.
- To save the customized control definition into a file to the customized control library, select Save As. Then, in the New Customized Control File dialog box, provide the file name and select OK.
- Select OK to create the customized control.
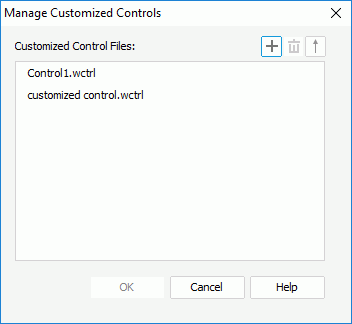
- If you select Customized Control from Lib, Designer displays the Manage Customized Controls dialog box, which lists all the customized control files in the customized control library. Select the one you want and select OK. You should publish the selected customized control file to Server together with the report in order for the customized control to take effect. Select here for more information about how to publish customized control files.
- If you select Customized Control, Designer displays the Customized Control – Web Action Builder dialog box.
- Select OK in the Display Type dialog box to finish defining the customized control.
At runtime, when the specified event occurs on the trigger object in the table, Page Report Studio displays a dialog box based on the customized control definition. Users can use it to perform the defined web actions.
 Back to top
Managing Customized Controls
You can manage the customized control files saved in the customized control library using the Manage Customized Controls dialog box (to open the dialog box, select Report > Manage Customized Controls).
Managements of the customized control files include:
- Creating a new customized control file
Select Add , provide a name to the new file in the New Customized Control File dialog box, then define the customized control in the Customized Control – Web Action Builder dialog box.
 - Editing a customized control file
Right-click the file and select Edit from the shortcut menu, then in the Customized Control – Web Action Builder dialog box, modify the customized control definition. - Renaming a customized control file
Right-click the file and select Rename from the shortcut menu. Type a new name and then select outside the name area to accept the change. - Creating a copy of a customized control file
Right-click the file and select Duplicate from the shortcut menu. Designer creates a copy of the file and lists it in the Customized Control Files box. You can then change the name of the copy file and the definition of the customized control. - Removing a customized control file
Select the file and select Remove , or right-click the file and select Delete from the shortcut menu.
 - Sorting the customized control files
By default, Designer lists the customized control files in the ascending order according to their names in the Customized Control Files box. To change the sort order, select . However, Designer does not remember the descending order after you exit the dialog box. The next time when you access the dialog box, the default sort order is always the ascending order.
Sample of Customized Control Content
The content of a customized control is HTML fragment and should be plain text that is children DOM element of HTML Body. You can use web action APIs in the HTML fragment. For more information about the APIs, see RptComponent.js in the <server_install_root>\public_html\webos\jsvm\src\com\jinfonet\api directory.
For example, the content of a customized control is:
                <style>
#plugin {
background-color: gray;
}

#plugin td {
background-color: white;
}

.item--available {
}

.item--unavailable{
color: #CCCCCC;
}
</style>

<table id="plugin" cellspacing="1px" style="margin:0px;width:100%;height:300px;border:1px solid silver;background-color:;">
<tr style="height:30px;"><td>
<table style="text-align:center;width:100%;background-color:;">
<tr>
<td><button id="btnSortA" onselect="this.doSort('Ascending')">Ascending</button></td>
<td style="border-left:1px solid gray;"><button id="btnSortD" onselect="this.doSort('Descending')">Descending</button></td>
</tr>
</table>
</td></tr>
<tr style="height:25px;"><td style="background-color:#cccccc;padding:3px;">
<input id="searchbox" style="width:85%;margin-right:3px;" type="text" onkeyup="this.search(e)"/>
<div style="width:10px;height:19px;float:right;cursor:pointer;"
onselect="this.clearSearch()">x</div>
</td></tr>
<tr style="height:150px;"><td>
<div id="fc-values" onselect="this.selectValue(e)" style="width:100%;height:150px;overflow:auto;"></div>
</td></tr>
<tr style="height:30px;">
<td style="background-color:#cccccc;"><button onselect="this.doFilter()">Apply</button><button onselect="this.clear()">Clear</button></td>
</tr>
</table>

<script type="text/javascript">

var comp; // Data container

var field; // DBField
var filter;

var _onGetDataContainer = function(msg){
var result = msg.result;

if(result.err == 0){
comp = result.obj.comp;
if(!comp) return;
comp.getAssocDBField(context.dsid, _onGetDBField);
}else{
System.err.println(result.msg);
throw new Error(result.msg);

}
}.$bind(this);

var _onGetDBField = function(msg){
var result = msg.result;
if(result.err == 0){
field = result.obj.field;

// To enable sort
Report.getFilterCtrl(field, comp, _onGetFilterCtrl);
}else{
System.err.println(result.msg);
throw new Error(result.msg);
}
}.$bind(this);

var _onGetFilterCtrl = function(msg){
var result = msg.result;
if(result.err == 0){
filter = result.obj.ctrl;
if(!filter) return;
// To enable filter
_renderValues.call(this, filter);
}else{
System.err.println(result.msg);
throw new Error(result.msg);
}
}.$bind(this);

var _canSort = function(){
var b = !!comp && !!field;
return b ? comp.isSortable() : false;
};

var _canFilter = function(){
var b = !!comp && !!field && !!filter
return b ? comp.isFilterable() : false;
};

var _renderValues = function(filter, values){
var td = document.getElementById("fc-values"),

i, len, val, item, buf, showAll;

showAll = !values;
values = values || filter.getAllValues();
td.innerHTML = "";
var isAll = filter.isAllSelected();
for(i=showAll ? -1:0, len=values.length; i<len; i++){
val = i < 0 ? {disp:"All", real:"__ALL__", selected:isAll, available:true} :
values[i];
item = document.createElement("LI");
item.className = val.available ? "item--available" : "item--unavailable";
buf = ["<input type='check box' id='fc-index-",i,"' "];
buf.push("value=\"", val.real, "\"");
if(val.selected){
buf.push("checked");
}
buf.push("/>", val.disp);
item.innerHTML = buf.join("");
td.appendChild(item);
}
};

this.doSort = function(type){
if(!_canSort()) return;
comp.sort(field, type);
};

this.selectValue = function(e){
e = e || window.event;
var ele = e.srcElement||e.target, key, checked;
if(ele.tagName != "INPUT") return;
key = ele.value;
checked = ele.checked;
if("__ALL__" === key){
filter.selectAll(checked);
 _renderValues.call(this, filter);
}else{
filter.select(key, checked);

// The element for "All" should be updated checked status.
ele = document.getElementById("fc-index--1");
if(filter.isAllSelected()){
ele.checked = true;
}else{
ele.checked = false;

}
}
};

this.doFilter = function(){
if(!_canFilter()) return;
filter.applyFilter();
this.hide();
};

this.clear = function(){
if(!filter) return;
filter.clearSelects();
 _renderValues.call(this, filter);
};


this.search = function(e){
if(!filter) return;
e = e || window.event;
var ele = e.srcElement||e.target, value = ele.value, values;
if(value){
values = filter.search(value);
}
 _renderValues.call(this, filter, values);
};

this.clearSearch = function(){
document.getElementById("searchbox").value="";
if(!filter) return;
_renderValues.call(this, filter);
};

Report.getDataContainerBy(context.dsid, _onGetDataContainer);

</script>
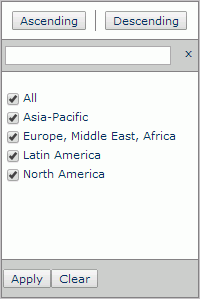
Suppose that the trigger object is a group-by field "Region". At runtime, the customized control dialog box displays as follows: