 Previous Topic
Grouping Data in Tables
Data in a table is usually organized into groups based on certain criteria. You can define multilevel groups in your table either when creating it or after you have generated the table. This topic introduces how you can add groups in a table and use the Group Data feature.
This topic contains the following sections:
- Adding Groups in a Table
- Setting the Sort Manner of Groups in a Table
- Specifying Select N Conditions in a Table
- Applying Special Function to Groups in a Table
- Filtering Groups in a Table
Adding Groups in a Table
- When creating or editing a table with the table wizard, select the Group screen (for a summary table in a web report and library component, the Columns screen).
For a table in a page report, you can also navigate to Insert > Group to add groups in the table. The following shows a sample UI.
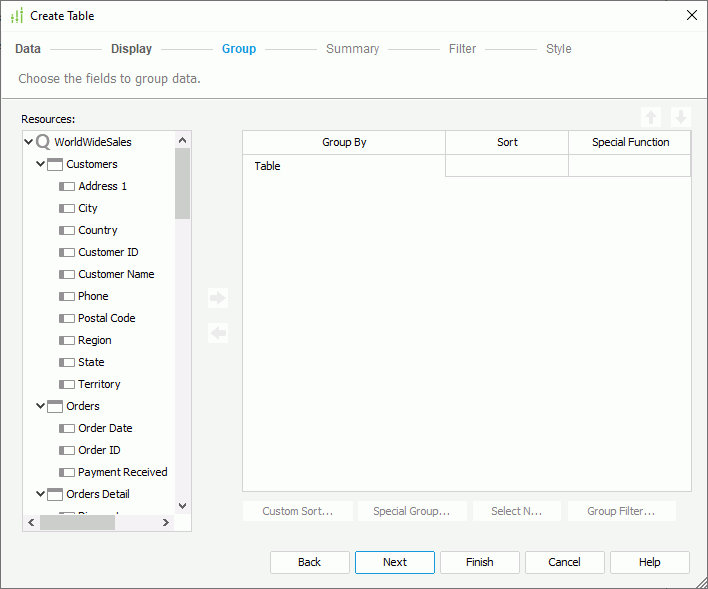
- Specify the position of the new group by selecting Table or an existing group in the right box, then:
- For a table using a business view, select a group object in the business view as the group-by field in the Resources box and select Add
 or drag the object from the Resources box to the right box. You can also use a dynamic formula used as Group that you have created for the business view in the current report as the group-by field.
 - For a table using a query resource, select a DBField in the query resource, or a formula or parameter valid to these DBFields in the current catalog as the group-by field in the Resources box and select Add or drag the field from the Resources box to the right box. For the usage about parameters as group-by fields, see Grouping Data Dynamically.
- For a table using a business view, select a group object in the business view as the group-by field in the Resources box and select Add
- In the Sort column, set the sort manner of groups at this group level.
- Specify the Select N condition for groups at this group level.
- If the table uses a query resource, you can also specify the following:
- When the group-by field is Numeric/String/Date/Time type, you can select a special function for it in the Special Function drop-down list.
- If you want to filter groups at a group level, select the group level and select Group Filter to specify the filter conditions.
- Repeat the preceding steps to add more groups. To remove a group, select it and select Remove
 or drag it to the Resources box.
 - You can adjust the group levels by selecting a group and then selecting Move Up
 or Move Down
  .
. - Select Finish to apply the settings.
Designer displays one or more GH-GF (group header and group footer) row pairs with the selected group-by fields in the table.
You can also add groups to a table by means of inserting group columns in the table.
 You cannot group the following SQL type of data: Db.SQL_BINARY, Db.SQL_BLOB, Db.SQL_CLOB, Db.SQL_LONGVARCHAR, Db.SQL_LONGVARBINARY, Db.SQL_VARBINARY, and Db.SQL_OTHER.
 Back to top
Setting the Sort Manner of Groups in a Table
After you add a group, you need to specify how you want to sort groups at this group level.
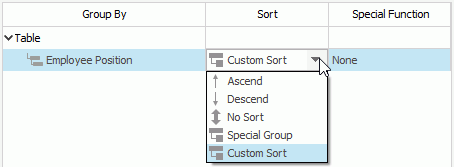
Ascend
Select to sort the groups in ascending order.
Descend
Select to sort the groups in descending order.
No Sort
Select to arrange the groups in their original order.
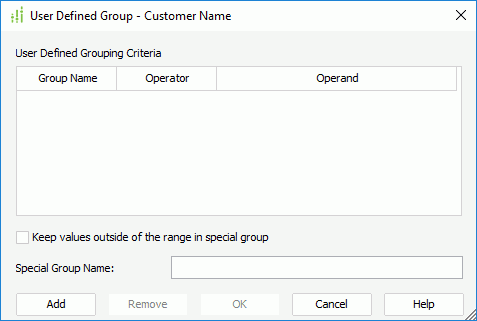
This option is only available to tables that use query resources. Select it and Designer displays the User Defined Group dialog box for you to define how to group your information.
Select it and Designer displays the Custom Sort dialog box for you to define how to sort the groups at current group level. You can specify some fields in the dialog box as the sort-by fields, then Designer sorts the groups by the values of the first record in each group on the related fields.
Example: Applying Custom Group Sort in a Table
Suppose that you have created a table of Group Above type in a page report in the catalog SampleReports.cat saved in <install_root>\Demo\Reports\SampleReports. The table uses the query EmployeeInformation in Data Source 1 of the catalog, displays Name, Hire Date, Employee Position, and Notes, is grouped by Assigned Region in Descend order, and applies the LogiReportDemo style.
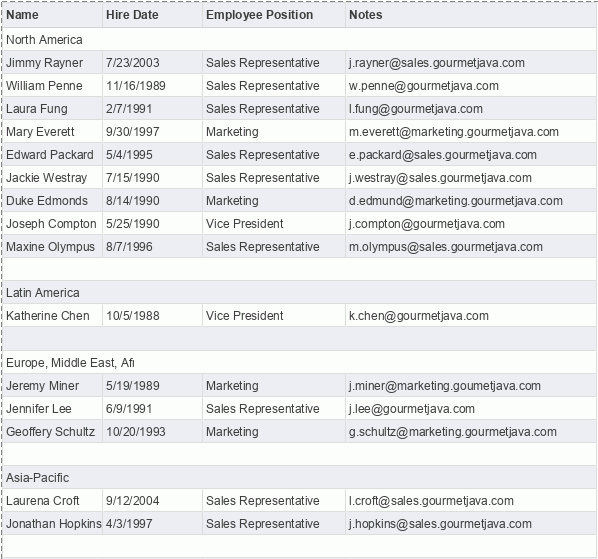
Now you want to sort the groups based on the hire date information. You can specify the sort manner as follows:
- Right-click the table and select Table Wizard from the shortcut menu. Designer displays the Table Wizard dialog box.
- In the Group screen, select Custom Sort from the drop-down list in the Sort column for the group-by field Assigned Region.
- In the Custom Sort dialog box, add the field Hire Date as the sort-by field for the group, keep the default sort order Ascend, then select OK.
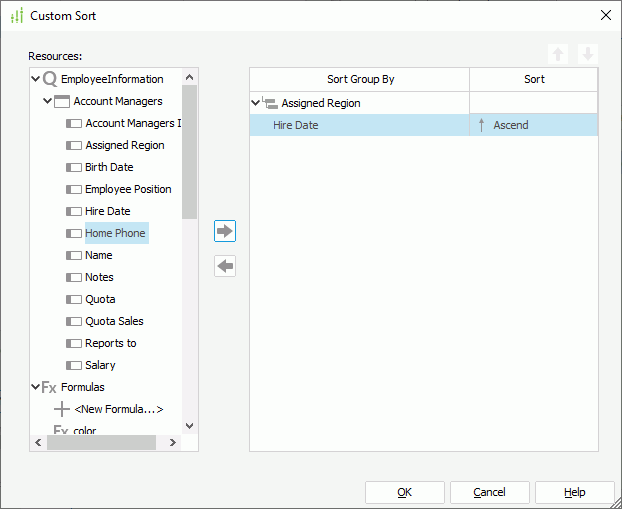
- Select Finish in the Table Wizard dialog box to apply the settings.
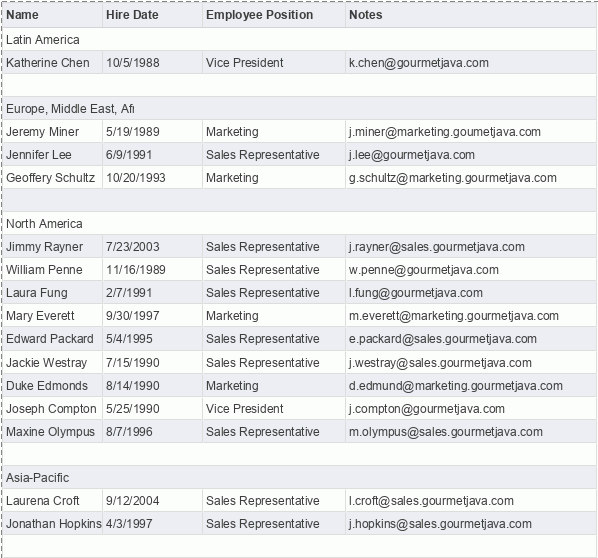
- Select the View tab to preview the table. You can find that the groups are sorted based on their first record's Hire Date values.
Specifying Select N Conditions in a Table
Sometimes, you may want to show data from a range in a group or some groups. To achieve this, you can use the Select N feature. By specifying a Select N condition, you can decide how many records or groups you want to display. You can also use an Integer parameter to control the value of Select N.
- To display the top or bottom N records in a table
- In the Group screen of the table wizard, select the Table node in the right box, then select Select N.
- In the Select N dialog box, you can see the text "The whole object" in the In text box.
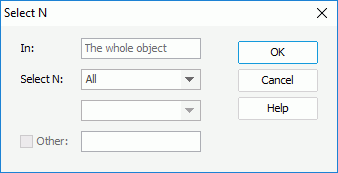
- Designer selects All in the Select N drop-down list by default, which means to display all the records in the table. Select Top N or Bottom N, then specify a number or an Integer-typed parameter in the current catalog to define the Top/Bottom N condition dynamically. Supposing the number or the value you specify for the parameter is N, when you preview the table, Designer only retrieves the first or last N records in the whole table.
- Select OK to go back to the table wizard.
- Select Finish in the table wizard to apply the settings.
- To display the top or bottom N groups in certain group level of a table
- In the Group screen of the table wizard, select the group-by field in the right box, and then select Select N.
- In the Select N dialog box, Designer displays the name of the group-by field that you have just selected in the In text box.
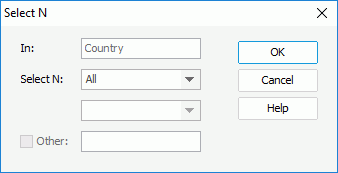
- Designer selects All in the Select N drop-down list by default, which means to display all the groups of this group level in the table. Select Top N or Bottom N, then specify a number or an Integer-typed parameter to retrieve the first or last N groups in the group level.
- To display all the other groups of this group level that do not match the Select N condition in an additional group (these groups are hidden by default), select the Other box and type a name for the additional group.
- Select OK to go back to the table wizard.
- Select Finish in the table wizard to apply the settings.
- The Select N conditions for the whole data component and each group are not mutually exclusive, so you can set them individually.
- If you use an Integer-typed parameter to define the Top/Bottom N condition dynamically, you should make sure that the parameter has at least one default value that is larger than 0; otherwise, users will get exceptions at runtime.
Example: Applying Select N Conditions in a Table
Based on the table result in the previous example, we set two Select N conditions in the table, one for the whole table and the other for the groups in the table.
- Right-click the table and select Table Wizard from the shortcut menu. Designer displays the Table Wizard dialog box.
- In the Group screen, select the Table node in the right box, and then select Select N.
- In the Select N dialog box, select Top N from the Select N drop-down list and type 2 in the combo box, then select OK.
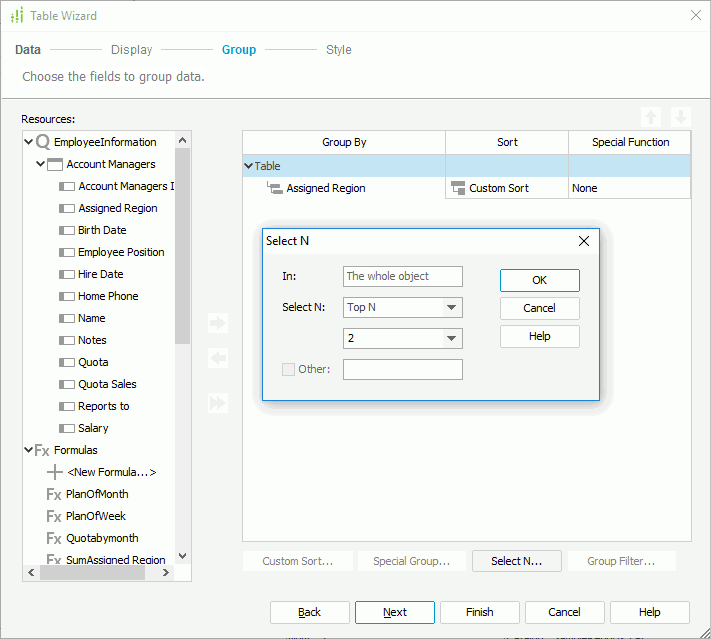
- In the Table Wizard dialog box, select the group-by field Assigned Region and select Select N again.
- In the Select N dialog box, select Top N, type 2, select Other and type Others in the text box, then select OK.
- Select Finish in the Table Wizard dialog box to accept all settings.
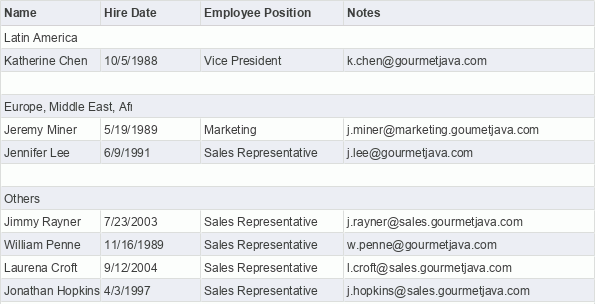
- Preview the table again. The table now displays only the first 2 records in each group (the group Latin America has only one record), shows the first 2 groups (Latin America and Europe, Middle East, Africa), and combines the records in the rest group into an additional "Others" group.
Applying Special Function to Groups in a Table
When a group-by field is Numeric, String, or Date/Time type, you can select a special function for it in the Special Function column. This is called "grouping data by intervals" in Report. It enables you to group data more clearly and logically, and to summarize data more effectively.
You can group data by intervals only in page reports that use query resources.
Special Functions for Numeric Type
| Function | Description |
|---|---|
| None | Displays all the records that have the same field value together as a group. |
| Up to 5 | Groups the records by intervals of 5. |
| Up to 10 | Groups the records by intervals of 10. |
| Up to 50 | Groups the records by intervals of 50. |
| Up to 100 | Groups the records by intervals of 100. |
| Up to 500 | Groups the records by intervals of 500. |
| Up to 1000 | Groups the records by intervals of 1000. |
| Up to 5000 | Groups the records by intervals of 5000. |
| Up to 10000 | Groups the records by intervals of 10000. |
Special Functions for String Type
| Function | Description |
|---|---|
| None | Displays all the records that have the same field value together as a group. |
| For 1st letter | Groups the records, of which the field values' first letter is the same together. |
| For first 2 letters | Groups the records, of which the field values' first two letters are the same together. |
| For first 3 letters | Groups the records, of which the field values' first three letters are the same together. |
| For first 4 letters | Groups the records, of which the field values' first four letters are the same together. |
| For first 5 letters | Groups the records, of which the field values' first five letters are the same together. |
| For last 1 letter | Groups the records, of which the field values' last letter is the same together. |
| For last 2 letters | Groups the records, of which the field values' last two letters are the same together. |
| For last 3 letters | Groups the records, of which the field values' last three letters are the same together. |
| For last 4 letters | Groups the records, of which the field values' last four letters are the same together. |
| For last 5 letters | Groups the records, of which the field values' last five letters are the same together. |
Special Functions for Date/Time Type
| Function | Description |
|---|---|
| None | Displays all the records that have the same field value together as a group. |
| For each second | Groups the records, of which the field values are in the same second together. |
| For each minute | Groups the records, of which the field values are in the same minute together. |
| For each hour | Groups the records, of which the field values are in the same hour together. |
| For each day | Groups the records, of which the field values are in the same day together. |
| For each week | Groups the records, of which the field values are in the same week together. |
| For each bi-week | Groups the records, of which the field values are in the same bi-week together. |
| For each half month | Groups the records, of which the field values are in the same half month together. |
| For each month | Groups the records, of which the field values are in the same month together. |
| For each quarter | Groups the records, of which the field values are in the same quarter together. |
| For each half year | Groups the records, of which the field values are in the same half year together. |
| For each year | Groups the records, of which the field values are in the same year together. |
Customized Special Function
In the special function list for all the preceding data types, Designer provides the Customize option. You can select it to define a special function by yourself.
To customize a special function for Numeric group-by field
- Select a group-by field of the Numeric type and then select Customize in the Special Function drop-down list. Designer displays the Customized Function dialog box.
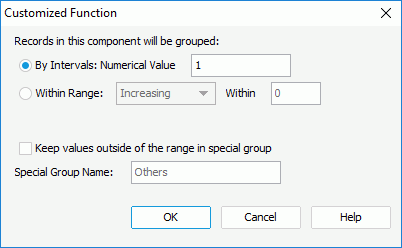
- Specify how you want to group the data.
- To group data by intervals, select By Intervals, then define the interval in the Numerical Value text box.
- To group data by a range, select Within Range, specify the range in the Within text box and select how to apply the range: to increasing data or decreasing data.
- Select Keep values outside of the range in special group if you want to put values that do not fall within the specified intervals or range in a new special group, and then type a name for the special group in the Special Group Name text box.
- Select OK to save the settings.
When grouping Numeric data by intervals, Designer follows this rule: all values in each range are >= the minimum value in the range and < the maximum value in the range, and 0 is the offset for the intervals.
For example, if you specify to group the following values by intervals of 5: -8, -6, -5, -3, -1, 0, 1, 3, 4, 5, 8, the result is:
| Ranges | Values |
|---|---|
| -10 to -5 | -8, -6 |
| -5 to 0 | -5, -3, -1 |
| 0 to 5 | 0, 1, 3, 4 |
| 5 to 10 | 5, 8 |
To customize a special function for String group-by field
- Select a group-by field of the String type and then select Customize in the Special Function drop-down list to display the Customized Function dialog box.
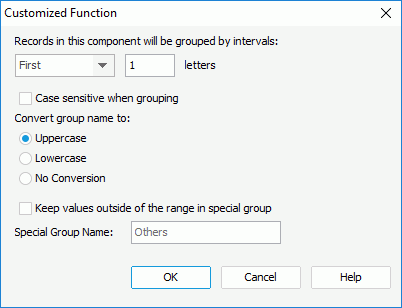
- Specify the group intervals. For example, to group records by the first N letters of the group-by field values, select First from the drop-down list and then type N in the text box. The number of the letters should be an integer no larger than 255.
- If you want to distinguish between uppercase and lowercase characters when grouping, select Case sensitive when grouping; otherwise, select in which way you want to convert the group names: Uppercase, Lowercase, or No Conversion.
If you select "Case sensitive when grouping", Designer selects "No Conversion" as the default conversion method.
- Select Keep values outside of the range in special group if you want to put values that do not fall within the specified intervals in a new special group, and then type a name for the special group in the Special Group Name text box.
- Select OK to save the settings.
To customize a special function for Date/Time group-by field
- Select a group-by field of the Date/Time type and then select Customize in the Special Function drop-down list to display the Customized Function dialog box.
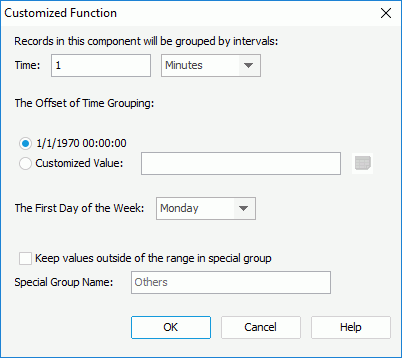
- Specify the group intervals by inputting a value in the Time text box and then selecting the required time unit from the drop-down list: second, minute, hour, day, week, month, quarter, half year, or year.
- Specify the offset with which you want to group the data. By default, Report takes "1/1/1970 00:00:00" as the offset. If you want to define the offset by yourself, select Customized Value and then select the calendar
 to choose the required offset from the calendar.
 - Specify which day you want to use as the first day of a week.
- Select Keep values outside of the range in special group if you want to put values that do not fall within the specified intervals in a new special group, and then type a name for the special group in the Special Group Name text box.
- Select OK to save the settings.
Filtering Groups in a Table
By applying a filter condition to the groups, you can specify the groups you want to display: if a group satisfies the filter condition, you can get all records in this group; if a group doesn't satisfy the condition, the whole group does not display.
You can apply the Group Filter feature to query-based page reports only.
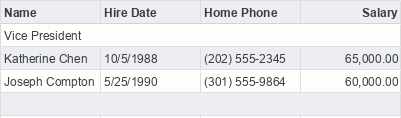
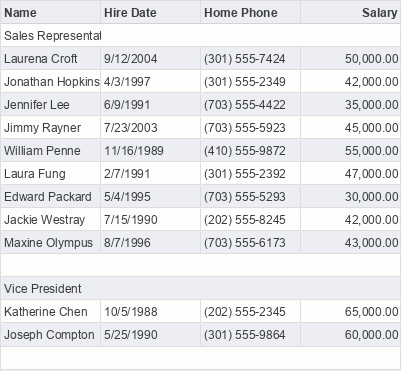
Suppose that you have created a table of Group Above type in a page report in the catalog SampleReports.cat saved in <install_root>\Demo\Reports\SampleReports. The table uses the query EmployeeInformation in Data Source 1 of the catalog, displays Name, Hire Date, Home Phone, and Salary, is grouped by Employee Position in Ascend order, and applies the LogiReportDemo style. Since you do not set any group filter condition, there are three groups in the table: Marketing, Sales Representative, and Vice President.
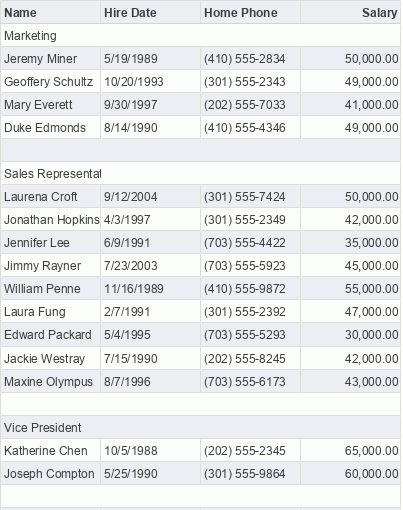
Example 1: Showing groups where the lowest employee salary is less than 50000
- Right-click the table and select Table Wizard from the shortcut menu. Designer displays the Table Wizard dialog box.
- In the Group screen, select the group-by field Employee Position and Designer enables the Group Filter button. Select the button to display the Group Filter dialog box.
- Specify the following information in the dialog box.
Logic Function Field Name (before Occurs With) Field Name (after Occurs With) Operator Value More Cleared Min Salary Salary < 50000 End 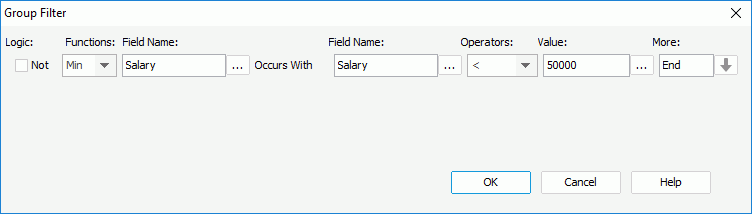
- Select OK to close the dialog box, and then select Finish in the Table Wizard dialog box to apply the settings.
- Select the View tab to preview the tab. The table only shows the two groups: Marketing and Sales Representative. The Vice President group that does not fit this condition is ignored.
Example 2: Showing groups in which the highest-salary employee was hired before Jan. 1, 1989
In this example, you need to set the Group Filter dialog box as follows:
| Logic | Function | Field Name (before Occurs With) | Field Name (after Occurs With) | Operator | Value | More |
|---|---|---|---|---|---|---|
| Cleared | Max | Salary | Hire Date | < | 1989-01-01 00:00:00.000 | End |
When you preview the table, it displays the Vice President group only.
Example 3: Showing groups where at least one "not highest" employee salary is larger than or equal to 50000
In this example, you need to set the Group Filter dialog box as follows:
| Logic | Function | Field Name (before Occurs With) | Field Name (after Occurs With) | Operator | Value | More |
|---|---|---|---|---|---|---|
| Selected | Max | Salary | Salary | > | 50000 | End |
When you preview the table, it shows the two groups: Sales Representative and Vice President.
- In the Value text box of the Group Filter dialog box, you can specify a constant or parameter.
- For String type constants, you can type the string without quotation marks; for Date/Time type constants, you have to follow the Date/Time format specified in the Date Format tab of the Get JDBC Connection Information dialog box.
- You should make sure that the report contains at least one record; otherwise, Designer throws out an error message.