 Previous Topic
Get JDBC Connection Information Dialog Box
You can use the Get JDBC Connection Information dialog box to create or edit a JDBC or Hive connection. This topic describes the options in the dialog box.
Designer displays the Get JDBC Connection Information dialog box when you do one of the following:
- Select JDBC or Hive and select OK in the New Data Source dialog box.
- In the Catalog Manager, right-click a data source and select New JDBC Connection or New Hive Connection from the shortcut menu, then select JDBC in the Select Connection Type dialog box.
- In the Catalog Manager, right-click a data source and select New Hive Connection from the shortcut menu.
- In the Catalog Manager, right-click an existing JDBC or Hive connection and select Edit Connection from the shortcut menu.
- Select OK in the Create Connection dialog box.
- In the Page Report Manager, right-click the root folder Reports and select Export on the shortcut menu.
- In the Publish to Report Server dialog box, select a catalog in the resource box, select More Options, then in the Connection tab, select a JDBC connection and select Modify.
- In the Choose JDBC Connection dialog box, select <Add JDBC Connection...> from the connection drop-down list and select OK.

Designer displays these options:
Connection List
This drop-down list contains the connection information that you previously added. The format of the connection information is:
JDBC URL/(JDBC Driver Name)
For example:
jdbc:oracle:thin:@192.168.1.1:OracleDB(oracle.jdbc.driver.OracleDriver)
Designer fills in the JDBC URL and driver name in the corresponding text boxes after you choose one of the connection items from the Connection List.
Use ODBC Data Source
Select to use an ODBC data source for the connection.
- DSN Name
Specify the name for the ODBC data source.
Use Connection Pool
Select to connect the database through a WebLogic connection pool.
Driver
Designer selects this option by default and disables it if you select Use ODBC Data Source or Use Connection Pool. Here you should type the JDBC driver class name such as oracle.jdbc.driver.OracleDriver which you want to use for this connection; otherwise, Designer tries all the JDBC drivers that you have added in the file jdbcdrivers.properties in <install_root>\bin for the JDBC URL you provide, when it tries to set up a database connection. That is to say, you can also add names of the JDBC drivers into that property file.
URL
Specify the valid JDBC URL which can establish a connection to the database.
User
Specify the user name for connecting to the database.
Password
Specify the password for connecting to the database.
 Designer disables all the preceding options when you use the dialog box for editing an existing connection in the Catalog Manager.
Test Connection
Designer displays this button when you use the dialog box for creating a connection. You can select it to test whether the specified connection information can connect to the database successfully.
More Options/Less Options
Select to show or hide the options for configuring the connection to meet the special requirements of the database.
OK
Select to apply your settings and close the dialog box.
Cancel
Select to close the dialog box without saving any changes.
Help
Select to view information about the dialog box.
Options
Experienced users can configure the JDBC or Hive connection to meet the special requirements of the database in the following tabs:
Qualifier Tab
Use this tab to specify the qualifier options for the connection.
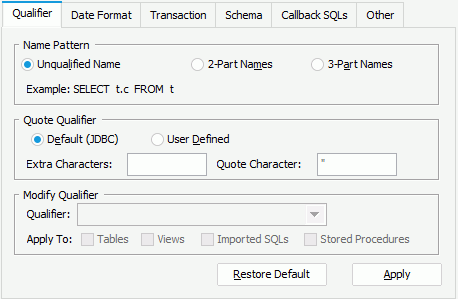
You can specify whether to use catalog or schema in data manipulation in this box.
- Unqualified Name
Select to include neither catalog nor schema in data manipulation. If you add a table or view from a different schema, you can create queries on it and use the queries to build reports, but when you run the reports, the table or view applies the default schema and you get an error that the table or view does not exist.Example: SELECT t.c FROM t
- 2-Part Names
Select to use schema in data manipulation. If you want to use tables and views from more than one schema, you must use 2 part or 3 part names.Example: SELECT schema.t.c FROM schema.t
- 3-Part Names
Select to use both catalog and schema in data manipulation.Example: SELECT catalog.schema.t.c from catalog.schema.t
This is very useful when you want to build reports that get data from more than one catalog and/or schema. If you only use an unqualified name, the SQL statement that Designer generates does not contain the catalog and schema name, and therefore Designer may not be able to find the table or view in the default schema and/or catalog.
Quote Qualifier
You can specify the characters, and then the qualifier name which contains the characters that you do not want to quote in this box. In Designer, you need to quote with the character defined by the database. The default character is double quotation marks (" ").
- Default (JDBC)
Select to get the extra name characters from JDBC. - User Defined
Select to modify the quote character according to the database system.- Extra Characters
Specify the extra characters for identifier names. - Quote Character
Specify the quote character.
- Extra Characters
Modify Qualifier
You can edit the current qualifier in this box.
- Qualifier
This drop-down list contains all the available qualifiers. You can change the current qualifier by selecting one from the drop-down list. The default value is the first one in the list. If the database dose not support qualifier, Designer does not display the drop-down list, and you cannot type the qualifier name. - Apply To
Specify to which data resources to apply the modified qualifier.- Tables
Select to apply the modified qualifier to all tables in the connection. - Views
Select to apply the modified qualifier to all views in the connection. - Imported SQLs
Select to apply the modified qualifier to all imported SQLs in the connection - Stored Procedures
Select to apply the modified qualifier to all stored procedures in the connection.
- Tables
Designer does not record the changes that you make in the Modify Qualifier box, meaning, if you change any value in the box and apply it, when you open the dialog box the next time, Designer displays its original value.
Restore Default
Select to restore the values in the tab to their defaults.
Apply
Select to accept the changes.
Date Format Tab
Different database systems use different formats for Boolean, Date, and Time values. You can use the Date Format tab to specify the format, so when Designer sends the SQL statement including parameters of the data type, they can be correctly translated into the format of your database system. For example, in an Oracle database, the default Date format is "dd-MMM-yy", while in a MySQL database system, it is "yyyy-MM-dd". Thus, you need to modify the Date format for the connection accordingly, so that the Designer generated SQL statements can function correctly with the database.
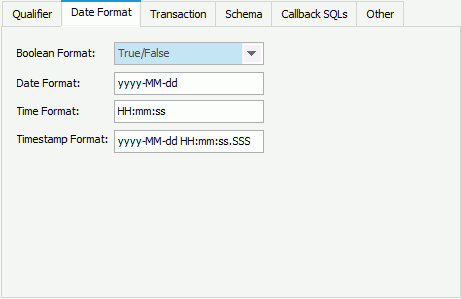
Boolean Format
Select the default format for Boolean type data in the connection.
Date Format
Specify the default format for Date type data in the connection.
Time Format
Specify the default format for Time type data in the connection.
Timestamp Format
Specify the default format for Timestamp type data in the connection.
| Symbol | Meaning | Presentation |
|---|---|---|
| y | year | Number |
| M | month | Number |
| d | day in month | Number |
| H | hour in day (0~23) | Number |
| h | hour in am/pm (1~12) | Number |
| m | minute in hour | Number |
| s | second in minute | Number |
| S | millisecond | Number |
The Date and Time formats Report supports follows that of Java. For more information, refer to the java.text package DateFormat interface in the Java API Specification.
Transaction Tab
Use this tab to specify the transaction options for the connection.
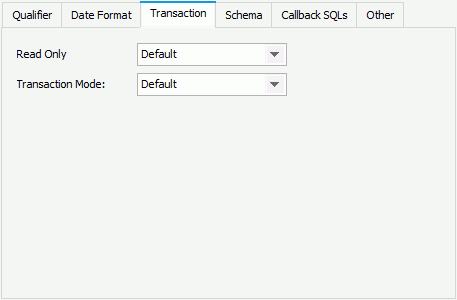
Select the mode to open the connection to the JDBC database. The initial setting is "Default" which uses the mode specified by the database administrator which could be "Read Only" or "Read & Write".
- Default
Select to apply the default setting of the database, which can be "Read & Write" or "Read Only". - Read Only
Select to allow users to access the database in read-only mode. This allows the driver to optimize performance for reporting which does not need to write to the database. - Read & Write
Select to allow users to access the database in read-write mode. This opens the database with updates enabled which requires more processing to ensure concurrency control.
Select the transaction mode for the connection.
- Default
Select to apply the setting from the database. - None
Select to not use transactions in the connection. - Read Uncommitted
Select to allow dirty reads, non-repeatable reads, and phantom reads to occur in the connection. This mode can speed up the transaction of the connection. If you select this mode, transactions are not isolated from each other. When the database supports other transaction isolation levels, it ignores whatever mechanism is used to implement those levels, so that they do not adversely affect other transactions. Transactions running at the Read Uncommitted level are usually read-only. When you set the Read Only option and select the Transaction Isolation option of "Read Uncommitted", it provides faster access to the data. However, if a database transaction is rolled back, the read retrieves an invalid row and results in an inaccurate report.
 - Read Committed
Select to prevent dirty reads, and allow non-repeatable reads and phantom reads to occur in the connection. If you select this mode, when one transaction is reading, updating, or deleting a row, other transactions cannot update or delete it until this transaction has been committed or rolled back. - Repeatable Read
Select to prevent dirty reads and non-repeatable reads, and allow phantom reads to occur in the connection. If you select this mode, when one transaction is updating, deleting several rows, or inserting new rows into them, other transactions cannot also update or delete these rows, until this transaction has been committed or rolled back. - Serializable
Select to prevent dirty reads, non-repeatable reads, and phantom reads in the connection. If you select this mode, when one transaction is updating, deleting several rows, or inserting new rows into them, other transactions cannot update, delete these rows, or insert any new rows into these rows, until this transaction has been committed or rolled back.
Schema Tab
Use this tab to specify the schema options for the connection.
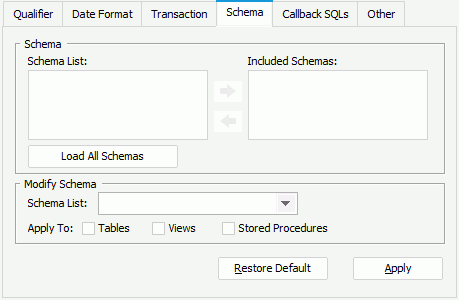
Schema
You can choose the required schemas and show them in the Add Tables/Views/Synonyms dialog box in this box.
- Schema List
This box lists the schemas for you to choose. - Included Schemas
This box shows the schemas that you select. -
 Add button
Select to add the specified schemas to the Included Schemas box. -
 Remove button
Select to remove the specified schemas from the Included Schemas box. - Load All Schemas
Select to show all the schemas in database.
You can modify the current schema in this box.
- Schema List
This drop-down list contains all the available schemas. You can change the current schema by selecting one from the drop-down list. - Apply To
Specify to which data resources to apply the modified schema.- Tables
Select to apply the specified schema to all tables in the connection. - Views
Select to apply the specified schema to all views in the connection. - Stored Procedures
Select to apply the specified schema to all stored procedures in the connection.
- Tables
Designer does not record the changes that you make in the Modify Schema box, meaning, if you change any value in the box and apply it, when you open the dialog box the next time, Designer displays its original value.
Restore Default
Select to restore the values in the tab to their defaults.
Apply
Select to accept the changes.
Callback SQLs Tab
You can add a group of SQL statements that you want Report to execute right after you create the connection. Callback SQLs enable you to configure the session context before running the queries to fetch data for reports.
Different DBMSs provide different APIs to configure sessions. For example, when you are connecting to an Oracle database, you can use the DBMS_SESSION.SET_CONTEXT procedure in a user-designated package to set or reset attributes of the session context, and then add SQL statements in the Callback SQLs tab to call the procedure. You can reference parameters, constant level formulas, and the User Name special field in callback SQL statements as you reference them in import SQL statements.
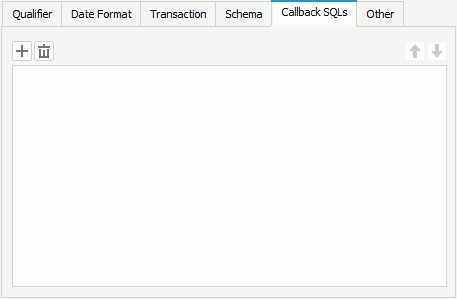
 Add button
Select to add a new line to edit the SQL statement.
 Remove button
Select to delete the specified SQL statement.
 Move Up button
Select to move the specified SQL statement to a higher position. Report executes the SQL statements one by one in the sequence.
 Move Down button
Select to move the specified SQL statement to a lower position.
Other Tab
When you use parameters to build queries, there may be special characters in the parameter values like a back slash (\), and you would like Designer to interpret them literally, rather than as a special character. In this case, you can replace the special characters with another string according to your database, for example, for an MySQL database, use "\\" to represent "\". You can specify these settings in the Other tab.
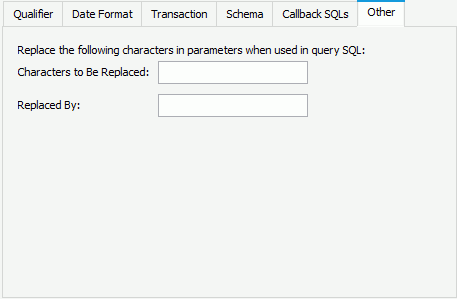
Characters to Be Replaced
Specify the characters that need to be replaced in parameter values when Designer passes the parameter values to queries.
Replaced By
Specify the characters to replace with.
 Back to top