Using Stored Procedures
This topic provides a brief introduction about using stored procedures in Designer, and describes how you can add stored procedures into a catalog via the JDBC connections you have set up and work with them in the catalog.
This topic contains the following sections:
- Knowing Stored Procedures
- Adding Stored Procedures to a Catalog
- Editing Parameter Values
- Updating Stored Procedures
- Converting the Data in Stored Procedures
Knowing Stored Procedures
A stored procedure is a compiled program, consisting of one or more statements and is saved into a database. The statement in a stored procedure can be an SQL statement or a control flow statement, such as an If-else statement or a Loop statement. A stored procedure is stored in the database, so that it can be called locally or remotely. In addition, a stored procedure can return a value, single result set or multiple result sets. Currently, Report supports stored procedures that return a single result set. If a stored procedure returns more than one result set, Report uses the first one.
As a program, a stored procedure can take parameters. There are three types of parameters: IN, OUT, and INOUT. The IN parameter lets you pass values to the procedure. The OUT parameter returns values to the caller. The INOUT parameter enables you to pass initial values to the procedure, and then returns the updated value to the caller.
You can use a stored procedure to create page reports directly, and in this sense a stored procedure functions the same as a query. Therefore, you can use the Data Manager to control the data retrieval of stored procedures and create cached result files for stored procedures the same as you do for queries. You can also use stored procedures to build queries and business views.
However, due to the unique nature of Oracle stored procedures and EnterpriseDB stored procedures, you are unable to add them directly into a catalog. As an alternative, Report has developed the User Data Source API which can use a stored procedure in Oracle or EnterpriseDB. For more information, see Oracle Stored Procedure UDS and EnterpriseDB Stored Procedure UDS. Report already includes these user data source classes so you do not need to write any Java code yourself to use them.
![]() Not all stored procedures can return data usable by Designer. The stored procedure needs to return a result set.
Not all stored procedures can return data usable by Designer. The stored procedure needs to return a result set.
Adding Stored Procedures to a Catalog
To add procedures stored in the database to a catalog via a JDBC connection, take the following steps:
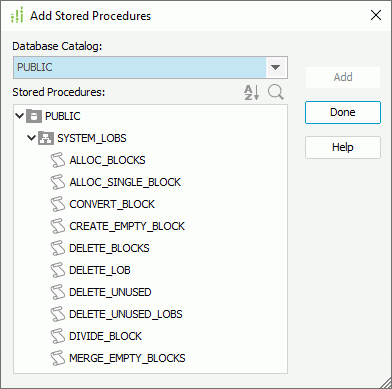
- In the Catalog Manager resource tree, right-click the JDBC connection node and select Add Stored Procedure on the shortcut menu. Designer displays the Add Stored Procedures dialog box.

- From the Database Catalog drop-down list, select the catalog in the database which contains the stored procedures you need.
- The Stored Procedures box lists all the stored procedures in the selected database catalog in a three-level tree. The top level is SQL-catalog, the second is SQL-schema, and the last level are stored procedures. Select the required stored procedures and select Add to add them to the catalog.
 Not all databases support stored procedures. In this case, you may see nothing in the Stored Procedures box.
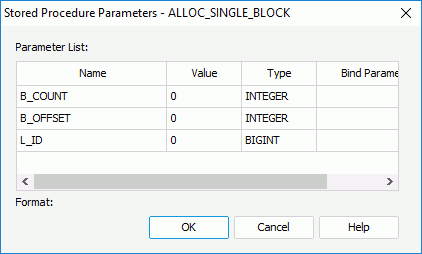
 - If any of the selected procedures contain parameters, Designer displays the Stored Procedure Parameters dialog box for you to specify the required values. Designer saves these values inside the stored procedure object, and uses them as the default values when executing this procedure. You can edit the stored procedure parameters at any time.
- Select Done to close the dialog box.
After you have added a stored procedure into a catalog, Designer in turn performs the following:
- Retrieving the stored procedure's information from the database via JDBC.
- Prompting you to provide the values of the IN and INOUT parameters if the stored procedure has them.
- Executing the stored procedure once in order to get the result set.
- Creating the field objects of the procedure object according to the result set returned.
You can then use the field objects to design reports.
![]() When adding a stored procedure, you may get the following error:
When adding a stored procedure, you may get the following error:
[DBS-B]Could not find stored procedure 'test1;1'.
This is because test;1 becomes quoted when Designer finds the semicolon in it. To remove the quotation marks, you need to modify your connection information as follows:
- Right-click your JDBC connection and select Edit Connection from the shortcut menu. Designer displays the Get JDBC Connection Information dialog box.
- Select the Qualified tab, then in the Quote Qualifier box, select User Defined and remove all the characters from the Extra Characters and Quote Character text boxes.
- Select OK to confirm the settings.
Editing Parameter Values
When you add a stored procedure that contains parameters, Designer prompts you to specify values for its parameters. Designer saves these values inside the stored procedure object in the catalog, and uses them as the default values when executing the stored procedure. You can edit stored procedure parameters at any time. Also, the IN type parameters of a stored procedure is available for use the same as any other Report parameters.
To edit the parameter values of a stored procedure
- Right-click the stored procedure and select Parameters on the shortcut menu. Designer displays the Stored Procedure Parameters dialog box.

- The dialog box lists all the IN and INOUT parameters in the stored procedure. Double-click the Value cell to edit the value of each parameter.
- Double-click the Bind Parameter Name cell to bind the IN and INOUT parameters in the stored procedure to the existing parameters or constant level formulas of the same type predefined in the catalog data source in which you have created the JDBC connection, or to the User Name special field (to bind to a parameter or formula, type the name of the parameter or formula in the cell; to bind to the User Name special field, type username in the cell). By default, the bound parameter is the one with the same name of the IN/INOUT parameter that Designer automatically creates when you add the stored procedure.
- Select OK to apply the changes to the parameters.
Updating Stored Procedures
If you make any changes to stored procedures in the database, you need to update them in the catalog so that the reports built on them can work properly.
To update the stored procedures added to a catalog
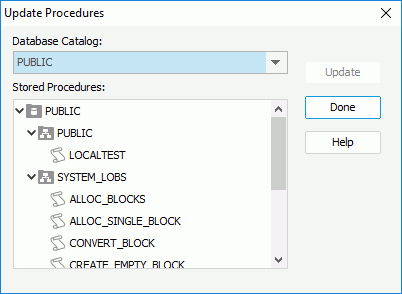
- Select any stored procedure, right-click it, and select Update on the shortcut menu. Designer displays the Update Procedures dialog box.

- Select the stored procedures you want to update, and then select Update.
- Select Done to close the dialog box.
Converting the Data in Stored Procedures
Report supports converting the data in stored procedures from one type to another before the data is passed to Report. This assures that the row data in the database is not affected. To do this, you need to implement Report interfaces and then Report triggers your implementation to convert the data.
- Write a class to extend jet.universe.plugin.ResultSetConvertor in JREngine.jar in
<install_root>\liband implement the abstract method:public abstract ResultSet convert(final String catalogName, final String schemaName, final String procName, final ResultSet rs);
You can refer to the sample ResultSetConvertorImpl.java in
<install_root>\help\samples\APIConvertData, which converts String to Date and Time. - Compile the class into a .jar file.
- Put the JAR file in the jet.universe.customcolumn_2.0.0 folder located in the
<install_root>\help\samples\APIConvertDatadirectory. - Modify plugin.xml in the jet.universe.customcolumn_2.0.0 folder.
- Change the class to the real name of the class:
<description class="ResultSetConvertorImpl"/> - Change the library name to the real name of the JAR file:
<library name="convertor.jar">
- Change the class to the real name of the class:
- Move the two folders jet.universe.addcolumn_1.0.0 and jet.universe.customcolumn_2.0.0 from the
<install_root>\help\samples\APIConvertDatadirectory to the<install_root>\pluginsdirectory. - Start Designer to view the converted data.
You can also perform the conversion on Server in the same way.
 Previous Topic
 Back to top