 Previous Topic
Edit Conditions and Label Dialog Box
You can use the Edit Conditions and Label dialog box to edit advanced single color conditional fill and legend entry labels for your bar, bench, line, pie, and donut charts. This topic describes the options in the dialog box, which vary by chart type.
When you open the dialog box from the Format Bar dialog box, Format Pie dialog box, or Format Donut dialog box, Designer displays these options:
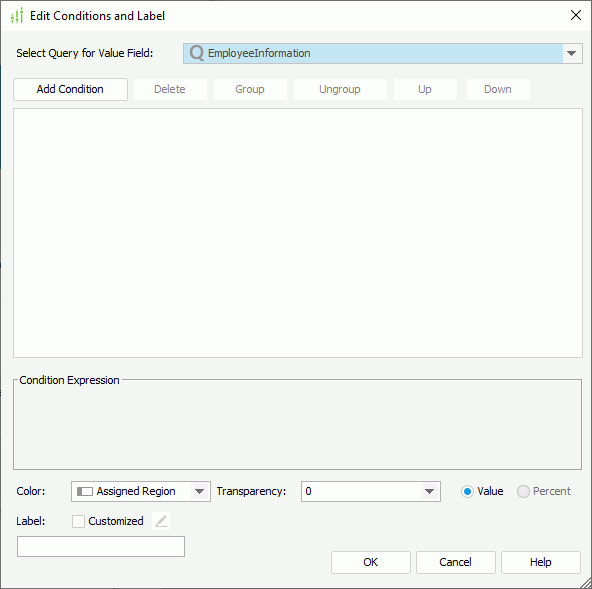
Select Query for Value Field
This drop-down list contains the queries which you can use for editing the conditions. Select the query which contains the fields you want to use as the values to build the conditions.
Add Condition
Select to add a new condition.
Delete
Select to delete the specified condition.
Group
Select to add the specified conditions in a group. You can also add conditions to an existing group by selecting the conditions and the group while holding Ctrl on the keyboard and then selecting the Group button.
Ungroup
Select to ungroup the specified conditions.
Up
Select to move the specified condition or group up to a higher level.
Down
Select to move the specified condition or group down to a lower level.
Logical operator drop-down menu
Specify the logical operator to apply for the specified conditions. It can be "And", "Or", "And Not", or "Or Not".
Field text box
Specify the field on which to define the condition.
Operator drop-down list
Specify the operator to compose the condition. It can be "=", ">", ">=", "<", "<=", or "!=".
Value text box
Specify the field in the selected query as the value to build the condition. You can also select <Input...> and type the value in the text box.
Condition Expression
This box displays the SQL statement of the conditions.
Color
Specify the color to apply to the chart values which meet the condition. Select a field in the specified query the values of which contain strings such as 0x000000 to control the color, or select <Input...> and type the value in the text box.
Transparency
Specify the transparency of the color. Select a field in the specified query the values of which are integers between 0 and 100 to control the transparency, or select <Input...> and type the value in the text box.
Value
Select to display the data in the condition expression as value. Designer applies this option only when the field which the condition is based on is a value field of the chart, or a field containing numeric values.
Percent
Select to display the data in the condition expression in percent. Designer applies this option only to pie chart, 100% Stacked Bar/Bench 2-D chart, and 100% Stacked Bar/Bench 3-D chart, and only when the field which the condition is based on is a value field of the chart, or a field containing numeric values.
Label
Specify the legend entry label for values of the condition. You can edit the label in the text box, or select Customized and then select Edit  to customize the label in the Label Editor dialog box.
OK
Select to apply your settings and close the dialog box.
Cancel
Select to close the dialog box without saving any changes.
Help
Select to view information about the dialog box.
 Back to top
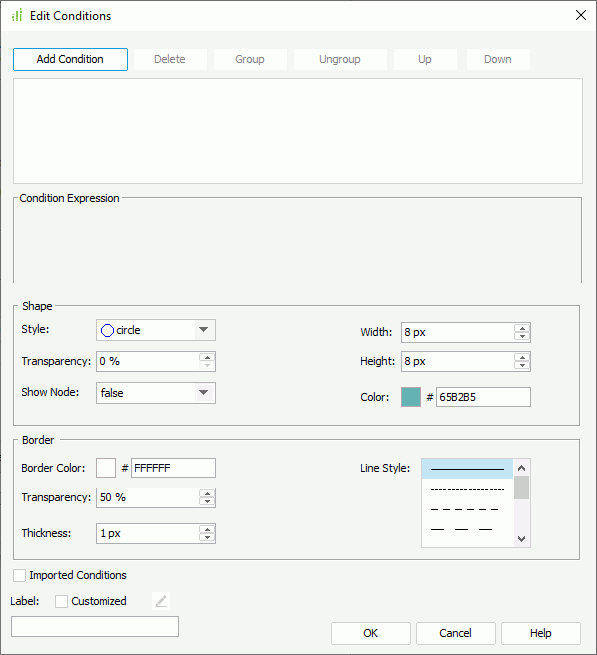
When you open the dialog box from the Node tab of the Format Line dialog box, Designer displays these options:
Select Query for Value Field
Designer displays the drop-down list when you select Imported Conditions. It contains the queries which you can use for editing the conditions. Select the query that contains the fields you want to use as the values to build the conditions.
Add Condition
Select to add a new condition.
Delete
Select to delete the specified condition.
Group
Select to add the specified conditions in a group. You can also add conditions to an existing group by selecting the conditions and the group while holding Ctrl on the keyboard and then selecting the Group button.
Ungroup
Select to ungroup the specified conditions.
Up
Select to move the specified condition or group up to a higher level.
Down
Select to move the specified condition or group down to a lower level.
Logical operator drop-down menu
Specify the logical operator to apply for the specified conditions. It can be "And", "Or", "And Not", or "Or Not".
Field text box
Specify the field on which to define the condition.
Operator drop-down list
Specify the operator to compose the condition. It can be "=", ">", ">=", "<", "<=", "!=".
Value text box
Specify the value of how to build the condition. When you select Imported Conditions, you can select a field in the specified query as the value to build the condition.
Condition Expression
This box displays the SQL statement of the conditions.
Shape
You can specify the shape properties of the nodes, the values of which meet the condition in this box.
- Style
Specify the style of the nodes. - Transparency
Specify the transparency of the color. When you select Imported Conditions, you can select a field in the specified query the values of which are integers between 0 and 100 to control the transparency, or select <Input...> and type the value in the text box. - Show Node
Specify whether to show the nodes. When you select Imported Conditions, you can select a field in the specified query the values of which are true and false to control it, or select <Input...> and type the value in the text box. The node related properties for the line chart take effect only when you set this option to "true". - Width
Specify the width of the nodes, in pixels. - Height
Specify the height of the nodes, in pixels. - Color
Specify the color of the nodes.- When you do not select Imported Conditions, you can select the color indicator and select a color from the color palette, or type the hexadecimal RGB value (for example, 0xff0000) of a color in the text box.
- When you select Imported Conditions, you can select a field in the specified query the values of which contain strings such as "0x000000" to control the color, or select <Input...> and type the value in the text box.
Border
Designer displays this box when you select the Style option other than "plus", "multiplication", "star1", or "star2". You can use it to specify the border properties for the nodes, the values of which meet the condition.
- Border Color
Specify the color of the border.- When you do not select Imported Conditions, you can select the color indicator and select a color from the color palette, or type the hexadecimal RGB value (for example, 0xff0000) of a color in the text box.
- When you select Imported Conditions, you can select a field in the specified query the values of which contain strings such as "0x000000" to control the color, or select <Input...> and type the value in the text box.
- Transparency
Specify the transparency of the border. When you select Imported Conditions, you can select a field in the specified query the values of which are integers between 0 and 100 to control the transparency, or select <Input...> and type the value in the text box. - Thickness
Specify the width of the border, in pixels. - Line Style
Select the line style of the border.
Line
Designer displays the box when you select the Style option of "plus", "multiplication", "star1", or "star2". You can use it to specify the line properties for the nodes, the values of which meet the condition.
- Thickness
Specify the width of the nodes, in pixels. - Line Style
Select the line style of the nodes.
Imported Conditions
Select to use field values to build the conditions and control values of some node properties.
Label
Specify the legend entry label for values of the condition. You can edit the label in the text box, or select Customized and then select Edit to customize the label in the Label Editor dialog box.
OK
Select to apply your settings and close the dialog box.
Cancel
Select to close the dialog box without saving any changes.
Help
Select to view information about the dialog box.