Previous Topic
Creating and Updating Catalogs Using Catalog Studio
You can now create and update catalogs directly on Report Server using c, without turning to Report Designer.
 You need a Catalog Studio license to use this feature. For more product information, including new purchases and upgrades, contact US Sales or UK Sales.
This topic contains the following sections:
- Enabling Catalog Studio
- Creating a Catalog and Accessing Catalog Studio
- Editing a Catalog
- Adding a Data Source
- Setting Up the JDBC Driver
- Adding a Connection in a Data Source
- Callback After Connecting to Database
- Adding a JSON Connection in a Data Source
- Editing Connection Resources
- Adding a Query in a Data Source
- Editing the Joins in a Query
- Filtering a Query
- Creating Computed Columns in a Query
- Adding Formula Fields to a Query
- Creating Union Queries in Catalog Studio
- Creating Queries with Branches (Parent-Child Relationship) in Catalog Studio
- Adding a Business View in a Data Source
- Defining Hierarchies in a Business View
- Creating Predefined Filters for a Business View
- Editing Business View Security
- Adding a Stored Procedure in a Data Source
- Adding Imported SQL Statement in a Data Source
- Adding a User Defined Data Source (UDS) in a Data Source
- Adding a Parameter in a Data Source
- Adding a Formula in a Data Source
- User Grants and Catalog Access Control
- Defining Catalog Object Security
- Data Security Configuration in Catalog Studio
- Modifying a Catalog
- Managing Catalog Sessions: Locking and Unlocking
- Customizing Catalog Studio Profile
- Searching for Catalog Resources
- Removing Catalog Resources
- Catalog Resource Properties
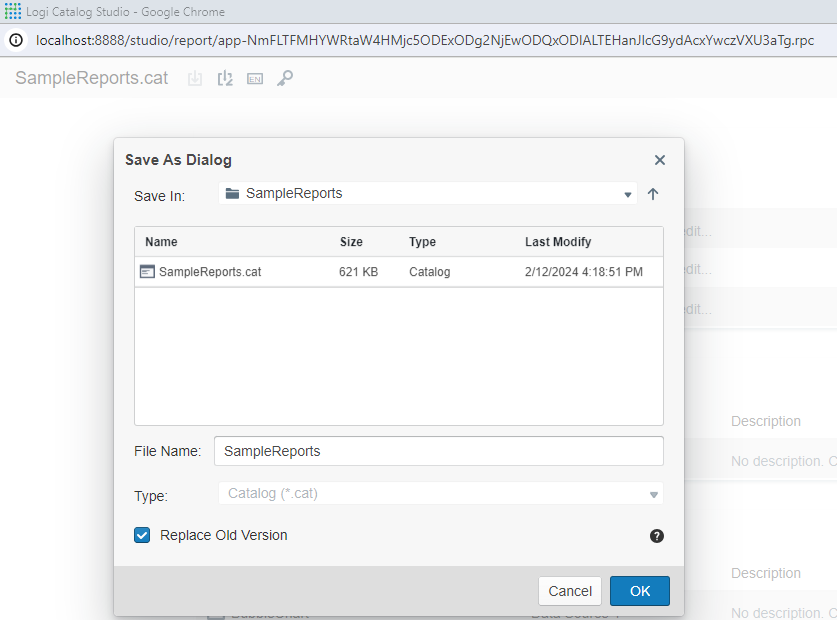
- Save and Save As Options in Catalog Studio
Enabling Catalog Studio
- Start Server, for example, a local Server.
- To toggle the Catalog Studio feature, open a web browser and access the following URL on the localhost server: http://localhost:8888/studio/rpc/sysctl?enable.catstudio=true. Please note that only system administrators (admin) are authorized to execute this command.
 Back to top
Creating a Catalog and Accessing Catalog Studio
To create a catalog, navigate to New > Catalog on the Resources page of the Server Console. Server displays Catalog Studio.
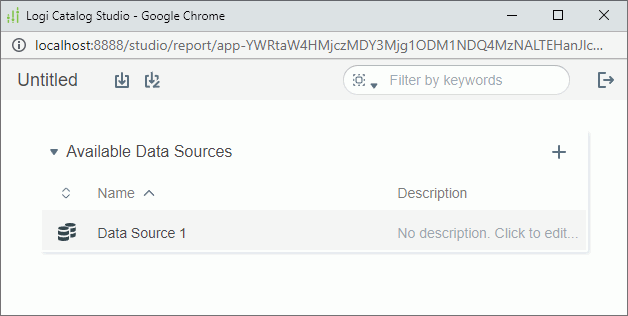
By default, Server adds a data source in the new catalog. You need to add a data connection in the data source. After adding a data connection, you can then create queries, business views, imported SQLs, parameters in the data source, and more data sources in the catalog if you want. In the following sections, you can learn about how to create or edit these resources.
Editing a Catalog
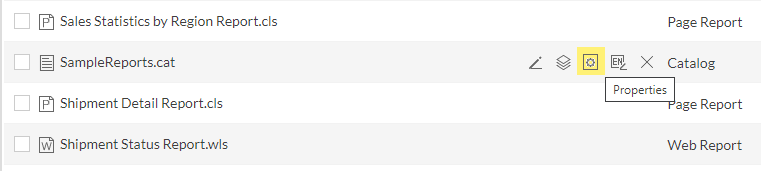
To edit a catalog, navigate to the catalog that you want to modify on the Resources page of the Server Console, and then select the Edit icon on the floating toolbar. Server displays Catalog Studio. You can update the resources in the catalog using Catalog Studio. For more information, see the following sections.
If you cannot see the Edit icon on the floating toolbar, please check following configurations and permissions.
- Navigate to the <install_root>\bin\server.properties file.
- Within this file, locate the web.page.option.show_catalog property and set it to "true". The default value for this property is already set to "true."
- Now, you'll need to configure the permissions for the catalog. To accomplish this, access the Server console.
- Hover your mouse over the catalog you wish to edit, and then select the Properties icon.
- Within the properties dialog, enable and specify permissions for specific users.
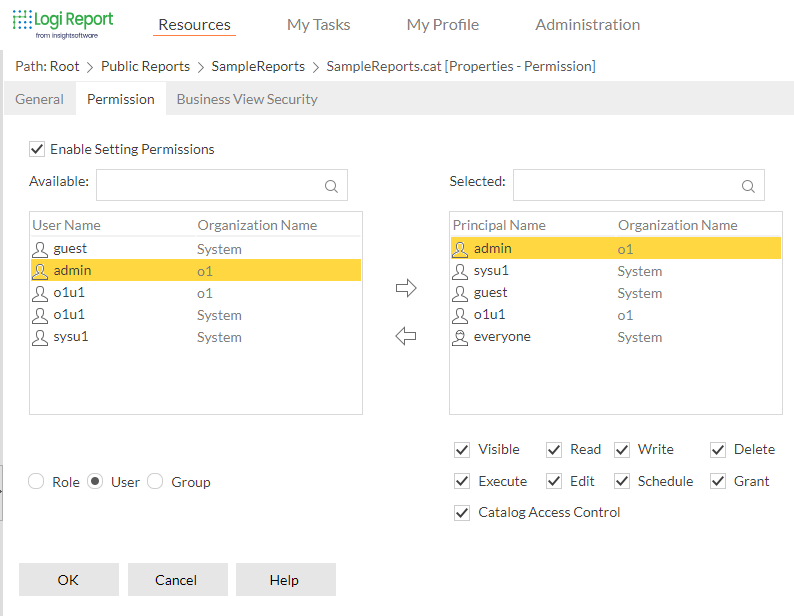
- After setting the permissions, select OK to save your changes and complete the permission settings.
Adding a Data Source
- In the Available Data Sources section, select Add Data Source
 . Server adds a new data source.
- Provide the description for the data source by selecting the Description field and then typing the content you want.
- To specify other properties of the data source, select Settings
 .
Server displays the following properties.
.
Server displays the following properties. 
Property Description Display Rounding Mode Specify the rounding mode for displaying numeric data values in the reports that you create in this data source. Choose an option from the drop-down list. - Up
Rounding mode to round away from zero. - Down
Rounding mode to round towards zero. - Ceiling
Rounding mode to round towards positive infinity. - Floor
Rounding mode to round towards negative infinity. - Half Up
Rounding mode to round towards "nearest neighbor" unless both neighbors are equidistant, in which case round up. - Half Down
Rounding mode to round towards "nearest neighbor" unless both neighbors are equidistant, in which case round down. - Half Even
Rounding mode to round towards the "nearest neighbor" unless both neighbors are equidistant, in which case, round towards the even neighbor.
For more information about the rounding mode, see https://docs.oracle.com/javase/10/docs/api/java/math/RoundingMode.html.
Data Type: Enumeration
Is Default Specify whether the data source is the default data source for the catalog. One catalog must have one and only one default data source. Data type: Boolean
Pre-join Specify whether to apply the pre-join information that you define for the data source when building queries and defining join relationships in business views in the same data source. Data type: Boolean
Synchronize Names Specify whether to synchronize resource mapping names in the data source in the Catalog Studio. When the property is true, if you change the mapping name of a resource in the Catalog Studio, Server will automatically update all other resources in the data source that reference the resource to use the new name.
If you change resource names and then save the catalog, Server asks whether you want to synchronize the resource names in the reports in the same folder as the catalog. It might take a while to perform the synchronization when there are a large number of reports.
Use Mapping Name Prefix Specify whether to automatically add table/imported SQL/stored procedure names as the prefix in the default mapping names of their columns when you add tables, importing SQLs, and stored procedures from the database into the data source. By default, this property is "false", so when you add table1.column1 into the data source, its default mapping name depends on whether the mapping name "column1" already exists in the data source: if it exists, Server applies "table1_column1" as the default mapping name of table1.column1; if it does not exist, Server uses "column1". If you want to use "table1_column1" no matter whether "column1" exists, you can set this property to "true", then Server always adds the table names as the prefix of their columns.
Data type: Boolean
- Up
Setting Up the JDBC Driver
Before you can retrieve data from a relational database in Report, you should first set up the JDBC driver.
- Install the JDBC driver according to the instructions provided by the JDBC driver supplier and understand the URL format required by the driver.
- Append the class path of the JDBC driver's JAR files with full path into Report's environment configuration file by editing setenv.bat for Windows or setenv.sh for UNIX/Linux in
<install_root>\bin. For example, if you are using the Oracle JDBC driver ojdbc7.jar, append it as follows:set ADDCLASSPATH=%JAVAHOME%\lib\tools.jar;c:\oracle\lib\ojdbc7.jar; The step for appending the class path is very important. The same changes made to Designer’s class path must be made to the class path for Server too. A missing JDBC driver in the Report startup batch file or command line results in a "ClassNotFoundError" message when you try to run a report.
 - Add the driver into Server's driver template file jdbcdrivers.properties in
<install_root>\binin the following format:jdbc.drivers=JDBCDriverName:JDBCDriverName:...
Where, JDBCDriverName is the JDBC driver name that Report can automatically load when it starts up, and ":" is the delimiter between two driver names.
The following example specifies an Oracle thin driver and an Interbase thin driver:
jdbc.drivers=oracle.jdbc.driver.OracleDriver:interbase.interclient.Driver Once you have added the drivers in jdbcdrivers.properties, later when you set up JDBC connections in Server, you do not need to provide the driver name manually. Server can search from the beginning of the class path and find one that contains the specified class.
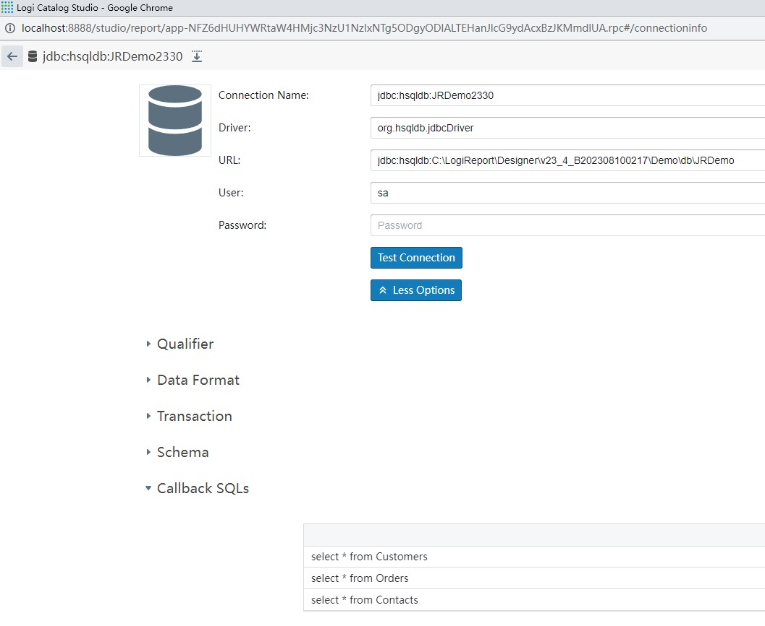
Adding a Connection in a Data Source
- In the Available Data Sources section, hover over a data source line and point to the Add button
 . Server displays a drop-down menu.
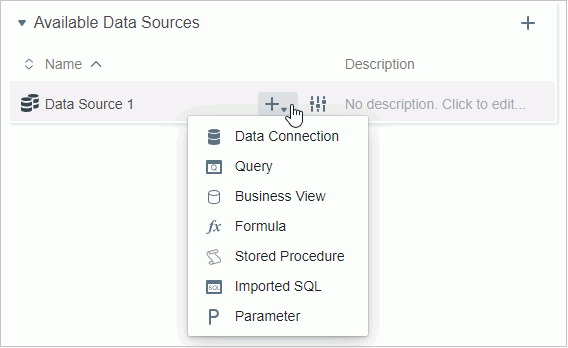
- Select Data Connection. Server displays the Choose Connection page.
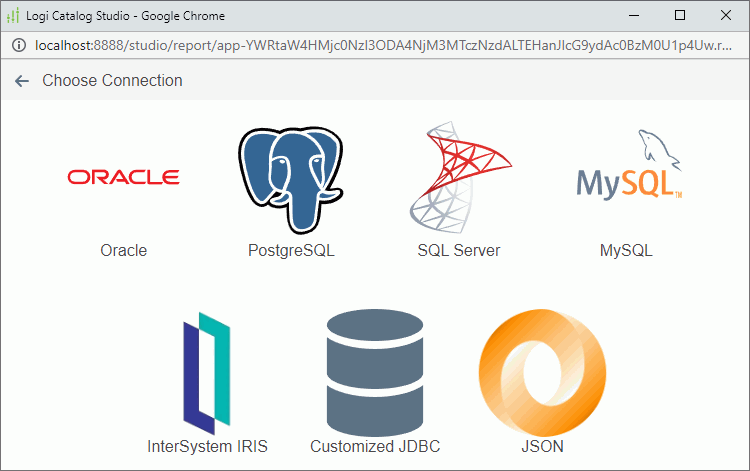
- Select Oracle, PostgreSQL, SQL Server, MySQL, InterSystem IRIS, or Customized JDBC as you want. Server displays the New Connection dialog box.
The following shows an example of an Oracle connection.
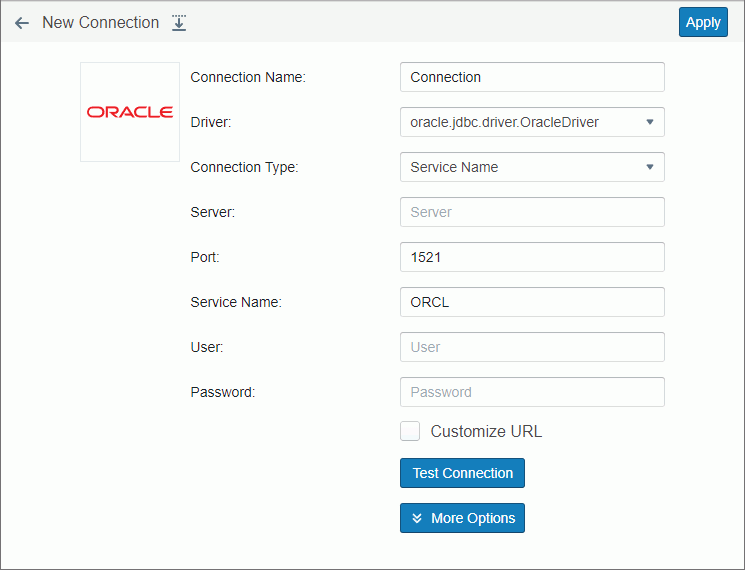
- In the Connection Name field, specify a name for the Oracle connection.
- In the Driver field, specify the class name of the JDBC driver such as oracle.jdbc.driver.OracleDriver for the connection. For more information, see Setting Up the JDBC Driver.
- By default, you need to specify the Server (the database server IP or name), Database (the database name or InterSystems IRIS namespace name, not available to Oracle), and Port (the port of the database server) information for connecting to the database. And for Oracle, you need to select a connection type: Service Name, SID, or TNS, and then specify the corresponding information in the Service Name field. However, if you don't want to set the information respectively, you can choose to specify the information in the URL of the JDBC driver instead, by selecting Customize URL and then typing the driver URL in the URL field. The URL format is regulated by the driver itself.
- Specify the username and password used to connect to the database.
- Select Test Connection to test whether the information you provide is available.
- If your database has some special requirements, you can select More Options to modify the connection properties according to your requirements.
- Select Apply to add the connection into the data source.
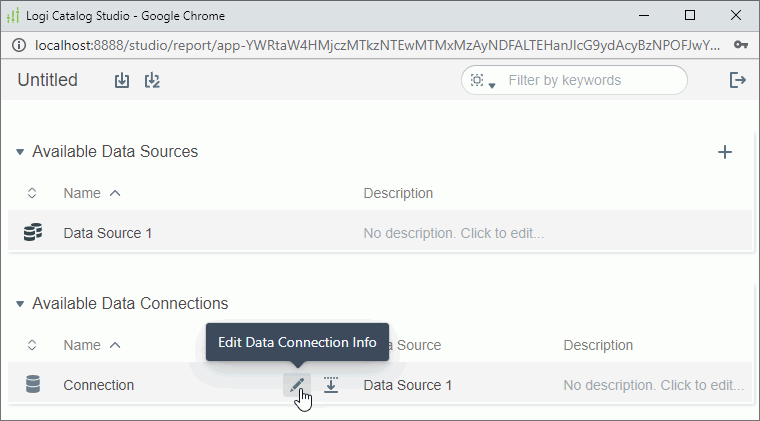
After you have created a connection, you can modify the connection information if you want. To do this, hover over the connection line in the Available Data Connections section, and then select Edit Data Connection Info on the floating toolbar. Server displays the Edit Connection dialog box. You can update the dialog box following the preceding steps.
Callback After Connecting to Database
When a user initially connects to the database, a session is established. The SQL-1999 standard introduced a set of statements to configure the current SQL session. Different Database Management Systems (DBMSs) provide various APIs for users to configure the session.
For example, Oracle employs the DBMS_SESSION.SET_CONTEXT procedure within a user-designated package to set or reset session context attributes. Oracle enforces the use of DBMS_SESSION.SET_CONTEXT within a package, limiting its invocation to within the package's procedures or functions.
In SQL Server, you can utilize the sp_set_session_context stored procedure to establish key/value pairs in the session context. This procedure can be called multiple times when multiple key session settings or value pairs are required within the context.
These SQL statements are permitted to reference parameters, constant formulas, or special fields like the username.
Connections that involve callback SQLs are added to a connection pool, but they cannot be reused or shared between requests. This means that when a connection is defined with callback SQLs, Report will create a new connection object for each request. The maximum number of such connections that can be created is controlled by the MaxCount property within the ConnectionPoolConfig.properties file in the <install_root>\bin folder. Report always sets the MaxShare property to 1. If any of the callback SQLs fail, the getConnection function should return null, as a connection may not function correctly in such cases.
Please note that dynamically editing callback SQLs will not be supported in the server's dynamic connection user interface. If callback SQLs are defined in the catalog, they will still be applied to the dynamic connection. For instance, if a JDBC connection is defined with callback SQL in Report Designer or Catalog Studio, and this catalog is deployed to the server, administrators can configure a dynamic connection through the provided interface. However, editing callback SQLs for the dynamic connection within this interface is not allowed. At the time when the dynamic connection is created, the previously defined callback SQL in Catalog will be applied.
In Catalog Studio, you can access a Callback SQLs option within the JDBC Connection panel. By expanding this option, you can either input your own SQL queries or conveniently copy and paste your existing SQL queries into the provided text area.
Adding a JSON Connection in a Data Source
- In the Available Data Sources section, hover over a data source line and point to Add. Server displays a drop-down menu.
- Select Data Connection. Server displays the Choose Connection page.
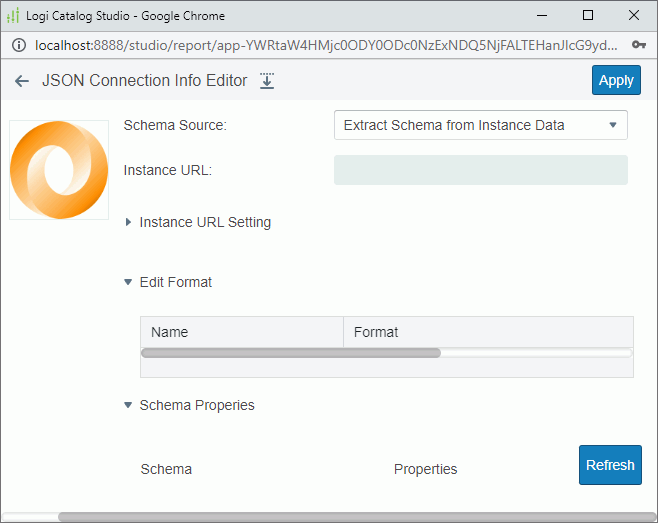
- Select JSON. Server displays the JSON Connection Info Editor.
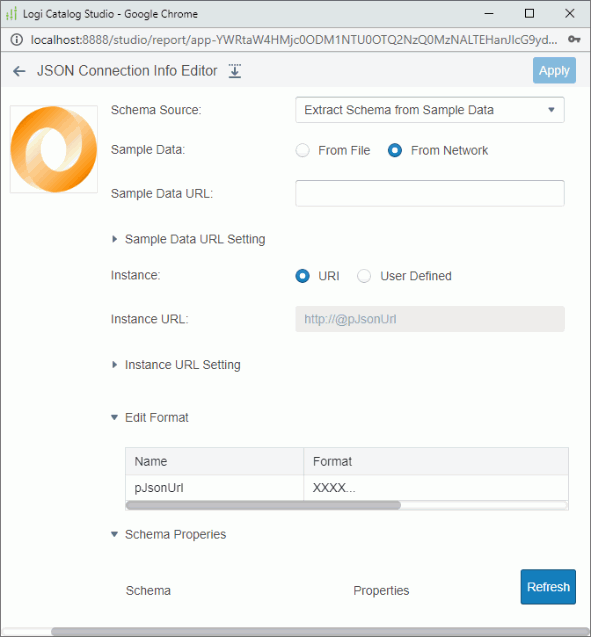
-
From the Schema Source drop-down list select Extract Schema from Sample Data or Extract Schema from Instance Data.
- Provide information for extracting the JSON schema.
- When you have selected Extract Schema from Sample Data as the schema source:
- You can get sample data from a local file or by the network. To upload a local sample data file to Server, select From File, and then select Upload to select the file. To get sample data from the network, select From Network, and then type the URI string of the sample data file in the Sample Data URL field.
- In the URI string, you can reference parameters in the current catalog data source in the format @FieldName. For example, if a URI string is
http://localhost:8080/rest/getData?startDate=2016-01-01, and you want to use the parameters pHost, pPort, and pStartDate to dynamically generate the URI, type the URI string ashttp://@pHost:@pPort/rest/getData?startDate=@pStartDate. - When the URI string contains characters, such as "@", ":", and double quotation marks, or other strings that do not need to be parsed, you should quote them with double quotation marks.
- In the URI string, you can reference parameters in the current catalog data source in the format @FieldName. For example, if a URI string is
- Specify how to get instance data for the JSON schema.
- To get instance data from a URI, select URI, then type the URI string in the Instance URL field. The instance should match the JSON schema that you have defined in the specified sample data file. You can also reference parameters in the URI string as described earlier.
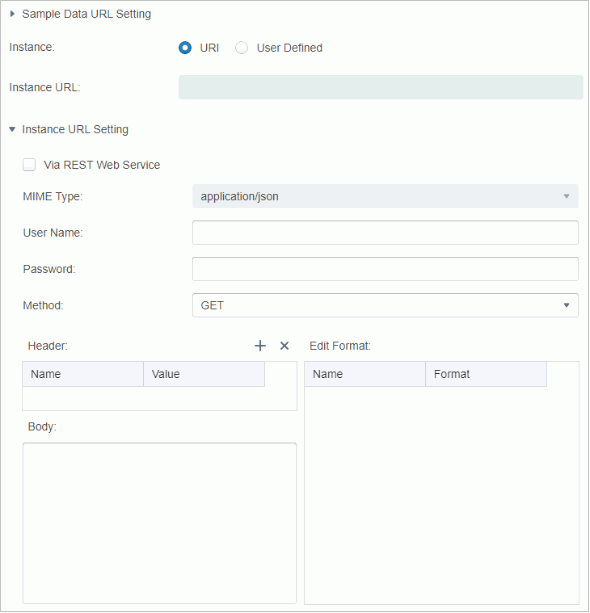
When the URI string you specify begins with the "http://" or "https://" protocol, you can specify RESTful options for the sample data.
When you are editing a JSON connection that you published from Designer, and the instance is from a local file, Server will disable the Instance URL field and hide the Instance URL Setting section. - To receive the remote data via REST Web Service on the application server, select Via REST Web Service, then from the MIME Type drop-down list, select the MIME type for the REST Web Service data source. The REST Web Service Client API (such as the JAX-RS Client API of Java EE) will then be used to get the remote data.
 If you do no select Via REST Web Service, Server receives the remote data via the protocol in the URL you specify in the Sample Data URL field.
 - Specify the user name and password for remote data authentication.
- Select an HTTP method from the Method drop-down list to send the request: GET or POST.
- Select the Add button above the Header box to add a header line, then specify the name and value of the user-defined HTTP header. Repeat this to add more headers. To delete a header, select it and then select the Delete button
 .
. - In the Body box, type the user-defined HTTP body.
- When editing the HTTP headers and body, you can reference parameters as described earlier.
- If you reference parameters in the HTTP headers and body, you can edit the format of their values in the Edit Format table.
- To receive the remote data via REST Web Service on the application server, select Via REST Web Service, then from the MIME Type drop-down list, select the MIME type for the REST Web Service data source. The REST Web Service Client API (such as the JAX-RS Client API of Java EE) will then be used to get the remote data.
- To get instance data from a user-defined interface, select User Defined, then provide the class name with package name in the Class Name field. The class you specify should exist and can be found by Server, which means the class should be in the class path of the system environment or in the ADDCLASSPATH variable of setenv.bat/setenv.sh stored in
<install_root>\bin. After you fill in this field, Server automatically displays the class name of the interface that the class implements behind "The class implements:". Specify the parameter string for the user-defined interface in the Parameter field. The parameter string must match the format defined in the class. You can also reference parameters in the parameter string as described earlier.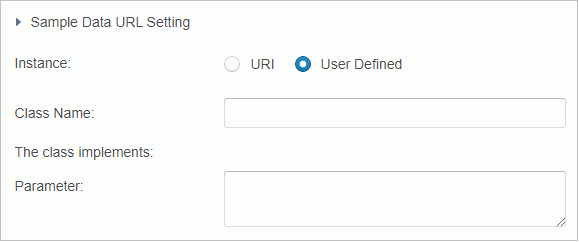
- To get instance data from a URI, select URI, then type the URI string in the Instance URL field. The instance should match the JSON schema that you have defined in the specified sample data file. You can also reference parameters in the URI string as described earlier.
- You can get sample data from a local file or by the network. To upload a local sample data file to Server, select From File, and then select Upload to select the file. To get sample data from the network, select From Network, and then type the URI string of the sample data file in the Sample Data URL field.
- When you have selected Extract Schema from Instance Data as the schema source, type the URI string of the instance file in the Instance URL text box. In the URI string, you can reference parameters as described earlier. When the specified URI string begins with the "http://" or "https://" protocol, you can specify RESTful options for the instance data.
- When you have selected Extract Schema from Sample Data as the schema source:
- When you reference parameters in the URI/parameter string, you can edit the format of their values in the Edit Format section.
- The Schema Properties box lists the elements in the JSON schema. Select an element and modify its properties in the Properties box.
- Select Refresh to reload the schema information and refresh the schema resource tree and properties.
- Select Apply to add the JSON connection into the data source.
After you have created a JSON connection, you can modify the connection information if you want. To do this, hover over the connection line in the Available Data Connections section, and then select the Edit Data Connection Info button on the floating toolbar. Server displays the Edit Connection dialog box. You can update the dialog box following the preceding steps.
Editing Connection Resources
You can update the tables, views, and synonyms in a data connection.
Hover over a data connection line in the Available Data Connections section, and then select the Edit Data Connection Resource button  on the floating toolbar. Server displays the following page. You can also access this page by selecting the Edit Resource button in the Edit Connection dialog box when you are editing the connection information of a data connection.
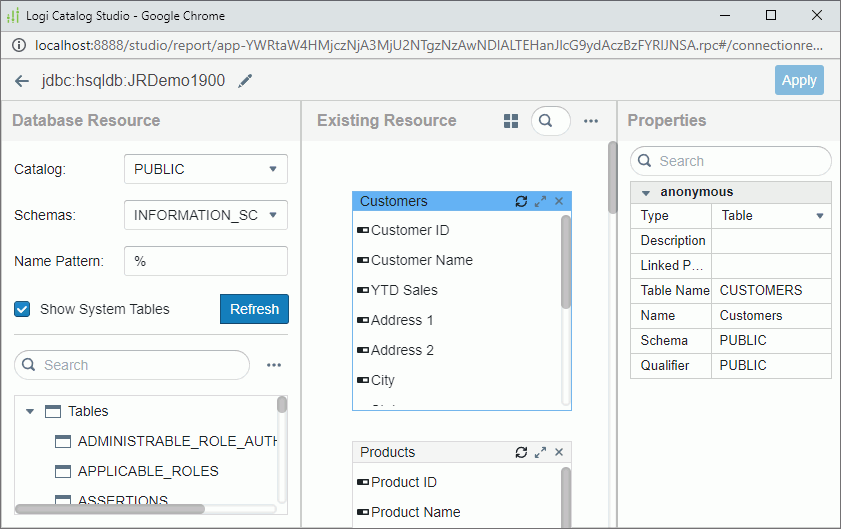
- From the Catalog drop-down list, select the catalog you want. Skip this step for a JSON connection.
- Specify a schema in the selected catalog from the Schemas drop-down list. By default, Server displays the tables/views/synonyms contained in the selected schema in the resources panel.
- You can display certain tables/views/synonyms by names or by patterns in their names. Server displays the wildcard "%" in the Name Pattern field. If you want to view tables/views/synonyms beginning with "AL" in the resources panel, type AL% (case sensitive). Skip this step for a JSON connection.
- Clear Show System Tables if you don't want to display the system tables/views/synonyms in the resources panel. Skip this step for a JSON connection.
- Select Refresh. Server displays the tables/views/synonyms as you want in the resources panel.
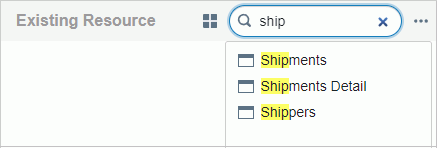
You can search for tables, views, and synonyms that you want using the search bar. Type the keyword in the search bar. Server displays the resources that contain the keyword.
To expand or collapse all the tables, views, and synonyms in the resources panel, select the More Options button
 , and then select Expand All or Collapse All.
To sort the tables, views, and synonyms in the ascending or descending order, select the More Options button
, and then select Ascending or Descending. - Drag the tables/views/synonyms you want one by one from the resources panel to the Existing Resource panel in the middle.
For tables/views/synonyms that you have added to the data connection, Server displays a check mark beside them in the resources panel. In this way, you can easily know which tables/views/synonyms have been added to the connection and which haven't.
- Repeat step 1 to 6 to add more tables from other catalogs and schemas.
- In the Existing Resource panel, select a table or a column in a table, and then update the table properties or column properties in the Properties panel if you want.
In the Properties panel, you can search for the property names that you want using the search bar. Type the keyword. Server displays the property names that contain the keyword.
- Select Apply to save your changes.
You can then create queries and business views based on the tables, views, and synonyms that you have added to the data connection.
In the Existing Resource panel, you can perform the following actions on the tables, views, and synonyms that you have added to the data connection:
- To remove a table, view, or synonym, select the Remove Table button
 on the title bar.
- To rearrange the tables, views, and synonyms, select the Rearrange All Tables button
 .
. - To refresh a table, view, or synonym, select the Refresh button
 on the title bar. If there are invalid columns, Server displays a red mark on the left of them. You can delete the invalid columns by selecting the Delete button
  on the right.
 - To search for tables, views, and synonyms, type the keyword in the search bar. Server lists the resource names that contain the keyword. Select the one you want, and Server highlights it in the panel.
For a JDBC connection, you can specify the objects among which you want to search. Select the More Options button
, and then select the objects. - To search for columns in a table, view, or synonym, first maximize it by selecting the Maximize button
 on the title bar. Then, type the keyword in the search bar. Server lists the column names that contain the keyword. Select the one you want, and Server highlights it in the table, view, or synonym.
Adding a Query in a Data Source
- In the Available Data Sources section, hover over a data source line and point to the Add button . Server displays a drop-down menu.
- Select Query. Server displays the Query Editor.
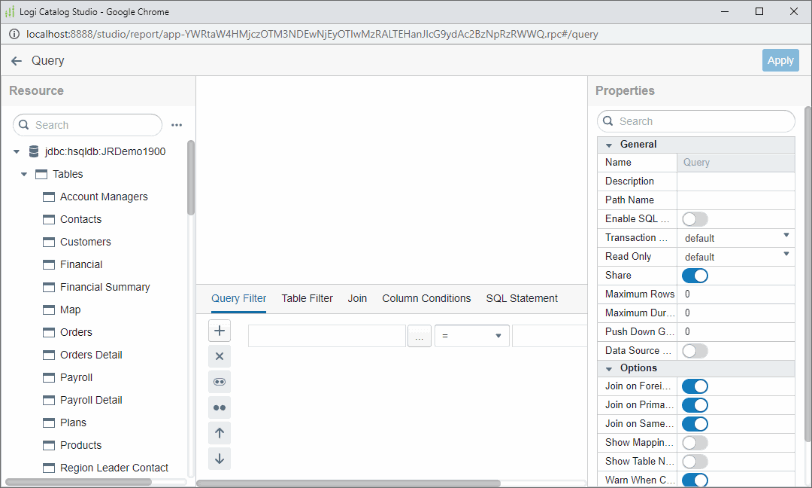
- Drag tables, views, synonyms, other queries, or imported SQLs one by one to the panel above Query Filter.
To remove an added table, select the Remove Table button
on the title bar. - Select the columns in each table that you want to use for the query. To select all columns in a table, select All.
- Join the tables. Point to the column that is the source of the join, and then select and hold the left mouse button while dragging the join away from the source column to the destination column.
- Edit the conditions of the joins if you want.
- Create filters to narrow down data retrieved to the query.
- You can add computed columns and formula fields to the query.
- Select SQL Statement to view the SQL statement of the query, when your query only uses tables, views, and synonyms from one JDBC connection.
- When you select a column in a table, you can update the properties of the column in the Properties panel.
In the Properties panel, you can search for the property names that you want using the search bar. Type the keyword. Server displays the property names that contain the keyword.
- When you select All in a table or none, you can update the properties of the query in the Properties panel.
- Select Apply to save the query.
- Select the Back button
 to return to the home page of Catalog Studio. Server lists the new query in the Available Queries section for the data source.
After you have created a query, you can modify it if you want. To do this, hover over the query line in the Available Queries section, and then select the Edit Query button on the floating toolbar. Server displays the Query Editor. You can update the query following the preceding steps as you did when you created the query.
Editing the Joins in a Query
- In the Query Editor dialog box, select the join icon
 in a join line. The black join line becomes blue.
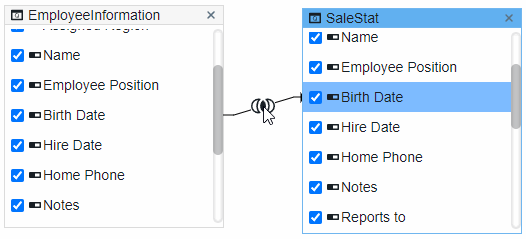
- Select Join. Server displays the Join tab.
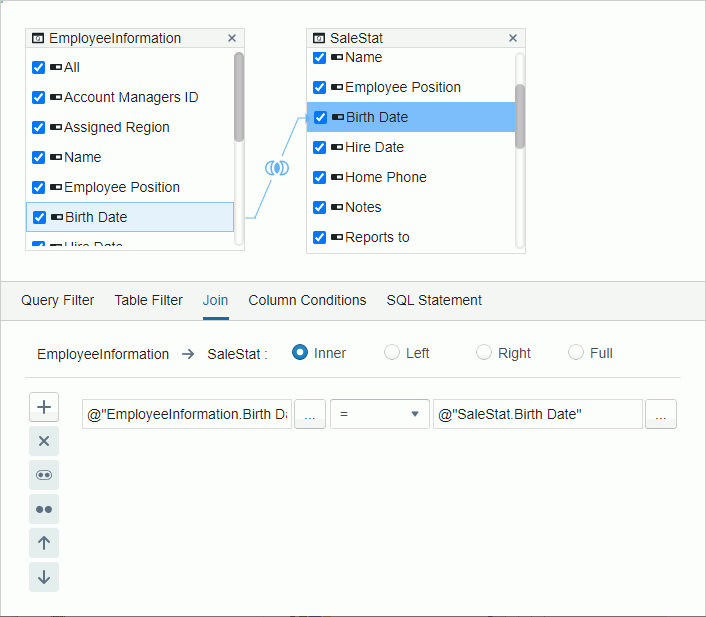
- To make the join an outer join, select Left, Right, or Full if you would like all rows of the left table, right table, or both tables to be retrieved. Regardless of where you place the tables in the Query Editor dialog box, left table is where the arrow starts, and right table is where the arrow points.
- Edit the join condition in the condition panel.
- Select the ellipsis button
 beside the two field boxes to select a column in the two tables involved in the join, or a parameter or constant level formula in the current catalog data source, and then select the operator to compose the condition. You can also type the column, parameter, or formula name in the field boxes, and the input format for parameters and formulas should be @FieldName or :FieldName.
 - Select the Add Condition button
 to define more condition lines and specify the logic relationship between the condition lines: "AND" or "OR".
- To group some condition lines, select them, and then select the Group button
 . Server then adds the selected condition lines in one group and applies them as one line of filter expression (you can also group conditions and groups together).
 - To take out any condition or group from a group, select it and then select the Ungroup button
 .
. - To adjust the priority of a condition line or group, select it, and then select the Up button
 or Down button
  .
. - To delete a condition line or group, select it, and the select the Delete button
 .
.
- To group some condition lines, select them, and then select the Group button
- When you reference a parameter in a join condition, Server ignores the Ignore Predicate If Parameter Value Is Null setting of the parameter. Using parameters in the join conditions can dynamically change query results at runtime. It works similarly as in query filters.
- Select the ellipsis button
- Select Apply to accept the changes.
- The joins in one path should never form a loop (any table in this path has direct or indirect joins with all the other tables).
- Not all database systems support all the join forms. For example, MySQL does not support Full Outer Join, so be sure to check your database manuals.
- When the tables in a query come from the same collection of a MongoDB database, you cannot edit the joins between them.
Filtering a Query
You can specify criteria to filter the columns you prefer to retrieve from the database for a query, so that when you build reports on the query, the returned result is narrowed down.
You can compose filter conditions in both the format of a QBE (Query By Example) and a filter. Using the filter format, you can define the conditions on the query and any tables in the query. The overall filter conditions applied to a query includes all of them, that is QBE filter AND query filter AND table filter. Always select the SQL button to view your conditions and parse the query to ensure the syntax is valid.
Filtering with the QBE Format
The Column Conditions tab is for you to filter out some unnecessary records in a query. This filter is in the QBE format. The advantage of QBE retrieval is that you do not need to learn a query language to frame a query. Server shows you all the data fields you have added to the query, and all you need to do is to specify the information that restricts the search to the required criteria. Any fields left blank match everything.
When filtering with the QBE format, you type the search criteria into a template resembling the record. For example, if a column is labeled REGION, and it is a list of all 50 states in the United States. If you only want to see information from California (CA) and New York (NY), in the criteria panel, you can pick out CA and NY by placing their names in the column as follows:

You just need to type CA and NY. Server automatically places ='xx' (equal sign and quotes). The following is a list of the available syntax:
- Comparison predicates ( =, >, <, >=, <=, <> ).
- BETWEEN predicate (example: BETWEEN 1 AND 100).
- IN predicate (example: NOT IN (1, 3, 5)).
- LIKE predicate (example: LIKE '%apple%').
- NULL predicate (example: IS NOT NULL).
In the Conditions/Or text box of a table column, type a value and then select outside of the text box or select Enter to apply the value. Server filters the table column with the value.
When you select or clear a table column, Server displays or removes it from the Column Conditions tab. When you select a column in a table, Server also selects it in the Column Conditions tab, and vice versa.
When you remove a table, Server removes all added columns of the table including formula fields and computed fields from the Column Conditions tab. You can also remove any table column from the Column Conditions tab: select the column on the tab and then select the Delete button . Server clears the column from its table at the same time. To undo the deletion, find the column in the table and select it.
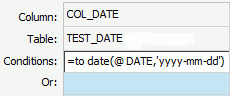
If your query uses tables from an Oracle database and you want to use a parameter of the Date or DateTime data type or a specific date or time to filter the column in the query, you need to apply the to_date() or to_timestamp() function in the filter condition, for example:
Filtering with the Filter Format
Compared with QBE, the filter format provides you with more flexibility with composing the conditions. The expression includes not only the DBFields, but also formulas and parameters. You can also manually type in strings that the database supports. For example, you can reference functions predefined in the database like qualifier.functionname ("qualifier" is optional) in the conditions.
When you use the filter format to filter a query, you can add the filter conditions on both the query and any tables in the query. Report Engine applies a filter that is based on a query as long as the query is used or referenced, while a filter based on a specific table in a query is applied only when the table is queried at runtime.
- To create a filter based on a query
Select Query Filter in the Query Editor dialog box. Then, specify the filter conditions. The resources available for use are the table columns in the query, the parameters, queries, summaries, and valid formulas of the query in the same catalog data source as the query. - To create a filter based on a specific table in a query
Select Table Filter in the Query Editor dialog box. Then, specify the filter conditions. The resources available for use are the columns in the table, the parameters, queries, and valid formulas of the table in the same catalog data source as the query.
To specify the filter conditions
- In the field text box (the first text box), specify the field or subquery you want to filter, by using the Expressions dialog box or typing manually.
To specify a field or subquery in the filter condition using the Expressions dialog box:
- Select the ellipsis button
 . Server displays the Expressions dialog box.
 - Double-click a field on the Real Name tab or a subquery on the Subquery tab. Server adds the item in the expression preview text box. You can edit the expression in the preview text box directly. To clear content from the preview text box, select the delete button in the text box.
- Select OK. Server adds the field or subquery in the field text box.
To type a field or subquery manually in the field text box, use the format @ResourceName. When the resource name contains blank space, use double quotation marks to quote the resource name, for example, @"Resource Name".
- Select the ellipsis button
- From the operator drop-down list, set the operator with which you want to compose the filter expression.
- In the value text box (the second text box), specify the value of how to filter the field by using the Expressions dialog box or typing the value manually.
To specify the value in the filter condition using the Expressions dialog box:
- Select the ellipsis button . Server displays the Expressions dialog box.
- Double-click a field on the Real Name tab (you can use a parameter to filter the query dynamically), a subquery on the Subquery tab (see an example of using subqueries to narrow down the result), or a field value on the Field Value > Basic tab (the Field Value tab is available when you have specified a field in step 1). Server adds the item in the expression preview text box. You can edit the expression in the preview text box directly. To clear content from the preview text box, select the delete button in the text box.
- You can use the Field Value > Advanced tab to select the values of any fields in the query. Server displays all the fields in the query on the Advanced tab. Select the fields whose values you want to use, and then select Fetch. Server displays the values of the fields you just selected. Double-click a value to add it to the expression text box.
- Select OK when you finish specifying the value. Server adds the value in the value text box of the filter expression.
- Select the ellipsis button
- Select the Add Condition button to define more condition lines and specify the logic relationship between the condition lines: "AND" or "OR".
- To group some condition lines, select them, and then select the Group button . Server then adds the selected condition lines in one group and applies them as one line of filter expression (you can also group conditions and groups together).
- To take out any condition or group from a group, select it and then select the Ungroup button .
- To adjust the priority of a condition line or group, select it, and then select the Up button or Down button .
- To delete a condition line or group, select it, and the select the Delete button .
- Select Apply to save the condition.
Inputting Filter Condition Values Manually
When you type the value manually for a condition, you need to pay attention to the following.
- You should separate multiple values with ","; if a value contains the character "," or "\", write the character as "\," or "\\".
- For String type values
Quote the values with single quotes.Example1: Customers_Country='USA'
Example2: Customers_Country in 'Australia','Germany','Mexico'
You can type the quotation marks by yourself or let Server add them automatically.
- For Date type values
Make sure the format of the value you specify is consistent with that of your database. Filters are executed in the database side and some databases have special requirements for the date format.If your query uses tables from an Oracle database and you want to use a parameter of Date or DateTime data type or a specific date or time to filter the fields of a query, you need to use the to_date() or to_timestamp() function in the filter condition, for example:

Using Subqueries in Filter Conditions
When filtering the fields of a query with the filter format, you can also use subqueries to narrow down the result. The following shows the subquery syntax.
Quantified predicate
A quantified predicate compares a value with a set of values.
- Syntax
expression----+- = --+- SOME --+-- ( subselect )
                                        +- <>  -+  ANY    ---+
                                        +- ! = --+  ALL   ----+
                                        +- <   --+
                                        +- >   --+
                                        +- <=  --+
                                        +- ! >  --+
                                        +- >=  --+
                                        +- ! < --+
The subselect must specify a single result column and can return any number of values, whether they are null or not.
- When ALL is specified, the result of the predicate is:
- "True" if the result of the subselect is empty, or if the specified relationship is true for every value returned by the subselect.
- "False" if the specified relationship is false for at least one value returned by the subselect.
- "Unknown" if the specified relationship is not false for any values returned by the subselect and at least one comparison is unknown because of a null value.
- When SOME or ANY is specified, the result of the predicate is:
- "True" if the specified relationship is true for at least one value returned by the subselect.
- "False" if the result of the subselect is empty, or if the specified relationship is false for every value returned by the subselect.
- "Unknown" if the specified relationship is not true for any of the values returned by the subselect and at least one comparison is unknown because of a null value.
- When ALL is specified, the result of the predicate is:
- Examples
Select qty FROM sales WHERE qty>= ALL (SELECT qty FROM sales)
SELECT BUYERID, ITEM FROM ANTIQUES WHERE PRICE != ANY (SELECT PRICE FROM ANTIQUES);
EXISTS predicate
The EXISTS predicate tests for the existence of certain rows.
- Syntax
- [ NOT ] EXISTS--(subselect)The subselect may specify any number of columns, and
- The result is "true" only if the number of rows specified by the subselect is not zero.
- The result is "false" only if the number of rows specified by the subselect is zero.
- The result cannot be unknown.
- Example
Select DISTINCT pub_name FROM publishers WHERE EXISTS (SELECT * FROM titles WHERE pub_id = publishers.pub_id AND type = 'business')
IN predicate
The IN predicate compares a value with a set of values.
- Syntax
expression----+-- [NOT] IN --+-- ( subselect )In the subselect form, the subselect must identify a single result column and may return any number of values, whether null or not.
- Example
Select distinct pub_name FROM publishers WHERE pub_id IN (SELECT pub_id FROM titles WHERE type = 'business')
The following example explains how to apply a subquery when filtering a field.
- Create a query mainin in the catalog, add the Customers table and select the following columns: Customers_Customer ID, Customer Name, Customers_City, and Customers_Region.
- Select Query Filter in the Query Editor.
- Select the ellipsis button
 beside the field text box. Server displays the Expressions dialog box.
 - Double-click the Customers_Customer ID column.
- Select OK. Server adds the Customers_Customer ID field into the filter condition.
- Select in as the operator from the operator drop-down list.
- Select the ellipsis button next to the value text box. Server displays the Expressions dialog box.
- Select Subquery.
- Double-click an existing query in the catalog to be the subquery.
Here, we use the query subin, which contains the Orders table and the Orders_Customer ID column, and has a condition "Ship Via=Express Delivery".
- Select OK. Server adds the subin subquery into the value text box.
- Select Apply to save your condition.
Then, Server applies the subin subquery to the filter when you build a report that uses the Customers_Customer ID column.
- When you use a parameter in the filter criteria of a query, you can specify how to handle the case when the parameter value is NULL at runtime (for example, not provided). You can remove the parameter condition from the query's filter criteria or treat the parameter value as a default value (0) or an empty string, which could cause great differences in your reports. If you want to remove the parameter condition from the query when this happens, select Ignore Predicate If Parameter Value Is Null in the Properties panel of the query in the Query Editor dialog box. For a parameter of String data type, when its value is blank, if you select Ignore Predicate If Parameter Value Is Null, Report Engine considers the value of this parameter as NULL, and this predicate does not appear in the where clause; if you do not select Ignore Predicate If Parameter Value Is Null, Report Engine treats the value as an empty string ("").
- You cannot filter the following SQL types of data: Db.SQL_BINARY, Db.SQL_BLOB, Db.SQL_CLOB, Db.SQL_LONGVARCHAR, Db.SQL_LONGVARBINARY, Db.SQL_VARBINARY, and Db.SQL_OTHER.
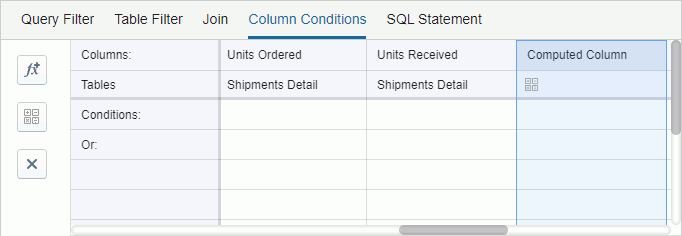
Creating Computed Columns in a Query
You can create computed columns in a query which is based on tables, views, and synonyms from one JDBC connection only.
- In the Query Editor > Column Conditions tab, select the New Computed Column button
 . Server displays the Add Computed Column dialog box.
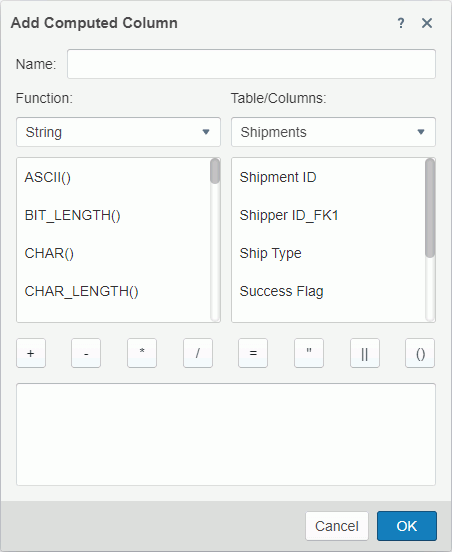
- Type a name for the column in the Name field.
- Compose your functions for the column.
In the lower part of the dialog box, there are functions and tables/columns of the query. They are just for your reference. You can specify the expression by yourself in the editing text box, only if the expression can be accepted by your database. In addition, the functions in this dialog box are not from the Report system. They are from the database you are connecting to. For each database, you may get a different set of functions. Thus, if you change your database, some of these functions may no longer exist. You can use the following functions to write an expression:
- String
Select to use a String formula in the expression. - Numeric
Select to use a Numeric formula in the expression. - Time & Date
Select to use a Time or Date formula in the expression. - +
Select to add the numbers or fields together in the expression. - -
Select to subtract the numbers or fields in the expression. - *
Select to multiply the numbers or fields in the expression. - /
Select to divide the numbers or fields in the expression. - =
Select to equate fields together. - "
Select to place quotations on long character strings or names that have blanks in them. For example, you should place quotes on values such as "New York" or "Washington DC". - ||
Select to place fields together in the same expression. For example, "New York" || "Washington DC". - ()
Select to place fields in parentheses.
- String
- Select OK to create the computed column. Server places the computed column on the Columns Conditions tab together with the table columns in the query.
- Select Apply to save your query.
If you want to edit a computed column, you can select the text box that contains the button  in the computed column, and then edit it in the Add Computed Column dialog box Server displays.
After you create a computed column, Server adds it to the SQL of the query. Suppose you have added the Net Total computed column in a query and the computation is @UNITPRICE * @QUANTITY * (100 - @DISCOUNT) / 100, when you view the SQL statements of the query, you see the following SQL statement being inserted into the SQL: @UNITPRICE * @QUANTITY * (100 - @DISCOUNT) / 100 AS "Net Total".
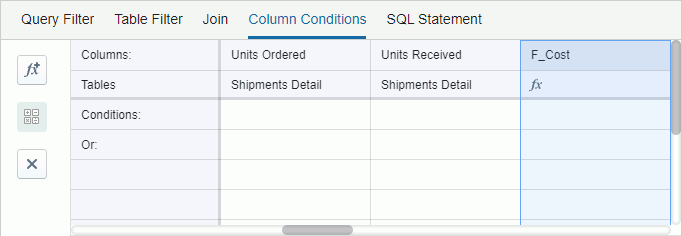
Adding Formula Fields to a Query
In addition to the table columns, you can also add formula fields to a query.
- In the Query Editor > Column Conditions tab, select the New Formula Field button
 . Server displays the Add Formula Fields dialog box.
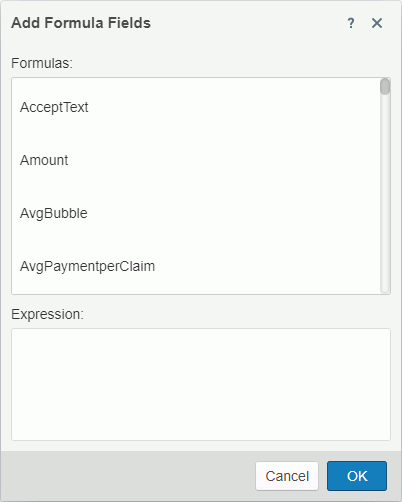
- Server lists the formulas in the current catalog data source that are valid for the query in the Formulas box. When you select a formula, Server displays its statement in the Expression box. Choose the formula you want and select OK. Server adds the formula on the Columns Conditions tab together with the table columns in the query. If the table that contains the columns the selected formula references doesn't exist in the query, Server automatically adds this table to the query with the involved columns selected at the same time.
- Repeat the preceding steps to add more formulas if you want.
- Select Apply to save your query.
You can replace any formula field added to a query with another one as follows: select the text box that contains the formula button  and then choose another field in the Add Formula Fields dialog box.
The processing of a formula field is very different from a computed column even though the data looks the same. The computed column is calculated by the database engine before the data is returned, while the formula value is calculated by Report Engine after the data is returned so is less efficient.
Creating Union Queries in Catalog Studio
You can combine specified records from more than one query into a result set by creating a union query. Unlike a join which creates one record with multiple columns from two queries, UNION appends the results of one query to the results of the second query, so the number of records is the sum of the two queries. This topic describes how you can create union queries in Catalog Studio.
When creating a union query, you should make sure that in all the queries you are combining, you have added the same number of columns in the same order. You should also pay careful attention to the data type of the columns, and make sure that each column resides in the same position in all queries, as well as having compatible data types. The column names do not need to match. For example, if the first query has five columns, the first of which contains DateTime data, you should make sure that each of the other queries you are combining also has five columns, the first of which contains DateTime data, and so on. A common union query usage is combining a query from one instance of a database to a second instance of the database. For example, you want all records of the Customers table from one database appended to all records of the Customers table from a second database. The two Customers tables must match exactly the number of columns, the SQL type, and sequence.
A union query does not support formulas and parameters.
To create a union query:
- In the Business View Editor, select the query name in the Resource Objects column to enter the BV Query Editor.
- In the Query Editor, select the Union tab at the bottom.
- The Queries panel contains all valid queries in the current catalog that you can combine to the primary query. Select a query and drag to the Union panel. If no valid query is available, click the Add button to add new queries.
- In the Queries panel, double-click individual queries and rename.
- Hover over individual query, and then select the Edit button to edit or the Delete button to delete the query.
- Define the new query. The selecting order of the columns to include in the new query should refer to the order in the primary query. The SQL type and the number of the columns should also match those in the primary query. For example, when you select two columns in the primary query, the first one is Integer data type and the second String, then in the new query, you should also first select an Integer column and then a String column.
- Select Apply to create the new query.
- Repeat steps 4 through 7 until you have created all the queries you want to combine to the primary query.
- Add the queries you just created from the Queries panel to the Union panel.
- In the Union panel, select in the Attribute column of each query to specify its attribute in the union.
 : Select it if you do not want to return duplicate records from the query.
 : Select it if you want to return all records from the query.
- Select Apply. The primary query now functions as a union query.
Creating Queries with Branches (Parent-Child Relationship) in Catalog Studio
Parent Tables: Resources (tables) can be dragged from the Resource panel to the Parent table panel. When a table is dragged to the Parent table panel, it will be displayed as a tree view with the table name as the root and columns of this table as the leaf nodes. Select one or more columns from the parent table trees as the common key by selecting the checkbox before the columns. At least one column must be selected. Remove a table and its’ columns from the Parent table panel by dragging it to the Resource panel.
Child Tables: Tables can be dragged from the Resource panel to the Child table panel. When a table is dragged and drop to the Child table panel, a new branch is created, and the table is added to this new branch. When a table is dropped to an existing branch, it will be added to the branch. Remove a table from the Child table panel by dragging it to the Resource panel.
Only those resources that are consistent with the selected resources (tables and fields) in the query can be dragged to Parent or Child table panel. The tables in the Parent or Child tables must be consistent with the selected resources (tables and fields) in the query panel. Each resource can only be dragged once to the Parent or Child table panel.
To add/delete a branch in the Child tables, click the Add/Delete button in the Child table header.
To rename a branch, double-click the branch name and rename it. The branch name must be unique in this query.
Select Apply to save the BV query with the branch changes.
Adding a Business View in a Data Source
- In the Available Data Sources section, hover over a data source line and point to the Add button . Server displays a drop-down menu.
- Select Business View. Server displays the Query Editor.
- Follow the steps of creating a query to add tables, views, synonyms, queries, and imported SQLs, join the tables, and predefine filter conditions for the business view.
- Select Apply to save your tables and conditions.
- Select the Back button . Server displays the Business View Editor.
- Drag fields one by one from the Resource Objects panel to the business view resource tree.
- To add a category, select the New Category button
 . Server adds a category under the root node.
 - Drag fields one by one to a category.
- Define hierarchies on the business view to allow users to drill report data to particular groups at runtime.
- To adjust the order of objects in the business view, use the Move Up button and Move Down button .
- To remove an object from the business view, select the Delete button on the floating toolbar.
- Create predefined filters on the business view for users to choose when using the business view to create reports.
- Configure security for the business view to limit user access to the view elements.
- Select an object and you can then customize its properties in the Properties panel.
- You can select the root node Ondemand Query in the Resource Objects panel to switch to the Query Editor of the business view.
- Select the Back button to return to the home page of Catalog Studio. Server lists the new business view in the Available Business Views section for the data source.
After you have created a business view, you can modify it if you want. To do this, hover over the business view line in the Available Business Views section, and then select the Edit Business View button on the floating toolbar. Server displays the Business View Editor. You can update the business view following the preceding steps as you do when you created a business view.
Defining Hierarchies in a Business View
You can regard a hierarchy as a category that contains group objects sharing a hierarchical relationship in the order from the highest level to the lowest. Hierarchies enable users to drill report data up and down to particular groups at runtime. For example, you can add these group objects into one hierarchy called Dates: Sales Year, Sales Quarter, Sales Month, and Sales Date. When you use any of these group objects to group data in a table, crosstab, or chart, users can use the context menu to drill up or down to the next level. You can create any number of hierarchies such as dates, times, geography, and product types.
The group objects added in a hierarchy are just references to the real group objects and therefore cannot be edited.
To create hierarchies in a business view
- In the Business View Editor dialog box, select the New Hierarchy button
 . Server adds a blank hierarchy under the root node in the business view resource tree. You can add a hierarchy to any category in a business view and it does not make any difference where you place the hierarchy. For easy look-up, you can put them under the root category.
 - Drag group objects from the business view resource tree to the hierarchy as hierarchical groups.
- You can also drag fields from the Resource Objects panel to the hierarchy. Then, if you have not added any of the selected fields as group objects in the business view, Server automatically adds them to the hierarchy and places them at the bottom of the business view resource tree at the same time.
- You can adjust the position of the group objects in the hierarchy by selecting a group object and selecting the Move Up button and Move Down button . The higher you place a group object, the higher its level is in the hierarchy.
- If you want to remove a group object from the hierarchy, select the Delete button on the floating toolbar.
- Repeat the preceding steps to create more hierarchies in the business view.
- Select Apply to save the hierarchies into the business view.
Creating Predefined Filters for a Business View
You can predefine filters in a business view for users to choose when they design or modify data components that use the business view, so as to filter out the unnecessary data in the data components.
If you want to filter the data to use in a business view, you need to define query filter while specifying the data resources for the business view.
To create predefined filters in a business view:
- In the Business View Editor dialog box, select the New Predefined Filter button
 . Server adds a predefined filter to the business view resource tree.
 - Hover over the predefined filter, and then select the Edit button on the floating toolbar. Server displays the Predefined Filter dialog box.
- In the Name field, specify the name of the filter.
- In the Description field, provide the description of the filter.
- In the Condition section, select the ellipsis button next to the field text box (the first text box). Server displays the Expressions dialog box. Double-click the field you want. Server adds the field in the expression preview text box. You can edit the expression in the preview text box directly. To clear content from the preview text box, select the delete button in the text box. After finishing specifying the field, select OK. Server adds the field in the field text box.
You can also type the name of the field as @FieldName directly in the field text box. When the field name contains blank, use double quotation marks to quote the name like @"Field Name".
- From the operator drop-down list, select the operator with which you want to compose the filter condition.
- In the value text box, specify the value of how to filter the field.
- Select the ellipsis button next to the value text box (the second text box). Server displays the Expressions dialog box. Switch to the Field Value tab. The tab contains all values of the selected field. Double-click the value you want, and then select OK. Server adds the value in the value text box.
However, if you have chosen to manually type the field name in step 5, here you need to first select the field on the Field tab of the Expressions dialog box once again to get its value list, before switching to the Field Value tab to select a value.
- If you are familiar with the values of the selected field, you can also type the value manually (when the selected operator requires multiple values, you have to specify the values manually). When you type multiple values, you should separate them with ","; if a value contains the character "," or "\", type the character as "\," or "\\".
- When the condition is based on a String field, you can apply an empty string as the value, by simply leaving the text box blank (value length=0).
- Select the ellipsis button
- Select Add Condition to add a condition line.
- Repeat the preceding steps to define more condition lines and specify the logic relationship between the condition lines: "AND" or "OR".
- To group some condition lines, select them and select Group. Server then adds the selected condition lines in one group and applies them as one line of filter expression (you can also group conditions and groups together).
- To take out any condition or group from a group, select it and select Ungroup.
- To adjust the priority of the condition lines, select it and select Up or Down.
- To delete a condition line, select it and select Delete.
- Server displays the SQL statement of your filter conditions in the SQL Statement panel.
- Add more predefined filters and define the conditions for each filter following the earlier steps.
- To remove a predefined filter from the business view, select the Delete button on the floating toolbar.
- Select Apply to save the filters into the business view.
You can then apply the filters when creating or editing reports based on the business view at runtime.
- If you remove the resources that you have used in some predefined filters from the business view, you cannot edit the predefined filters.
- You cannot filter the following SQL types of data: Db.SQL_BINARY, Db.SQL_BLOB, Db.SQL_CLOB, Db.SQL_LONGVARCHAR, Db.SQL_LONGVARBINARY, Db.SQL_VARBINARY, and Db.SQL_OTHER.
Editing Business View Security
You can use business view security to limit user access to elements of the business views in a catalog. For more information, see Introduction to Business View Security in the Report Designer Guide.
To define the security for a business view on Server, take the following steps:
- In the Business View Editor, select the Edit Security button
 on the Business View panel's toolbar or on the floating toolbar of an object in the business view resource tree. Server displays the Edit Business View Security dialog box. By default, the selected resource is the same as that when you selected .
The following shows a sample dialog box.

- In the Users/Groups/Roles panel, select a security principal to specify which resources in the business view the principal can access and view.
- In the Resources panel, select a view element.
If you see a security icon
beside a resource, it means that you have customized the resource security for the current principal. - In the Security Options box, clear Use Default if you to customize the data security and resource security for the selected view element. If you want to use the default security settings of the selected elements, retain the Use Default selection.
After you finish defining the data security and resource security, you can save the current security settings as the element's default security settings by selecting the Set as Default button
 .
. - In the Data Security box, specify whether the selected principal can access values of the selected view element, by selecting Allow or Deny of the Access property.
- If you select only a group object, you can further allow or deny specific members of the group object for the principal in the Data Security box.
- Select the Edit button for Allowed Set or Denied Set. Server displays the Edit Values dialog box.
- Choose a method of specifying the members: select members from the available list, or compose an expression to retrieve the members. You can use only one method.
- To select members, keep Selected Values being selected. If you would like to select all the possible members of the group object, select Select All; if you just want to select some of the members, leave Select All cleared, then select the members in the left box and select the Add button
 to add them to the right box.
 - To compose an expression, select Expression, then define the conditions.
Choose the operator with which to compose the condition from the operator drop-down list. From the value drop-down list, specify the value of how to build the condition. Select the ellipsis button
next to the value text box. Server displays the Expressions dialog box. Double-click the field value you want. Server adds the value in the expression preview text box. You can edit the expression in the preview text box directly. To clear content from the preview text box, select the delete button in the text box. After finishing specifying the value, select OK. Server adds the value in the value text box. You can also type the value manually. Select Add Condition to add a condition line. Define more condition lines and specify the logic relationship between the condition lines: "AND" or "OR".- To group some condition lines, select them and select Group. Server then adds the selected condition lines in one group and applies them as one line of filter expression (you can also group conditions and groups together).
- To take out any condition or group from a group, select it and select Ungroup.
- To adjust the priority of the condition lines, select it and select Up or Down.
- To delete a condition line, select it and select Delete.
You can use the search bar to search for values in the two value boxes separately.
- To select members, keep Selected Values being selected. If you would like to select all the possible members of the group object, select Select All; if you just want to select some of the members, leave Select All cleared, then select the members in the left box and select the Add button
- Select OK in the Edit Values dialog box to apply the specified values.
- If you select a user, specify whether the unspecified members of the group object are available to the user.
- Select the Edit button
- In the Resource Security box, specify whether you want the selected view element to be visible to the principal.
- Repeat steps 2 to 7 to customize other principal's permissions on the view elements.
- Select Apply to save the security into the business view.
- Select the Back button to return to the Business View Editor.
Adding a Stored Procedure in a Data Source
To add procedures stored in the database to a catalog via a JDBC connection, take the following steps:
- In the Available Data Sources section, hover over a data source line and point to the Add button . Server displays a drop-down menu.
- Select Stored Procedure. Server displays the Stored Procedure Editor.
- In the Stored Procedure Name field, type the name of the new stored procedure.
- Select a JDBC connection from the Connection drop-down list.
- From the Database Catalog drop-down list, select the catalog in the database that contains the stored procedures you need.
- Select Refresh.
- Server lists all the stored procedures in the selected database catalog in a three-level tree. The top level is SQL-catalog, the second is SQL-schema, and the last level are stored procedures. Select the stored procedure you want to add them to the catalog. Not all databases support stored procedures. In this case, you may not see any stored procedure.
- If the selected procedure contains parameters, Server displays all the IN and INOUT parameters in the Parameter List table for you to specify the parameter values. Double-click the Value cell to edit the value of each parameter.
Server saves these values inside the stored procedure and uses them as the default values when executing the stored procedure. Also, the IN type parameters of a stored procedure is available for use the same as any other Report parameters.
- Double-click the Bind Parameter Name cell to bind the IN and INOUT parameters in the stored procedure to the existing parameters or constant level formulas of the same type predefined in the catalog data source in which you have created the JDBC connection, or to the special field "User Name" (to bind to a parameter or formula, type the name of the parameter or formula in the cell; to bind to the special field "User Name", type username in the cell). By default, the bound parameter is the one with the same name of the IN/INOUT parameter that Server automatically creates when you add the stored procedure.
- Select Update. Server refreshes the Columns panel that lists the columns in the selected stored procedure.
- Select the root node or a column in the Columns panel, and you can then update the stored procedure properties or column properties in the Properties panel.
- Select Apply to save the stored procedure.
- Select the Back button to return to the home page of Catalog Studio. Server lists the new stored procedure in the Available Stored Procedures section for the data source.
After you create a stored procedure, you can modify it if you want. To do this, hover over the stored procedure line in the Available Stored Procedures section, and then select the Edit Stored Procedure button on the floating toolbar. Server displays the Stored Procedure Editor. You can update the stored procedure following the preceding steps as you did when you created a stored procedure.
Adding Imported SQL Statement in a Data Source
You can add imported SQL statements into a catalog after you have set up a JDBC connection.
- In the Available Data Sources section, hover over a data source line and point to the Add button . Server displays a drop-down menu.
- Select Imported SQL. Server displays the New Imported SQL page.
- Select a connection from the Connection drop-down list.
- The SQL Name field is read only.
- In the From DB Catalog drop-down list, select the catalog in the database which contains the tables/views/synonyms you want to use in the imported SQL.
- Create the statement of the imported SQL. You can write the SQL statement directly in the text panel or paste it from an outside editor.
- Select Check to test whether the SQL statement is correct. If yes, Server display green check mark under the SQL statement.
- Server displays the Columns panel, showing the imported SQL (the root node) and its columns. Select the root node or a column, and you can then update the imported SQL properties or column properties in the Properties panel.
In the Properties panel, you can search for the property names that you want using the search bar. Type the keyword. Server displays the property names that contain the keyword.
- Select Apply to save the imported SQL into the catalog.
- Select the Back button to return to the home page of Catalog Studio. Server lists the new imported SQL statement in the Available Imported SQLs section for the data source.
After you have created an imported SQL statement, you can modify it if you want. To do this, hover over the imported SQL statement line in the Available Imported SQLs section, and then select the Edit Imported SQL button on the floating toolbar. Server displays the Edit Imported SQL page. You can update the imported SQL statement following the preceding steps as you do with the New Imported SQL page.
Adding a User Defined Data Source (UDS) in a Data Source
- In the Available Data Sources section, hover over a data source line and point to the Add button . Server displays a drop-down menu.
- Select User Defined Data Source. Server displays the UDS editor.
- In the Class Name field, choose the appropriate class for your data source:
- For Oracle Stored Procedure, select jet.datasource.oracle.OracleProcedureUDS.
- For EnterpriseDB Procedure, select jet.datasource.enterprisedb.EnterpriseDbProcedureUDS.
- Specify the parameters for the UDS in the Parameter box. The parameter string must adhere to the format defined in the UDS class. You can reference parameters and constant-level formulas predefined in the current catalog data source using the format @FieldName and the special field @username for the User Name.
- When referencing parameters and formulas in the parameter string, you can select Edit Format to customize the format of their values.
- For more details on the usage of Oracle Stored Procedure, please refer to the examples provided in Using User-Defined Data Sources in the Report Designer Guide.
- Server displays the Columns panel, showing the UDS (the root node) and its columns. Select the root node or a column, and you can then update the UDS properties or column properties in the Properties panel.
In the Properties panel, you can search for the property names that you want using the search bar. Type the keyword. Server displays the property names that contain the keyword.
- Select Apply to save the UDS into the catalog.
- Select the Back button to return to the home page of Catalog Studio. Server lists the new UDS in the Available User Defined Data Source section for the data source.
After you have created a UDS, you can modify it if you want. To do this, hover over the UDS line in the Available User Defined Data Source section, and then select the Edit User Defined Data Source button on the floating toolbar. Server displays the UDS editor. You can update the UDS following the preceding steps as you do when you create a New UDS.
Adding a Parameter in a Data Source
- In the Available Data Sources section, hover over a data source line and point to the Add button . Server displays a drop-down menu.
- Select Parameter. Server displays the New Parameter page.
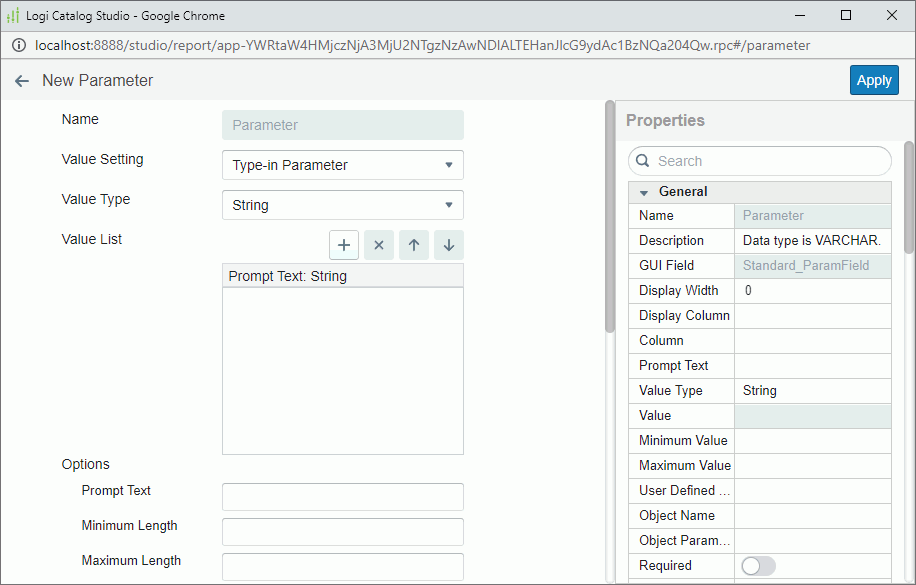
- The Name field is read only.
- Select a parameter type from the Value Setting drop-down list.
- In the value section, specify the parameter values. The section varies with the type you select from the Value Setting drop-down list.
- For Type-in Parameter:
- Select the data type of the parameter values from the Value Type drop-down list.
- Select the Add button
 to add a value line, select it, and then type a value of the specified data type.
- Repeat the preceding step to add more values.
- To adjust the order of the values, select the Up button or Down button .
- To remove any unwanted value, select it in the list, and then select the Remove button .
- To make a value the default selected value for the parameter, select it from the list.
- For Bind with Single Column:
Report provides a mechanism that links each value of the display field with the exact value of the bound field for a parameter, thus when you select a value of the display field, Report actually sends the value of the bound field to the query and filters the query result. This can help you bind the parameter to a data field in order to provide a list of values for report users to select which probably makes more sense. Report uses the selected value of the bound field as the parameter value. For example, it might be confusing if you provide a list of customer ID numbers for the report users to select at runtime, since the ID numbers would probably mean nothing to them. In cases like this, it is better for you to display values of other fields, which would make more sense. For this case, you might prefer to display customer names instead of ID numbers. When the report user selects a customer name from the list, Report passes its ID number to the query as the parameter value so that the search criteria can be fulfilled.- From the Data Source drop-down list, select the data source from which you want to get data for the parameter.
- Select a field from the Bind Column drop-down list, to filter the query when running a report with the parameter.
- If you want the values of another field to display for the report users to choose from, select that field from the Display Column drop-down list.
- Select the sort order from the Sort drop-down list.
To sort the parameter by other fields:
- Select Sort By.
- Select the Add button to add a field line.
- Select a field from the Sort By column to sort the parameter with.
- Select an order from the Sort column to sort the field.
- Repeat the preceding steps ii to iv to add more fields.
- To adjust the order of the fields, select the Up button
 or Down button
  .
. - To remove any unwanted field, select it in the list, and then select the Delete button
 .
.
- For Bind with Cascading Columns:
- From the Data Source drop-down list, select the data source from which you want to get data for the parameter.
- Specify whether to cache the data of the cascading parameters. The Cache Data setting takes effect only when Cache Data of Cascading Parameters is set to "True" or "False". Choose one of the following:
- Default
If you select this value and set Cache Data of Cascading Parameters to "True" or "False", whether Server will cache the data of the cascading parameters is decided by the "True" or "False" value of Cache Data of Cascading Parameters. - True
If you select this value and set Cache Data of Cascading Parameters to "True" or "False", Server will cache the data of the cascading parameters. - False
If you select this value and set Cache Data of Cascading Parameters to "True" or "False", Server will not cache the data of the cascading parameters.
- Default
- Select the Add button to add a parameter line.
- In the Bind Column cell, select a field from the drop-down list.
- If you want the values of another field to display for the report users to choose from, select that field from the drop-down list in the Display Column cell.
- Select in the Parameter cell to create the parameter. Report automatically adds a name for the parameter.
- Repeat steps b to e to create more parameters. Make sure that the Bind Column fields are of cascading relationship one level by one level down. In this way, you can create a group of cascading parameters.
- To adjust the order of the parameters, select the Up button or Down button .
- To remove any unwanted parameter from the cascading group, select it, and then select the Remove button .
- For Type-in Parameter:
- In the Options section, set the Options of the parameter.
- Customize more parameter properties in the Properties panel if you want.
In the Properties panel, you can search for the property names that you want using the search bar. Type the keyword. Server displays the property names that contain the keyword.
- Select Apply.
- Select the Back button to return to the home page of Catalog Studio. Server lists the new parameter in the Available Parameters section for the data source.
After you have created a parameter, you can modify it if you want. To do this, hover over the parameter line in the Available Parameters section, and then select the Edit Parameter button on the floating toolbar. Server displays the Edit Parameter page. You can update the dialog box following the preceding steps as you do with the New Parameter page.
Adding a Formula in a Data Source
- In the Available Data Sources section, hover over a data source line and point to the Add button . Server displays a drop-down menu.
- Select Formula. Server displays the Edit Formula dialog box.
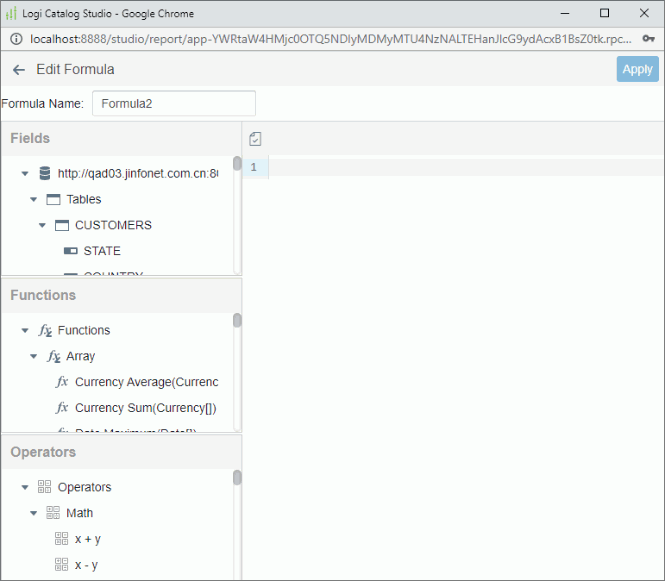
- Type a name for the formula in the Formula Name field.
- Compose the formula by selecting the required fields, built-in functions, and operators from the Fields, Functions, and Operators boxes respectively. You can also write the formula by yourself in the editing box on the right.
The editing box is a plain text editor. You can type, cut, copy, paste, and delete contents.
For more information, see Appendix 1: Formula Functions and Appendix 2: Formula Operators in the Report Designer Guide.
- Select the Check button
 to check whether the syntax of your formula is correct.
 - Select Apply.
- Select the Back button to return to the home page of Catalog Studio. Server lists the new formula in the Available Formulas section for the data source.
After you have created a formula, you can modify it if you want. To do this, hover over the formula line in the Available Formulas section, and then select the Edit Formula button on the floating toolbar. Server displays the Edit Formula dialog box. You can update the dialog box following the preceding steps as you do when you create a formula.
User Grants and Catalog Access Control
User Grants
In addition to system administrator roles, common users can be granted full permissions to access Catalog Studio. The authority to grant permissions resides solely with administrator roles.
Catalog Access Control
Catalog Access Control provides users with the permission to access the Catalog Studio Access Control Editor. This empowers common users to utilize the Catalog Studio Access Control Editor, enabling them to assign permissions to other common users within the catalog.
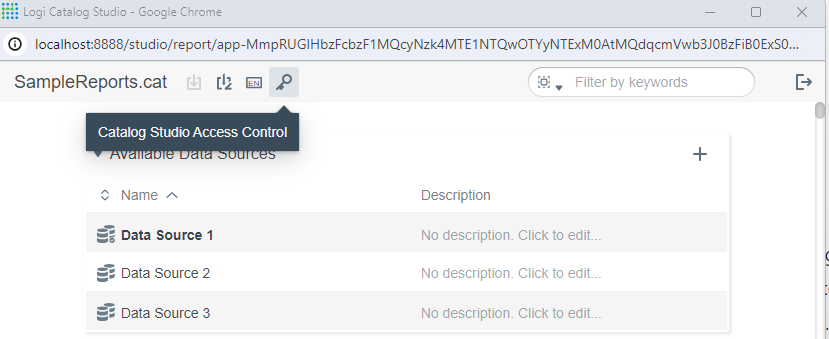
Principal Tree Display in Catalog Studio Access Control Editor
System User Login:
Display all system and organization principals in the principal tree, excluding system administrators, system admin users, and the logged-in user.
Organization User Login:
List all principals within the same organization, excluding organization administrators, organization admin users, and the logged-in user.
If a common user has access to the Catalog Studio Access Control Editor, their presence is omitted from the left principal resource tree. This restriction ensures that the user cannot modify permissions for themselves or administrators.
Catalog Download/Publish
-
The download/publish action is permitted for the administrators role.
-
If there is no any Data Security Settings in catalog, the download/publish action is allowed.
-
If a user has no Data Security Control permission, the download catalog action by the user is denied.
The security approach ensures that user grants and catalog access control are clearly defined, enhancing the overall security and management of Catalog Studio.
Defining Catalog Object Security
You can now edit these security settings of objects in Catalog Studio if you are an administrator: Create Children, Visible, Edit, and Delete. Different types of objects might have different sets of security settings.
- In the Catalog Studio, select the Object Security button on the toolbar. Server displays the Edit Object Security dialog box.
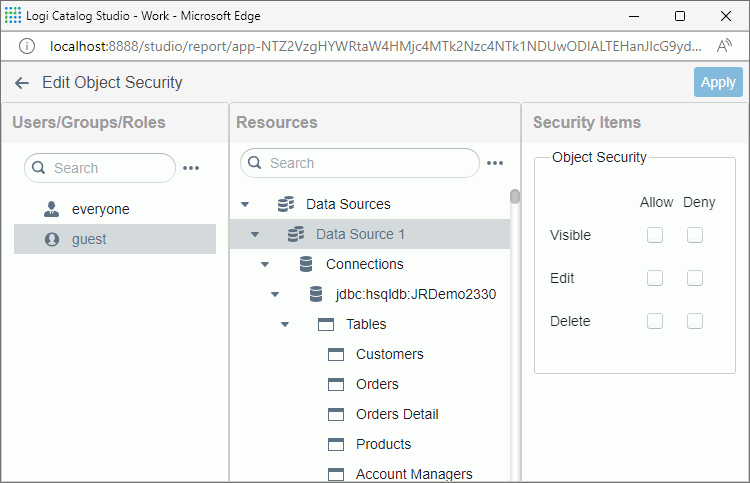
- Select one or multiple principals by using Ctrl or Shift keys + mouse click in the Users/Groups/Roles panel for whom you want to define the catalog object level security.
- Select one or multiple resources in the Resources panel. You can also choose to select/clear all or opt for selecting children. After making your selections, specify the permissions you wish to grant or deny to the selected principals. These permissions include Create Children, Visible, Edit, and Delete, allowing you to define the actions that the chosen principals can perform on the selected resources.
- Follow the step 3 to define security settings on other resources.
- Follow the steps 2 - 4 to define object security for other principals.
- Select Apply.
- Select the Back button to return to the home page of Catalog Studio. Server lists the new formula in the Available Formulas section for the data source.
Data Security Configuration in Catalog Studio
Catalog Studio provides robust data security controls to regulate the accessibility of data instances for users, groups, and roles, with restrictions applied at the record level. This section outlines the key features and procedures for configuring data security in Catalog Studio.
Overview of Data Security Policies
Definition of Data Security Policy:
Data security policies are established for each principal on a specific table. These policies determine which records of a table are accessible to the principal. Each policy is composed of the following information:
- Table Name, Principal Combination:
- Uniquely identifies a policy.
- Table name identifies the table to be protected.
- Principal is the name of the entity whose permissions will be controlled.
- Conditions:
- Specifies accessible records of the target table for the principal.
- To define conditions:
- Direct SQL: a user-inputted condition string.
Conditions Building:
- Direct SQL:
- User-inputted condition string.
- Basic syntax validation.
- Suitable for pure JDBC connections.
Configuring Data Security in Catalog Studio
- Hover over a data source object in Catalog Studio and select Edit Data Security on the floating toolbar.
If the icon is invisible, it may be disabled by the administrator in the user profile.
- Server displays the Data Security Editor. Select a principal from the Users/Groups/Roles panel.
- Select a table from the Resources panel.
- Choose the way of defining the data security between Join and Filter and Direct SQL.
- When you have selected Direct SQL, input search conditions in the text editor. Validate using Check, which is visible and enabled only for pure JDBC connections.
- After configuring data security, select Apply.
- Select the Back button to return to the home page of Catalog Studio.
- Save the changes to ensure they are retained.

You cannot close the browser directly; use the provided buttons for saving and navigation. The administrator can control the availability of the Data Security Editor in user profiles.
Modifying a Catalog
To modify a catalog, on the Resources page, hover over a catalog, and then select the Edit button on the floating toolbar.
Server displays Catalog Studio for you to modify the catalog. Catalog Studio displays the data sources, data connections, queries, business views, imported SQLs, parameters, and formulas in the catalog. You can add, edit, and remove these types of resources.
By default, Server expands all the catalog resources in Catalog Studio. You can collapse or expand an Available XXX section by selecting the triangle icon on the left.
To modify the name of a catalog resource, select the name, type a new name, and then select outside of the name field to accept the new name.
To provide or update a description for a catalog resource, select the Description field, type a description or new content, and then select outside of the field to accept your change.
Managing Catalog Sessions: Locking and Unlocking
To prevent confusion and resource conflicts, Report incorporates a catalog locking mechanism. When a user is actively modifying a catalog, it is placed in a locked status, preventing other sessions from accessing and making requests to the catalog.
Unlocking a Catalog Session
Unlocking via Catalog Modification:
- When a user opens an existing catalog on Server and successfully locks it for modification.
- Upon saving the catalog with a new resource path, the system automatically unlocks the catalog associated with the old catalog. Simultaneously, the system locks the catalog with the new catalog, maintaining the current catalog session.
Unlocking via Catalog Closure:
When a user closes a catalog by exiting Catalog Studio in the normal course of action, it concludes the current catalog session.
Merely closing the browser session does not terminate the catalog, and the Catalog remains in a locked status.
Unlocking via Server Console:
- Navigate to Server Console > My Tasks > Interactive page.
- Hover over the catalog session and select the option to stop it.
By following these procedures, you can efficiently manage catalog sessions, ensuring proper locking and unlocking to maintain data integrity and user collaboration.
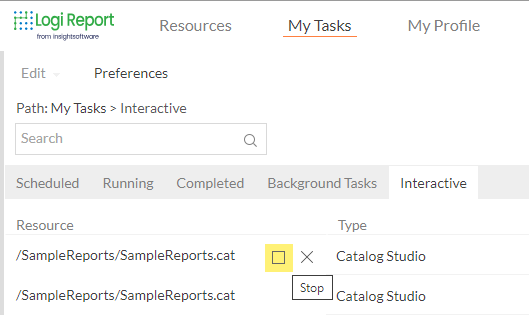
Customizing Catalog Studio Profile
You can configure the preferences and features of Catalog Studio by profile on the Server Console. This topic describes how you can customize Catalog Studio profile properties.
This topic contains the following sections:
Server Administrators
You can navigate to the Administration > Server Profile > Customize Profile > Catalog Studio tab on the Server Console, create different profiles for end users to choose, set the default profile, and edit/remove the profiles you created.
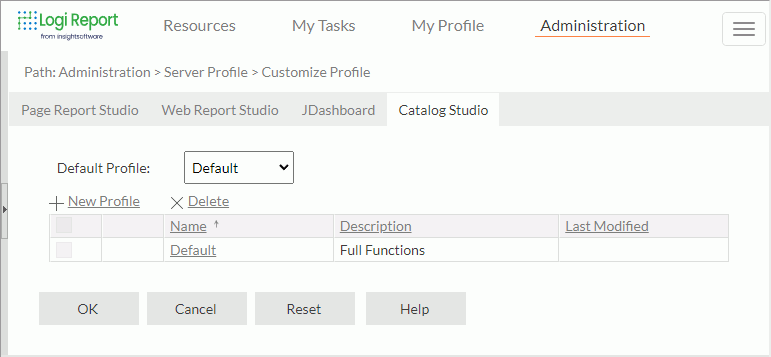
Server provides the Default profile which enables all the Catalog Studio features. You can create different profiles with different features to serve for different purposes. To create a new profile, select New Profile. Then, in the Catalog Studio Profile dialog box, define the features you want for the profile.
To set a default profile, select a profile from the Default Profile drop-down list. Server displays the Default profile and all other profiles that you have created in the drop-down list for your selection.
By selecting a profile name in the Name column, you can view the profile settings in the Catalog Studio Profile dialog box.
For the profiles that you created, you can edit them by selecting Edit and then making changes in the Catalog Studio Profile dialog box.
You can remove a profile if you no longer want it, select it in the profile table, then select Delete.
You cannot change or delete the Default profile.
Any Users
You can navigate to the My Profile > Customize Profile > Catalog Studio tab on the Server Console, then set the default profile for Catalog Studio or view the properties of all available profiles.
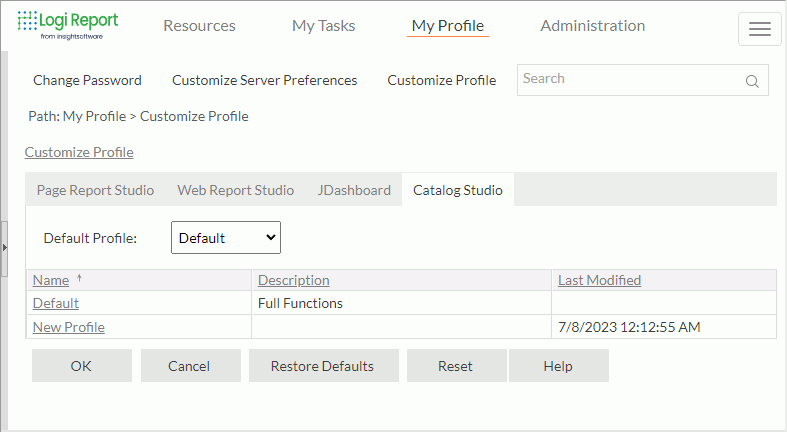
To set a default profile, select a profile from the Default Profile drop-down list. Server displays the Default profile and all other profiles that server administrators have created in the drop-down list for your selection.
To view the properties of profile, select its name, and then Server displays the Catalog Studio Profile dialog box.
Searching for Catalog Resources
You can search for catalog resources including data sources, data connections, queries, business views, stored procedures, imported SQLs, parameters, formulas, and all those resources using the search bar  on the toolbar of . Select the resource type button
  , select a resource type or All (if you want to search among all resources in the catalog) from the drop-down list, and then type the keyword you want to search.
Removing Catalog Resources
When there is more than one resource of the same type in a catalog, for example, two data sources or three business views, and you see the Delete button on the floating toolbar when you hover over such a resource in Catalog Studio, you can remove the resource by selecting .
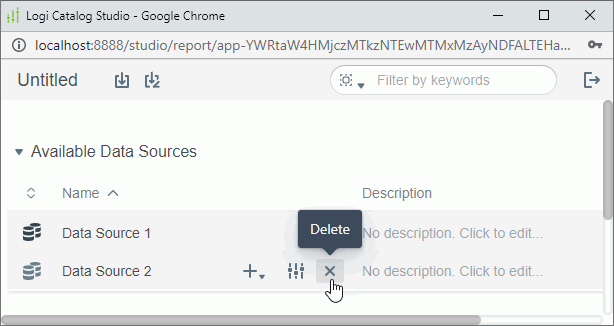
Save and Save As Options in Catalog Studio
You can save the current catalog, and additionally, choose to save the current catalog to a new path. This feature provides flexibility and allows you to efficiently manage and organize your catalogs.
Save Options:
-
Save
You can save the current catalog, preserving any modifications made during the editing session. -
Save As
You can save the current catalog with a new path, facilitating the creation of a duplicate or a modified version.
Save and Save As options are applicable only to non-XML format Catalogs.
The Save As feature is available only for catalogs without Data Security settings. You should remove any existing Data Security settings before initiating the Save As operation.
Save As functionality is restricted to administrator roles. Only users with administrative privileges have the authority to save a catalog with a new path.
By adhering to these guidelines, you can effectively utilize the Save and Save As options in Catalog Studio while ensuring compatibility and adherence to security considerations.