 Previous Topic
Working with DBFields
In a query-based report, the DBFields or database fields refer to fields directly from databases, user data sources, hierarchical data sources, or other data resources; in a business view-based report, they are the group and details objects in the business view. This topic introduces how you can insert DBFields in a report and use the DBField features.
For the DBFields in a report, you can use them as the trigger object of links, and change their display types if you want.
This topic contains the following sections:
- Inserting DBFields in a Report
- Adding Summaries for DBFields
- Adding Conditional Formatting to DBFields
- Searching for DBFields in a Report
See an example: The SampleComponents catalog, included with Designer, contains reports that have examples of how you could use each component type in a report. For the DBField component example, open <install_root>\Demo\Reports\SampleComponents\ForDBField.cls.
Inserting DBFields in a Report
You can insert DBFields in the report areas listed in Component Placement in Different Report Type.
For a business view-based report
In the Data panel, select the group or detail object and drag it to the destination.
For a query-based report
You can insert a DBField into a query-based report using either of the following two methods:
- By dragging and dropping
In the Data panel, select a dataset from the dataset drop-down list, then select the DBField and drag it to the destination. - Using dialog box
- Position the mouse pointer at the destination where you want to insert the DBField.
- Navigate to Insert > DBField or Home > Insert > DBField. Designer displays the Insert Fields dialog box.
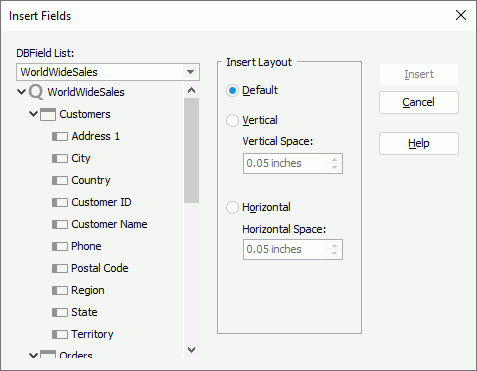
- Select a dataset from the dataset drop-down list. Designer then lists all resources in the specified dataset. However, if you are inserting DBFields into a data component, you should not change the dataset. You can only apply one dataset in a data component.
- Select the DBField you need. You can select multiple DBFields to insert them all at a time.
- When you select multiple DBFields, in the Insert Layout box, specify the layout of the DBFields in the report. By default, Designer arranges them in the default layout. You can arrange the DBFields horizontally or vertically by selecting Horizontal or Vertical, and customize the space between them.
- When you select multiple fields, specify how to arrange these fields in the Insert Layout box.
- Select Insert to insert the DBFields into the destination.

- You cannot use the Insert Fields dialog box to insert a DBField into a crosstab.
- If you insert a DBField into the detail panel of a banded object or table, Designer adds the name of the DBField automatically into the corresponding header panel; otherwise, Designer places the field and its name label in the same panel. If you do not want Designer to insert the name label automatically, clear "Insert field name label with field" in the Component category of the Options dialog box.
 Back to top
Adding Summaries for DBFields
In a query-based page report, you can add summaries for DBFields.
- Select a DBField, then do one of the following:
- Navigate to Insert > Summary.
- Right-click the DBField and select Summary Function from the shortcut menu.
Designer displays the Insert Summary dialog box.
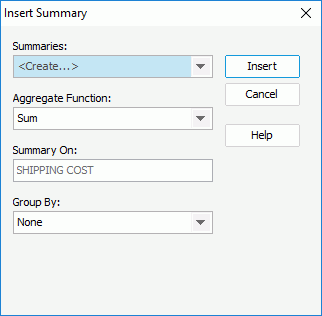
- From the Aggregate Function drop-down list, select the function of the summary. If you select DistinctSum, you should select the ellipsis
 next to the Distinct On text box to specify one or more fields according to whose unique values to calculate DistinctSum using the Select Fields dialog box.
 - When the report is grouped, select to which group level you want to apply the summary from the Group By drop-down list. If you select None, Designer adds the summary based on the whole report.
- Select Insert.
Designer then creates a summary with the default name "Function_DBFieldName" in the current catalog. The summary is also available under the Summaries node in the Data panel. You can drag it to use in the report.
Adding Conditional Formatting to DBFields
You can add conditional formatting to DBFields in a report, so the field values that meet a specified condition can automatically apply the formatting you define for the condition. This is very useful to highlight values that users may need to act on at runtime.
To apply conditional formatting to a DBField
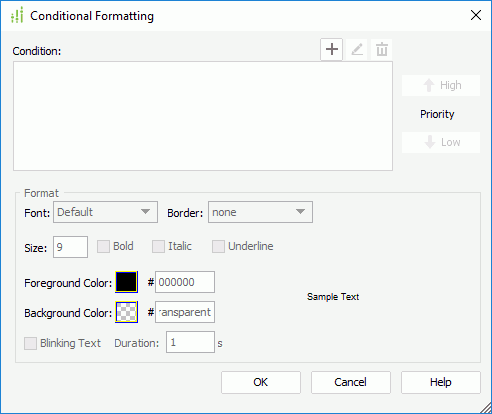
- Select the DBField and do one of the following:
- Select Conditional Formatting
 in the Format ribbon.
 - Right-click the DBField and select Conditional Formatting from the shortcut menu.
Designer displays the Conditional Formatting dialog box.
- Select Conditional Formatting
- Select Add
 . Designer displays the Edit Conditions dialog box.
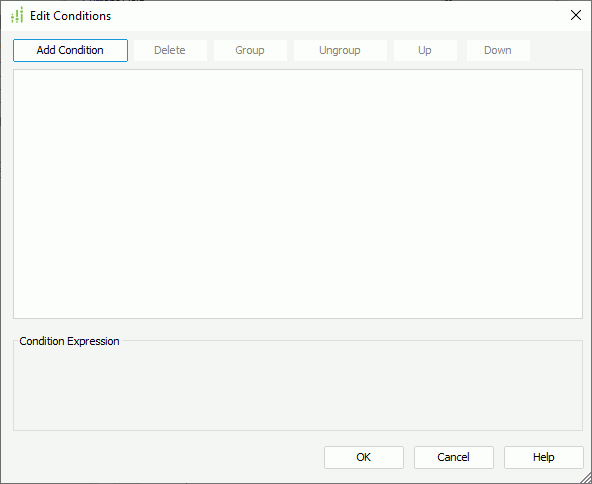
- Select Add Condition to add a condition line.
- From the field drop-down list, select the field on which to create the condition. You can also select the special field "User Name" or Page Number to compose the condition. If you select Page Number, Server applies the formatting to the field values on the pages that meet the condition at runtime.
- Choose the operator with which to compose the condition from the operator drop-down list.
- From the value drop-down list, specify the value of how to build the condition. You can also type the value by yourself.
- When you are adding conditional formatting to a DBField in a crosstab, you can select
 and then select an object from the drop-down list to use its value in the condition. Designer provides the following objects that are of the same data type as the field on which the condition is based in the drop-down list:
- Crosstab formulas if the crosstab uses a query resource
- Dynamic resources and aggregation objects if the crosstab uses a business view
- When the condition is based on a String field, you can apply an empty string as the value, by simply leaving the text box blank (value length=0).
If you would like to filter space string (one or more spaces) and empty string, create a formula with the statement
Trim(@Field)that transforms the spaces into empty string, then use the formula to replace the field itself in the condition.
- When you are adding conditional formatting to a DBField in a crosstab, you can select
- Repeat the preceding steps to define more condition lines and specify the logic relationship between the condition lines: "And", "Or", "And Not", or "Or Not".
- To group some condition lines, select them and select Group, Designer then adds the selected condition lines in one group and applies them as one line of filter expression (you can also group conditions and groups together).
- To take out any condition or group from a group, select it and select Ungroup.
- To adjust the priority of the condition lines, select it and select Up or Down.
- To delete a condition line, select it and select Delete.
- Select OK to save the condition. Designer displays and selects the newly added condition in the Condition box in the Conditional Formatting dialog box.
- In the Format box, specify the formatting you want to apply to the field values that meet the condition, such as the font face, font size, and font color. Select Blinking Text if you want to make the values blink, then in the Duration text box, set how long it takes the values to complete the transition from the foreground color to the transparent color, in seconds. The blink settings can work in Designer view mode, in HTML output, and at runtime.
- Repeat steps 2 to 9 to add more conditions and specify the formatting for each condition.
- To edit a condition, select the condition from the Condition box, select Edit
 , then edit the condition in the Edit Conditions dialog box.
 - To adjust the priority of the conditions, select a condition and select High or Low.
- To delete a condition and the corresponding formatting, select the condition in the Condition box and then select Remove
 .
.
- To edit a condition, select the condition from the Condition box, select Edit
- Select OK to save the settings.
To make the blink settings take effect in HTML output and at runtime, you need to make sure the web browser you use supports CSS3 animation, such as Firefox, Safari, and Chrome.
Searching for DBFields in a Report
When a report has many DBFields, you may find it difficult to locate where a certain field is. To easily find out the field you have lost track of in your report, you can use the Find DBField feature.
To find a DBField in a report
- Navigate to Home > Find. Designer displays the Find dialog box.
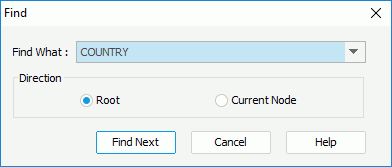
- Select the field you want to locate from the Find What drop-down list.
Besides DBFields, Designer also lists the formula fields used in the report in the Find What drop-down list, so you can also use this dialog box to locate a formula in a report.
- Specify the criteria with which to find the field.
- Root
Select to search for the field from the top node. - Current Node
Select to search for the field from the current node.
- Root
- Select Find Next and Designer selects the specified field in the report.