Setting Up JDBC Connections in a Catalog
Report supports most of the relational databases that support JDBC drivers. Via specific JDBC drivers, you can create connections which connect your catalogs to different relational databases. This topic describes how you can set up JDBC drivers for the Report products and create connections in a catalog via the JDBC drivers.
This topic contains the following sections:
- Setting Up the JDBC Driver
- Creating a Connection via the JDBC Driver
- Configuring Callbacks After Connecting to a Database
Setting Up the JDBC Driver
Before you can retrieve data from a relational database in Report, you should first set up the JDBC driver.
- Install the JDBC driver according to the instructions provided by the JDBC driver supplier and understand the URL format required by the driver.
- Append the class path of the JDBC driver's JAR files with full path into Report's environment configuration file by editing setenv.bat for Windows or setenv.sh for UNIX/Linux in
<designer_install_root>\bin. For example, if you are using the Oracle JDBC driver ojdbc7.jar, append it as follows:set ADDCLASSPATH=%JAVAHOME%\lib\tools.jar;c:\oracle\lib\ojdbc7.jar; The step for appending the class path is very important. The same changes made to Designer’s class path must be made to the class path for Server too. A missing JDBC driver in the Report startup batch file or command line results in a "ClassNotFoundError" message when you try to run a report. If you want to use the Preview as Page/Web Report Result feature in Designer, you also need to append the class path for the JDBC driver to setenv.bat/setenv.sh in
 <designer_install_root>\server\bin. - Add the driver into Designer's driver template file jdbcdrivers.properties in
<designer_install_root>\binin the following format:jdbc.drivers=JDBCDriverName:JDBCDriverName:...
Where, JDBCDriverName is the JDBC driver name that Report can automatically load when it starts up, and ":" is the delimiter between two driver names.
The following example specifies an Oracle thin driver and an Interbase thin driver:
jdbc.drivers=oracle.jdbc.driver.OracleDriver:interbase.interclient.Driver Once you have added the drivers in jdbcdrivers.properties, later when you set up JDBC connections in Designer, you do not need to provide the driver name manually. Designer can search from the beginning of the class path and find one that contains the specified class.
Creating a Connection via the JDBC Driver
To set up a JDBC connection in a catalog to retrieve data via JDBC driver, take the following steps:
- Create a catalog or open a catalog.
- In the Catalog Manager, do either of the following:
- To set up the connection in an existing data source in the catalog, right-click the data source node and select New JDBC Connection from the shortcut menu.
- To set up the connection in a new data source in the catalog, select any of the existing catalog data sources, select New Data Source on the Catalog Manager toolbar, then in the New Data source dialog box, specify the name of the data source, select the JDBC connection type and select OK.
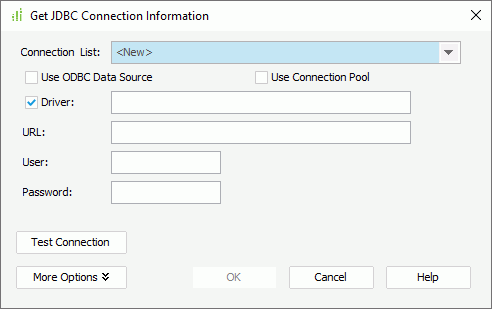
Designer displays the Get JDBC Connection Information dialog box.

- Provide the necessary information to connect with the database. You can set up a JDBC connection using one of the following methods:
- Setting up by adding an existing connection
- From the Connection List drop-down list, select the connection. This list contains previously added connection information. The format of the connection information is JDBC URL/(JDBC Driver Name), for example:
jdbc:odbc:jinfonet/(sun.jdbc.odbc.JdbcOdbcDriver) - The JDBC URL and JDBC driver name then appear in the corresponding text boxes.
- From the Connection List drop-down list, select the connection. This list contains previously added connection information. The format of the connection information is JDBC URL/(JDBC Driver Name), for example:
- Setting up a new JDBC connection
- In the Driver text box, specify the driver. If you have added the driver into jdbcdrivers.properties when setting up the JDBC driver, you can leave this empty. Designer can find the correct driver from the file.
- In the URL text box, specify the URL of the JDBC driver. The URL format is regulated by the driver itself.
- Specify the user name and password used to connect to the database.
- Setting up an ODBC connection
- Clear Driver and select Use ODBC Data Source.
- In the DSN Name text box, type the ODBC data source name.
- Specify the user name and password to enable accessing the database through the ODBC data source.

- The ODBC-JDBC bridge is not included in Java JDKs after version 7, therefore, for JDK 8 or later, you get an error that "No suitable driver found for jdbc:odbc". To resolve this issue, you need to add the path information of the ODBC-JDBC bridge to the class path during installation or by editing the file setenv.bat (setenv.sh on UNIX/Linux) in
<designer_install_root>\bin. - The JDK that Designer uses must match the ODBC data source that the operating system uses. For example, 32-bit ODBC data source can be connected by 32-bit JDK only.
- Setting up a connection via the WebLogic 6.1 connection pool
- Select Use Connection Pool. Designer then automatically displays the string weblogic.jinfonet.pool.Driver in the Driver text box.
- In the URL text box, specify the URL of the JDBC driver.
- Specify the user name and password respectively.
- Setting up by adding an existing connection
- If your database has some special requirements, you can select More Options to modify the options according to your requirements.
- Select Test Connection to test whether the information you provide is available.
- Select OK to set up the connection. Designer then displays a message box, showing the status of connecting to the database.
- Upon finishing setting up the connection, Designer displays the Add Tables/Views/Synonyms dialog box, prompting you to add tables from the database to the catalog. If you want to add tables later, select Done.
You can also use the connection plug-ins Designer provides to connect to the Oracle, MySQL, SQL Server, InterSystems IRIS, and PostgreSQL databases in an easy way.
![]() If you want to use the DB2 app connection, you need to install the client and configure the net address first.
If you want to use the DB2 app connection, you need to install the client and configure the net address first.
The following presents examples of connecting to specific relational databases.
Example 1: Connecting to Amazon RDS
Assume that:
- You have already installed the JDBC driver (com.mysql.jdbc.Driver), and have appended the archive files of the driver to the ADDCLASSPATH variable of setenv.bat in
<designer_install_root>\bin. - The RDS database server has the following information:
- Host name: jrdbtest.c4fb8hiicidz.us-west-2.rds.amazonaws.com
- Port number: 3306
- Database name: sampledb1110
- Database user & password: dbadmin, test1234
To set up a connection to connect a catalog in Designer to the database via Amazon RDS
- Open a catalog.
- In the Catalog Manager, right-click the node of an existing data source and select New JDBC Connection from the shortcut menu. Select JDBC in the Select Connection Type dialog box.
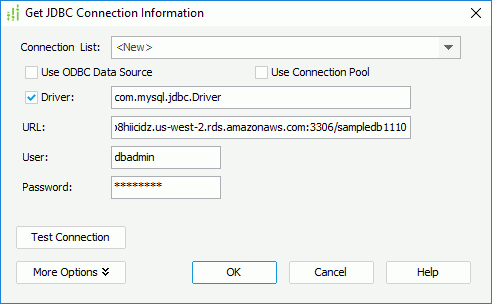
- In the Get JDBC Connection Information dialog box, type the JDBC driver class name com.mysql.jdbc.Driver in the Driver text box.
- In the URL text box, specify the URL in the format
jdbc:mysql://<hostname>:<port>/<database>. In this example, type jdbc:mysql://jrdbtest.c4fb8hiicidz.us-west-2.rds.amazonaws.com:3306/sampledb1110. The URL is dynamically generated when you apply an instance. - Type the user name dbadmin and password test1234 respectively.

- Select OK to set up the connection.
![]()
- You should not use RDS for small data queries since it takes a long time in the cloud.
- The RDS MySQL database is case sensitive for table names and column names, which may result in that the Report sample reports cannot run.
Example 2: Connecting to RedShift
Assume that:
- You have already installed the PostgreSQL JDBC driver (org.postgresql.Driver), and have appended the archive files of the driver to the ADDCLASSPATH variable of setenv.bat in
<designer_install_root>\bin. - The RedShift database server has the following information:
- Host name: jinfonet-rsdw-demo.cfcn5ogc14yr.us-east-1.redshift.amazonaws.com
- Port number: 5439
- Database name: sampledb
- Database user & password: dbadmin, test1234
To set up a connection to connect a catalog in Designer to the database via RedShift
- Open a catalog.
- In the Catalog Manager, right-click the node of an existing data source and select New JDBC Connection from the shortcut menu. Select JDBC in the Select Connection Type dialog box.
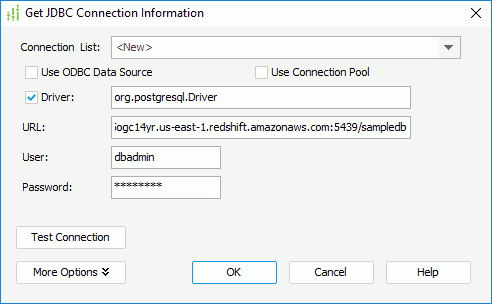
- In the Get JDBC Connection Information dialog box, type the JDBC driver class name org.postgresql.Driver in the Driver text box.
- In the URL text box, specify the URL in the format
jdbc:postgresql://<hostname>:<port>/<database>. In this example, type jdbc:postgresql://jinfonet-rsdw-demo.cfcn5ogc14yr.us-east-1.redshift.amazonaws.com:5439/sampledb. The URL is dynamically generated when you apply an instance. - Type the user name dbadmin and password test1234 respectively.

- Select OK to set up the connection.
![]()
- Redshift does not support the Double data type and it uses Decimal or Double Precision instead.
- Redshift does not support the Bytea, Bit(N), or Bit varying (N) data type, and so far there is no alternative data type for that, therefore Report binary data fields like photos stored in the demo database cannot be imported to Redshift.
- For more information about the features, functions, and data types that are not supported in Redshift, go to docs.aws.amazon.com/redshift/latest/dg/c_redshift-and-postgres-sql.html.
Example 3: Connecting via WebLogic 6.1 Connection Pool
- Set up the WebLogic Connection Pool.
- Assume that you have started the WebLogic Server, access the console through a web browser (
http://host:7001/console). Then, go to the left panel, and expand the JDBC node. - Select the Connection Pools node. Designer displays all the defined connection pools in the right panel.
- Select the Configure a New JDBC Connection Pool link.
- In the Configuration tab, define the connection pool as follows. Then, select Create.
- Name: jinfonet
- URL: jdbc:odbc:jinfonet
- Driver Classname: sun.jdbc.odbc.JdbcOdbcDriver
- Assume that you have started the WebLogic Server, access the console through a web browser (
- Check the Connection Pool. In the Monitoring tab, select the link Monitor all Active Pools to check if the pool is active. You can see the connection pool that you just created appear in the Monitoring tab.
- Select the Targets tab, and add examplesServer to the Chosen column to assign the connection pool to the server. Select Apply to save the changes.
- Set up the data source.
- Select the Data Sources node in the JDBC node. In the right panel, select the Configure a New JDBC Data Source link.
- In the Configuration tab, specify the values in the following text boxes.
- Name: jinfonetDS
- JNDI Name: jinfonetDS
- Pool Name: jinfonet
- Select Create. Designer adds the new data source in the Data Sources node in the left panel.
- Select the Targets tab and add examplesServer in the Available column to the Chosen column. Select Apply to save the changes.
- Add weblogic.jar to setenv.bat. To connect via the WebLogic Connection Pool in Designer, you first need to add weblogic.jar in
<weblogic_install_root>\wlserver6.1\libto the ADDCLASSPATH variable of setenv.bat in<designer_install_root>\bin. In this example, supposing that you have installed Designer inC:\LogiReport\Designer, and WebLogic inC:\bea, modify setenv.bat inC:\LogiReport\Designer\binto addC:\bea\wlserver6.1\lib\weblogic.jarto the ADDCLASSPATH variable as follows:set ADDCLASSPATH=%JAVAHOME%\lib\tools.jar;C:\bea\wlserver6.1\lib\weblogic.jar; - Set up the connection in Designer.
- Open a catalog.
- In the Catalog Manager, right-click the node of an existing data source and select New JDBC Connection from the shortcut menu. Select JDBC in the Select Connection Type dialog box.
- In the Get JDBC Connection Information dialog box, select Use Connection Pool. Designer automatically displays the string weblogic.jinfonet.pool.Driver in the Driver text box.
- Type in the URL jdbc:weblogic:jinfonet:@<hostname>:7001:jinfonetDS, where <hostname> is the host name or IP address of the WebLogic Server, 7001 is the port to which the WebLogic Server listens, and jinfonetDS is the JNDI Name of the data source. Select OK.
![]() Designer does not support the data types longbarbinary and BigDecimal when you use a WebLogic Connection Pool.
Designer does not support the data types longbarbinary and BigDecimal when you use a WebLogic Connection Pool.
Configuring Callbacks After Connecting to a Database
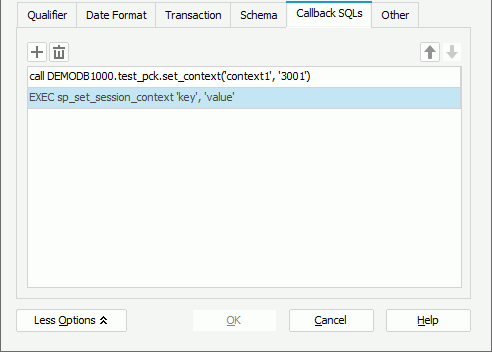
When you initially connect to a database, a session is established. The SQL-1999 standard introduces a set of statements for configuring the current SQL session. Different DBMSs provide different APIs for users to configure sessions. For example, Oracle employs the DBMS_SESSION.SET_CONTEXT procedure within a user-designated package to set or reset attributes of the session context. Oracle enforces the use of DBMS_SESSION.SET_CONTEXT within a package, limiting its invocation to within the package's procedures or functions. In SQL Server, users can use the sp_set_session_context stored procedure to establish key/value pairs in the session context. This procedure can be called multiple times when multiple key session settings or value pairs are required within the context.
When you set up a JDBC connection in Designer, you can add a group of SQL statements in the Callback SQLs tab of the connection dialog box to call the procedure of your database, which you want Report to execute right after you create the connection. Callback SQLs enable you to configure the session context before running the queries to fetch data for reports. You can reference parameters, constant level formulas, and the User Name special field in callback SQL statements as you reference them in import SQL statements.

When you configure the ConnectionPoolConfig.properties file to add connections with callback SQLs to the connection pool, Report does not reuse and share the connections between requests. Report creates a new connection object for each request. The max number of such connections is still controlled by the MaxCount property in ConnectionPoolConfig.properties. Report always sets MaxShare to 1. If any of the callback SQLs fails, the getConnection function should return null, as a connection may not function correctly in such cases.
![]() When a JDBC connection in a catalog is defined with callback SQLs in Designer, after the catalog is published to Server, Server also applies the callback SQLs to the dynamic connections based on this connection. Server administrators cannot edit callback SQLs via Server's dynamic connection user interface.
When a JDBC connection in a catalog is defined with callback SQLs in Designer, after the catalog is published to Server, Server also applies the callback SQLs to the dynamic connections based on this connection. Server administrators cannot edit callback SQLs via Server's dynamic connection user interface.
 Previous Topic
 Back to top