 Previous Topic
Working with XML Connections in a Catalog
This topic describes how you can set up XML connections in a catalog, and add and manage tables transformed from XML data sources in the catalog via the connections.
This topic contains the following sections:
- Setting Up XML Connections in a Catalog
- Adding More Tables to an XML Connection
- Managing Tables in an XML Connection
Setting Up XML Connections in a Catalog
To set up an XML connection to connect a catalog to an XML data source, take the following steps:
- Create a catalog or open a catalog.
- In the Catalog Manager, do either of the following:
- To set up the connection in an existing data source in the catalog, right-click the data source node and select Add XML Connection from the shortcut menu.
- To set up the connection in a new data source in the catalog, select any of the existing catalog data sources, select New Data Source on the Catalog Manager toolbar, then in the New Data source dialog box, specify the name of the data source, select the XML connection type and select OK.
Designer displays the XML Connection Wizard dialog box.
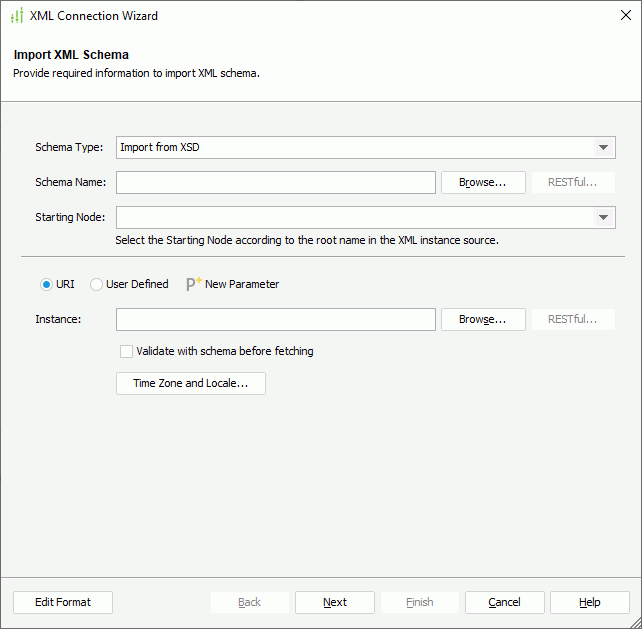
- In the Import XML Schema screen, specify the way to import the XML schema from the Schema Type drop-down list: Import from XSD or Parse from XML Instance.
- Provide the information for importing the XML schema.
- When you select the schema type as Import from XSD
- In the Schema Name text box, type the URI string of the schema file or select Browse to select the file.
- In the URI string, you can reference parameters and constant level formulas in the current catalog data source in the format @FieldName, and the User Name special field as @username. For example, if a URI string is
http://localhost:8080/rest/getData?startDate=2016-01-01, and you want to use the parameters pHost, pPort, and pStartDate to dynamically generate the URI at runtime, then the URI string ishttp://@pHost:@pPort/rest/getData?startDate=@pStartDate. - You can select New Parameter to create a parameter in the current catalog data source and reference it in the URI string, when the predefined parameters cannot meet your requirement.
- When the URI string contains characters, such as "@", ":", and double quotation marks, or other strings that do not need to be parsed, you should quote them with double quotation marks.
- If you use the User Name special field, when you select Next in the connection wizard, Designer displays the Security Identifier dialog box for you to specify the user name that you want to use to generate the stream. When a user runs a report that uses data from the XML data source at runtime, Server applies the user's ID.
- In the URI string, you can reference parameters and constant level formulas in the current catalog data source in the format @FieldName, and the User Name special field as @username. For example, if a URI string is
- When the URI string you specify begins with the "http://" or "https://" protocol, Designer enables the RESTful button. Select the button to specify RESTful options for the schema file in the RESTful Data Source Options dialog box.
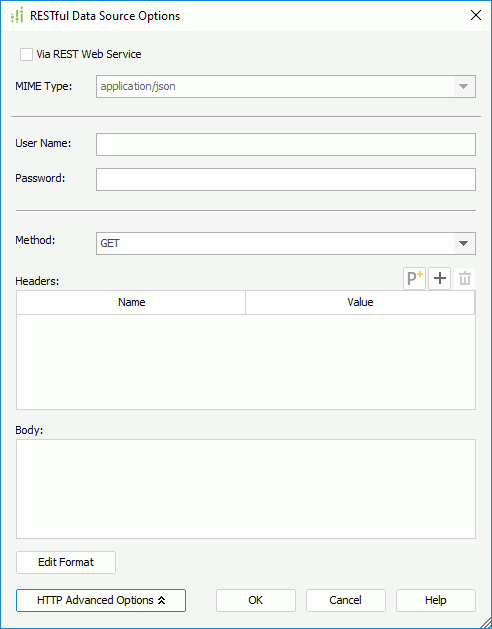
- To receive the remote data via REST Web Service on the application server, select Via REST Web Service, then from the MIME Type drop-down list, select the MIME type for the REST Web Service data source. You can also specify the type in the text box manually. The REST Web Service Client API (such as the JAX-RS Client API of Java EE) will then be called to get the remote data. When you use a proxy to connect to the REST Web Service, you need to configure the proxy parameters to enable the proxy to work successfully.
 If you do not select Via REST Web Service, Designer receives the remote data via the protocol in the URL you specify in the Schema Name text box in the connection wizard.
 - Specify the user name and password for remote data authentication.
- Select HTTP Advanced Options to specify the advanced HTTP options.
- Select an HTTP method from the Method drop-down list to send the request, which can be GET or POST.
- Select Add
 above the Headers box to add a header line, then specify the name and value of the user-defined HTTP header. Repeat this to edit more headers. To delete a header, select it and select Remove
  .
. - In the Body box, specify the user-defined HTTP body.
- When editing the HTTP headers and body, you can reference parameters, constant level formulas, and the User Name special field as described earlier. When the predefined parameters cannot meet your requirements, you can select
 to create the parameter.
 - If you reference parameters and formulas in the HTTP headers and body, you can select Edit Format to edit the format of their values.
- Select OK to apply the RESTful data source options and return to the XML Connection Wizard dialog box.
- From the Starting Node drop-down list, specify the starting node accordingly.
- Specify the XML instance file.
- To use an instance file from URI, select URI, then type the URI string in the Instance text box or select Browse to select the instance file. You can also reference parameters, constant level formulas, and the User Name special field in the URI string as described earlier. When the specified URI string begins with the "http://" or "https://" protocol., Designer enables the RESTful button. Select the button to specify RESTful options for the instance data.
- To use an instance file from a user-defined interface, select User Defined, then provide the class name with package name in the Class Name field. You can also select Browse to find the class file. The class you specify must exist and can be found by Designer, also by Server at runtime, which means the class should be in the class path of the system environment. After filling in this text box, Designer automatically displays the class name of the interface that the class implements behind "The class implements:". Specify the parameter string for the user-defined interface in the Parameter box. The parameter string must match the format defined in the class. You can also reference parameters, constant level formulas, and the User Name special field in the parameter string.
- Select Validate with schema before fetching to validate whether values in the XML instance are valid according to the W3C standard and the selected XSD schema.
- If a value of DateTime data type is accurate to millisecond, although the value is valid according to the W3C standard, Designer still displays the "Invalid Value" message. You can ignore the error message and continue the transformation process.
- If you use a parameter to dynamically specify an XML instance at runtime, the XML instance will be validated at runtime rather than in the importing process.
- In the Schema Name text box, type the URI string of the schema file or select Browse to select the file.
- When you select the schema type as Parse from XML Instance, type the URI string of the XML instance in the Schema Name text box or select Browse to select it. In the URI string, you can reference parameters, constant level formulas, and the User Name special field as described earlier. When the URI string you specify begins with the "http://" or "https://" protocol, Designer enables the RESTful button. Select the button to specify RESTful options for the instance data.
- When you select the schema type as Import from XSD
- Select Time Zone and Locale to specify the time zone and locale for the XML instance in the Time Zone and Locale Options dialog box.
- When you reference parameters and formulas in the URI/parameter string, you can select Edit Format to edit the format of their values.
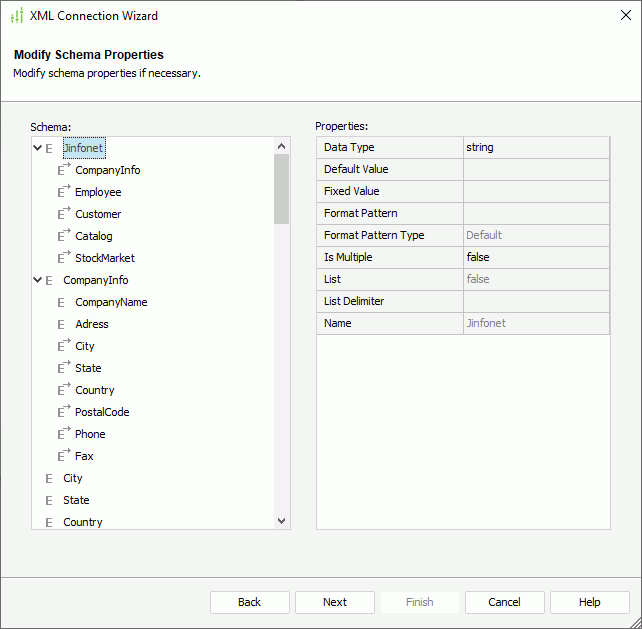
- Select Next. Designer displays the Modify Schema Properties screen. You can supplement and modify the properties.
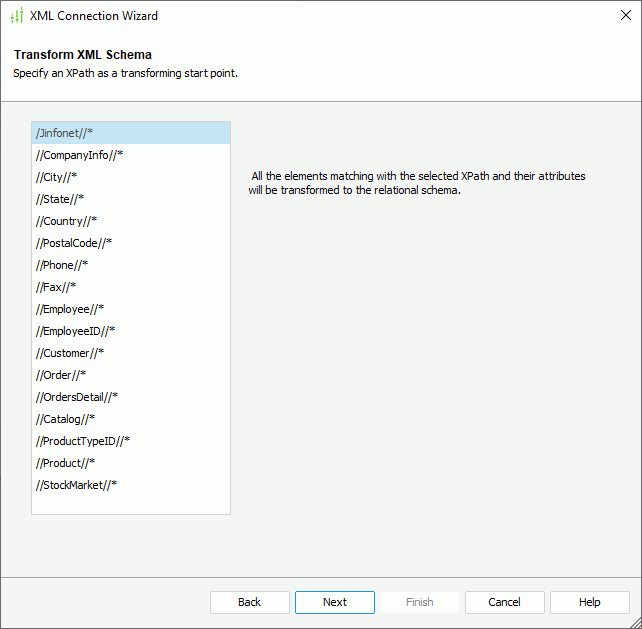
- Select Next. Designer displays the Transform XML Schema screen. Select an XPath to be the transforming start point.
- Select Next. Designer displays
the Transformed Relational Schema screen, showing the relational schema structure it transforms from the XML schema.

- Select Next. Designer displays the Add Table screen.

- The Tables box lists the tables Designer transforms from the schema. A table contains fields mapped to attributes, simple elements, content of complex elements, and other nodes in the XML data source. Select the tables you want to use in the connection and select Add
 to add them to the Added Tables box. Clear Generate the default pre-join path if you do not want to generate default pre-join paths for the tables.
You can create queries and business views using these tables and then develop reports based on the queries and business views.
to add them to the Added Tables box. Clear Generate the default pre-join path if you do not want to generate default pre-join paths for the tables.
You can create queries and business views using these tables and then develop reports based on the queries and business views. - Select Finish to complete the transformation process.
 Back to top
Adding More Tables to an XML Connection
After you have set up an XML connection in a catalog, you can add more tables transformed from the XML data source into the catalog via the connection.
- Do one of the following:
- Right-click the XML connection and select Add Tables from the shortcut menu.
- Right-click the Tables node of the XML connection and select Add Tables from the shortcut menu.
- Right-click an existing table in the XML connection if there is and select Add Tables from the shortcut menu.
- Right-click any folder in the Tables node of the XML connection if you have already created some and select Add Tables from the shortcut menu.
- Select the Tables node of the XML connection, or any existing table or folder in the connection and select Add Tables on the Catalog Manager toolbar.
Designer displays the Add Tables dialog box.
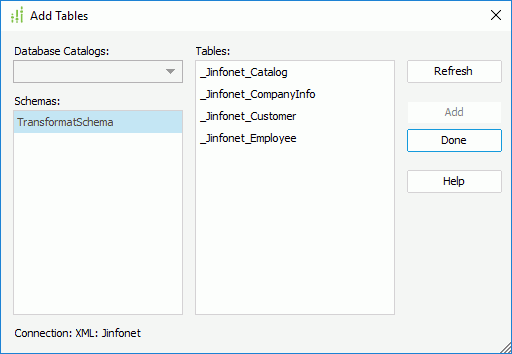
- Select Refresh.
- Designer lists the tables contained in the schema that it transforms from the XML file in the Tables box. Choose the required tables and select Add.
- Select Done to finish adding the tables and close the dialog box.
Managing Tables in an XML Connection
For the tables you have transformed from an XML data source and added into a catalog via an XML connection, you can refresh them, organize them into folders, and remove and add the table columns the same as you do with tables from a JDBC database.