 Previous Topic
Accessing Data via SOAP Web Service Connections
Web services provide a standard means of inter-operating between different software applications, running on a variety of platforms and/or frameworks. It is a way to connect to a remote application and request data directly from the application without going to a database. Designer supports SOAP Web Services defined by WSDL 1.1 or WSDL 2.0 as data sources. You can add SOAP Web Service data sources to a catalog by importing WSDL files. This topic describes how you can set up SOAP Web Service connections in a catalog, and add and manage tables obtained from SOAP Web Service data sources in the catalog via the connections.
This topic contains the following sections:
- Setting Up SOAP Web Service Connections in a Catalog
- Adding Tables to a SOAP Web Service Connection
- Editing the Operation Used to Create Tables
- Managing the Tables in a SOAP Web Service Connection
Setting Up SOAP Web Service Connections in a Catalog
To set up a connection to connect a catalog to a SOAP Web Service data source, take the following steps:
- Create a catalog or open a catalog.
- In the Catalog Manager, do either of the following:
- To set up the connection in an existing data source in the catalog, right-click the data source node and select New SOAP Web Service Connection from the shortcut menu.
- To set up the connection in a new data source in the catalog, select any of the existing catalog data sources, select New Data Source on the Catalog Manager toolbar, then in the New Data source dialog box, specify the name of the data source, select the SOAP Web Service connection type and select OK.
Designer displays the SOAP Web Service Data Source dialog box.
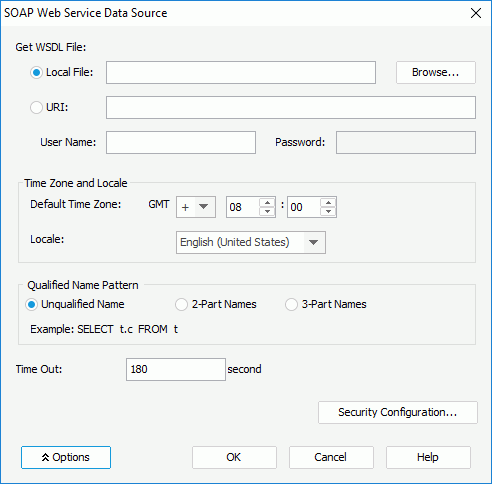
- Specify where to get the WSDL file of the SOAP Web Service data source.
- If you want to use a WSDL file on your local disk, select Local File, then select Browse to browse for the file.
- If you want to use a WSDL file through a URI, select URI, then type the URI string in the text box and specify the user name and password for assessing the WSDL file.
- Select Options to show the additional settings.
- In the Time Zone and Locale box, specify the time zone and locale for the SOAP Web Service data source.
- If you want to use the catalog or schema, or both of them in data manipulation, make the selection in the Qualified Name Pattern box accordingly.
- Type the number of seconds in the Time Out text box to specify how long to wait to get the WSDL file.
- Select Security Configuration to display the Security Configuration Setting dialog box to configure the security policy.
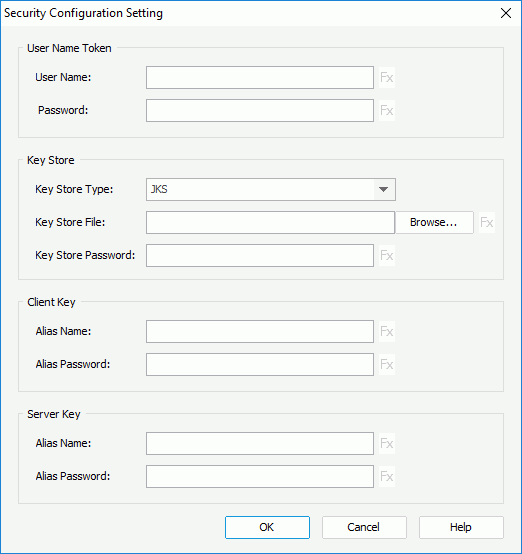
- Specify the user name and password for the user name token to be used in the security policy.
- From the Key Store Type drop-down list, select the type for the key store.
- Select Browse next to Key Store File to specify the key store file.
- Type the password in the Key Store Password text box to get the access to the key store file.
- In the Client Key box, specify the alias name to be used as client signature in the key store, and set the password for the name.
- In the Server Key box, specify the alias name and password to be used to get the server-side certification or public key in the key store.
- Select OK to go back to the SOAP Web Service Data Source dialog box.
- Select OK to set up the SOAP Web Service connection.

- Designer does not support WSDL files that use an Import statement to import content. You need to append the content directly in the WSDL file.
- When you configure the security policy for a SOAP Web Service connection, except for Key Store Type, you can control all the other options in the Security Configuration Setting dialog box using constant level formulas. However, the formula control is only available after you have set up the connection, meaning, when you edit an existing SOAP Web Service connection.
 Back to top
Adding Tables to a SOAP Web Service Connection
After you have set up a SOAP Web Service connection in a catalog, Designer stores all information of the SOAP Web Service defined in the WSDL file in the catalog, including information of service, operation, and the input message and output message in each operation. You can then add tables into the catalog via the connection based on this information. However, you can only define tables based on operations which support SOAP binding.
To add tables to a SOAP Web Service connection
- Do one of the following:
- Right-click the connection and select Add Tables from the shortcut menu.
- Right-click the Tables node of the connection and select Add Tables from the shortcut menu.
- Right-click an existing table in the connection if there is and select Add Tables from the shortcut menu.
- Right-click any folder in the Tables node of the connection if you have already created some and select Add Tables from the shortcut menu.
- Select the Tables node of the connection, or any existing table or folder in the connection any and select Add Tables on the Catalog Manager toolbar.
Designer displays the Add Table dialog box.
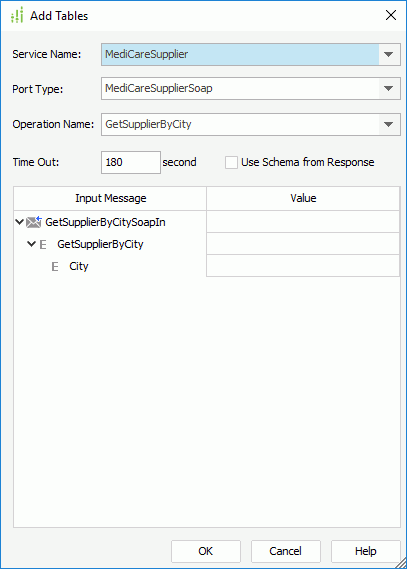
- Select a service from the Service Name drop-down list.
- If you use WSDL 1.1 to define the SOAP Web Service, you also need to specify the port type for the selected service from the Port Type drop-down list.
- Designer lists all operations with SOAP binding that are included in the selected service in the Operation Name drop-down list. Select the required operation and Designer displays the input message of the operation.
- Specify the value of the input message by either typing the value in the text box in the Value column, or selecting
 in the text box to select or define a constant level formula or parameter in the current catalog data source to return the value. If the Input Message column is empty, it means the input message has its own defined values, so you do not need to provide values for it.
 - Type the number of seconds in the Time Out text box to specify how long to wait to get the specified service and operation information defined in the WSDL file.
- If you use WSDL 1.1, you may sometimes find that the XML schema described by the output message does not match the concrete XML instance in the SOAP responded from the web service, as a result, Designer is not able to read data properly from that XML instance. In this case, you can select Use Schema from Response to ignore the XML schema in the output message and directly parse the XML schema from the specific XML instance that is included in the SOAP responded from the web service.
- Select OK to accept the changes and exit the dialog box.
You can then create queries and business views using these tables. A report is developed from a query (or something else which is functionally similar) or from a business view.
Editing the Operation Used to Create Tables
Designer displays the service and operation you have selected to create the tables in a SOAP Web Service connection under the Tables node of the connection. If you use WSDL 1.1 to define the web service, Designer also includes the defined port type. You can edit the information of the operation.
To edit the operation used for creating tables in a SOAP Web Service connection
- Select the web service operation node, right-click it and then select Edit from the shortcut menu. Designer displays the Edit Operation Calling Property dialog box.
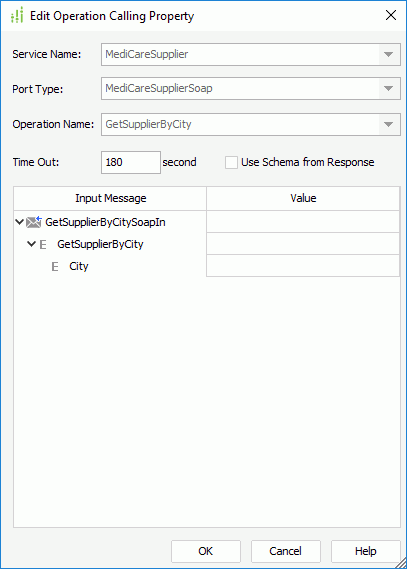
- Edit properties of the operation as described in the preceding procedure.
- Select OK to accept the changes and exit the dialog box.
Managing the Tables in a SOAP Web Service Connection
For the tables you have added into a catalog from a SOAP Web Service data source, you can refresh them, organize them into folders, and remove and add the table columns the same as you do with tables from a JDBC database.