 Previous Topic
Managing Page Reports
Designer places all the page report files physically in the same directory where the catalog file resides. Due to this, you are not able to get the details about a page report until you open it in Designer. For example, if you want to find a page report with a special condition, you have to load each page report. For just a few page reports, this is not a problem. However, the case is different when there are many reports. To ease the work for you, Designer provides you with the Page Report Manager for managing page reports by means of adding them into folders. Designer also enables you to manage the report tabs in a specific page report via the report tab bar, for example, you can import report tabs from another page report into it, move, duplicate, rename, and delete the report tabs, and customize the runtime open status of the report tabs. This topic introduces how you can manage the page reports in a catalog and the report tabs in a page report.
This topic contains the following sections:
- Managing the Page Reports in a Catalog
- Managing the Report Tabs in a Page Report
- Customizing the Status of Report Tabs in Page Reports
Managing the Page Reports in a Catalog
To manage the page reports using the Page Report Manager, navigate to Report > Manage Page Reports to open it first. You can categorize the page reports into different folders and work on them just like processing files in a file system: add, open, delete, move, rename, and search items.
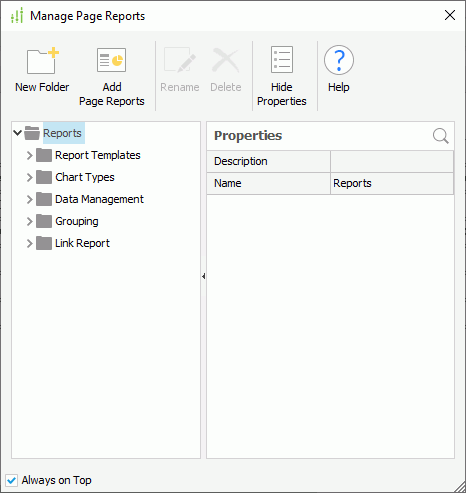
Adding a Folder
- Select a folder and select New Folder on the toolbar, or right-click a folder and select New Folder from the shortcut menu. Designer then adds a new folder as a subnode, and the default name for the folder is Folder1, Folder2.... You can rename the folder.
- Select the folder and select Rename on the toolbar, or right-click the folder and select Rename from the shortcut menu.
- Type a new name in the name box, and then select outside the box or select Enter on the keyboard.
Adding Reports to a Folder
- Select the folder to which you want to add the page reports and select Add Page Reports on the toolbar, or right-click the folder and select Add Page Reports from the shortcut menu. Designer displays the Choose Page Report dialog box.
- All the page reports in the current catalog are available in the report box. Select the required ones.
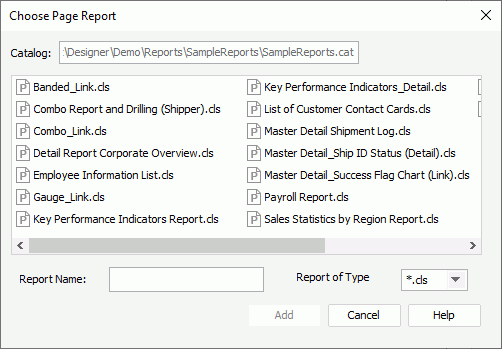
- Select Add to add the selected page reports to the folder. The default names of the report items are the file names of the reports. You can rename the reports as you would with a folder.
You can add a report to multiple folders in case you want to include it in multiple categories. You can double-click any report in the Page Report Manager to open the report.
Moving a Folder/Report to Another Folder
- Select the folder/report and right-click it, then select Move To from the shortcut menu. Designer displays the Move Report/Folder dialog box.
- The Move To box lists all the available folders. Select the folder to which you want to move the folder/report.
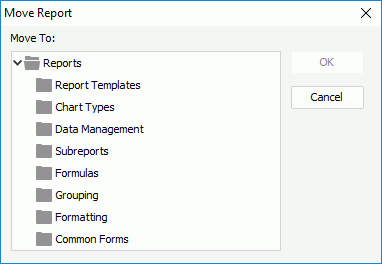
- Select OK to apply the setting.
You can also move a folder/report to another folder by simply dragging the folder/report to the destination folder.
Editing the Properties of a Folder/Report
Select the folder/report, select Show Properties on the toolbar, then edit its property values in the Properties sheet. After editing a value, select Enter on the keyboard to confirm the change.
A folder has the following properties:
- Description
Specify the description of the folder. - Name
Specify the name of the folder.
A report has the following properties:
- Author
Specify the author of the report. - Description
Specify the description of the report. - File Name
Specify the name of the report. - Keywords
Specify the keywords of the report. - Last Modified Time
Specify the last time at which the report was modified. - Last Print Time
Specify the last time at which the report was printed. - Last Run Time
Specify the last time at which the report ran. - Name
Specify the display name of the report. - Query Name
Specify the query used by the report. - Value Type
Specify the type of the report.
You can use the search box to search for the properties you want to edit (to display the search box, select the Search icon  at the upper right corner of the Properties sheet). To start searching, type the text you want to search for in the search box and Designer lists the properties containing the matched text. Designer closes the search box when you select another object.
You can use the following options in the search box:
-
 Drop-down icon
Select to list more search options.- Highlight All
Select to highlight all the matched text. - Match Case
Select to search for text that meets the case of the text you type. - Match Whole Word
Select to search for text that looks the same as the text you type.
- Highlight All
-
 Delete icon
Select to close the search box and cancel the search.
Searching for a Report or Folder
You can perform wildcard searches for report names or folder names in the Page Report Manager.
- Select a folder and right-click it, then select Search on the shortcut menu. Designer displays the Search Reports dialog box.
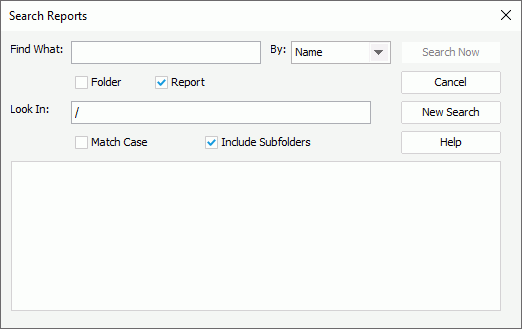
- In the Find what text box, type the report or folder name, or report keywords you specify for the Keywords property of the report in the Properties sheet, then select the corresponding search criteria from the By drop-down list, which can be by name, by keywords, or by name or keywords.
 If you just type part of the report or folder name, or report keywords, use * to replace the other part of the name or keywords. For example, if you want to search for the report EmployeeInformation, you should type *Info* instead of info in the text box.
 - Select what you want to find: a folder, a report, or both.
- Type the search path in the Look in text box.
- Select Match Case to limit the search to text that exactly matches the case of the search text.
- Select Include Subfolders to find the folder or report also in the subfolders of the search path.
- Select Search Now to start searching. Designer lists the matched results in the search result box.
- If you want to start another search, select New Search and set the condition.
Exporting the Report Information to a Table
You can export report information in the Page Report Manager to a table in a database. The default name of the table is "ReportsInfo". You can change the name as required. Each row of the table is a report description.
- Select the root folder Reports and right-click it.
- On the shortcut menu, select Export. Designer displays the Get JDBC Connection Information dialog box.
- Fill in the required text boxes for connecting to the database, and then select OK.
- Give a name for the table and select OK in the Input dialog box. Designer adds the report information to the table in the database. You need to make sure there are no duplicate name in the database; otherwise, Designer replaces the same name table directly.
You can then set up a JDBC connection in a catalog to connect with the database and add the table to the catalog via the JDBC connection.
Deleting Folders/Reports
- Select the folders/reports in the Reports tree, and then do one of the following:
- Select Delete on the keyboard.
- Select Delete on the toolbar.
- Right-click and select Delete from the shortcut menu (it works when only one object is selected).
Designer displays a Warning message box.
- Select the option Also delete report files from file system if you want to remove them from your local directory permanently; otherwise, leave the option cleared to only remove them from the virtual tree in the Page Report Manager.
- Select Yes in the box. When you select folders, Designer removes the folders and all their content.
If you delete a report manually from the local file system, later when you open the Page Report Manager, you can see that Designer marks the node representing the report with a red cross. You can remove the invalid node as described in the preceding procedure.
 Back to top
Managing the Report Tabs in a Page Report
You can also manage the report tabs in a specific page report, for example, import report tabs from another page report into it, and insert, duplicate, and delete the report tabs via the report tab bar.
Importing Report Tabs into a Page Report
You can import report tabs to a page report from another page report in the same catalog, and specify dataset for the data components in the to be imported report tabs.
- Navigate to File > Import > Page Report.
- In the Open Report dialog box, specify the page report that contains the report tabs you want to import, then select Open. Designer displays the Select Report Tab dialog box.
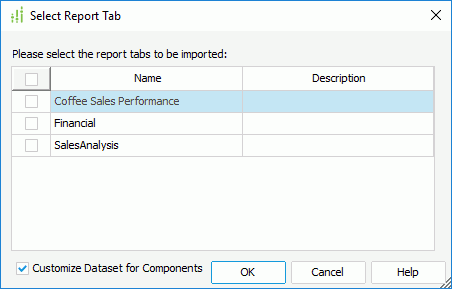
- Select the report tabs you want to import.
- If you want to customize the datasets used by data components within the to be imported report tabs, select Customize Dataset for Components.
- Select OK. Designer displays the Customize Dataset dialog box.
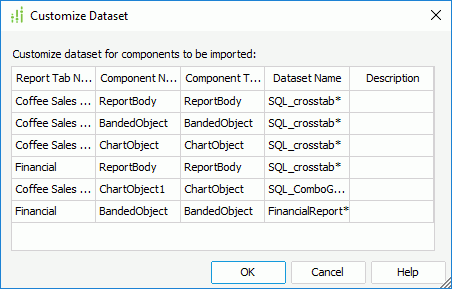
- Designer lists all data components in the selected report tabs, which have self-bound datasets. Specify which dataset you want a data component to use by selecting its Dataset Name cell and choosing from the drop-down list.
- Select OK to import the report tabs with the specified datasets for their data components. Designer displays the imported report tabs after the existing report tabs in the page report.
Managing Report Tabs with the Report Tab Bar
For each page report, you can use the report tab bar to duplicate, move, rename, and delete the report tabs it contains.

Copying a Report Tab
- On the report tab bar, right-click the report tab and select Copy on the shortcut menu.
- Specify
where to place the copied report tab.
- If you want to make a copy of the report tab within the current report, right-click any report tab and select Paste from the shortcut menu. Designer then prompts you to give the report tab a new name. Specify the name as required.
- If you want to copy the report tab to another page report of the same catalog, open the report to which to copy the report tab, then right-click any report tab and select Paste from the shortcut menu. The report that you are copying from must still be open in Designer.
Moving a Report Tab to Another Page Report
- On the report tab bar, right-click the report tab and select Cut on the shortcut menu.
- Open the page report in the same catalog where to put the report tab.
- Right-click any report tab and select Paste on the shortcut menu.
Renaming a Report Tab
- On the report tab bar, right-click the report tab and select Rename on the shortcut menu.
- In the Input Report Tab Name dialog box, specify a new name for the report tab and select OK.
Duplicating a Report Tab
To make a duplicate report tab in the current page report, right-click the report tab on the report tab bar, then select Duplicate on the shortcut menu.
Removing a Report Tab
To remove a report tab from the current page report, right-click the report tab on the report tab bar, then select Remove on the shortcut menu. Since a page report cannot be empty, you are not able to remove all of the report tabs in the page report.
Customizing the Status of Report Tabs in Page Reports
By default, when users run a page report in Page Report Studio, they open all the report tabs in the page report. If a page report contains a large number of report tabs, opening all these report tabs at the same time affects the Server performance. Therefore, Designer provides you the flexibility to specify which report tabs in specific page reports you prefer to open by default in Page Report Studio, to reduce the runtime performance impact.
To customize the report tab status in page reports
- Open the page reports one by one.
- Right-click any report tab on the report tab bar and select Customize Status from the shortcut menu. Designer displays the Customize Page Report Tab Status dialog box.
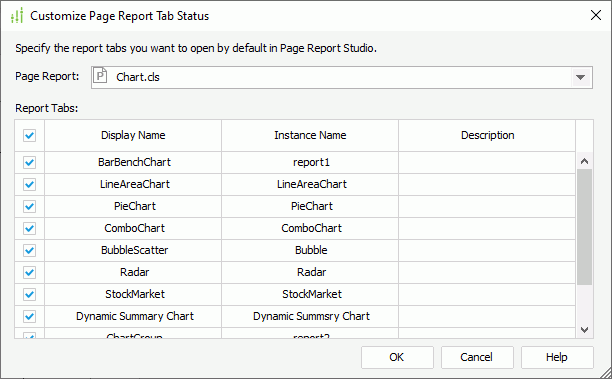
- The Page Report drop-down list contains all the page reports you have opened. Select a page report.
- Designer displays all the report tabs you have created in the selected page report in the Report Tabs box. Select the report tabs that you prefer to open by default when users run the page report in Page Report Studio. You should select at least one report tab to open.
- Repeat the preceding steps to customize the status of the reports tabs in other page reports.
- Select OK to accept the settings.
- Save the page reports one by one to save their report tab status into the page report files.
On the report tab bar, you can find that Designer adds a check mark to the report tabs which you select to open in Page Report Studio.