 Previous Topic
Managing Cached Report Data
Cached report data (CRD) is a cached subset of data fetched from the database and is a substitute for the database for retrieving data for reports. This topic describes how you can create cached report data automatically or by scheduling tasks and manage the scheduled tasks, as an administrator.
Cached report data provides the following benefits.
- Reports can run from a specific point in time such as a month end report or quarter end report without going back to the DBMS to get the original data.
- Many users can run reports from data cached from a single data resource without impacting production DBMS users.
- Users running a report will all see the same view of the data, thus the data will not change minute by minute based on current DBMS updates.
- You can schedule cached report data for any time frame to simulate real time on-demand reporting for many users while not slowing down the production DBMS.
You can create cached report data for data resources including queries, stored procedures, imported SQL statements, user defined data sources, hierarchical data sources, and parameters whose type is Bind with Single Column or Bind with Cascading Columns.
You can either ask Server to automatically create cached report data (auto CRD) or schedule to have a cached data result created for a data resource and updated at a specific time or periodically (scheduled CRD).
- Auto CRD
Server does not create auto CRD by default. You need to enable the feature and configure the maximum hard disk space for auto CRD and how long to keep an auto CRD. - Scheduled CRD
Via Report's scheduling mechanism, you are able to define when to create a cached data result for a data resource and how to update it according to time. If a scheduled CRD is updating when the server shuts down, the CRD will continue with the update when the server restarts. Server maintains the data before the shutdown. Scheduled CRD have no version: once they are updated, only access the latest are in the data resource.
This topic contains the following sections:
- Creating Cached Report Data Automatically
- Scheduling Cached Report Data Results
- Managing Scheduled CRD Tasks
Creating Cached Report Data Automatically
To ask Server to automatically generate cached report data, you need to enable the generation of auto CRD and configure the maximum hard disk space for auto CRD and how long an auto CRD can be kept.
To enable creating cached report data automatically:
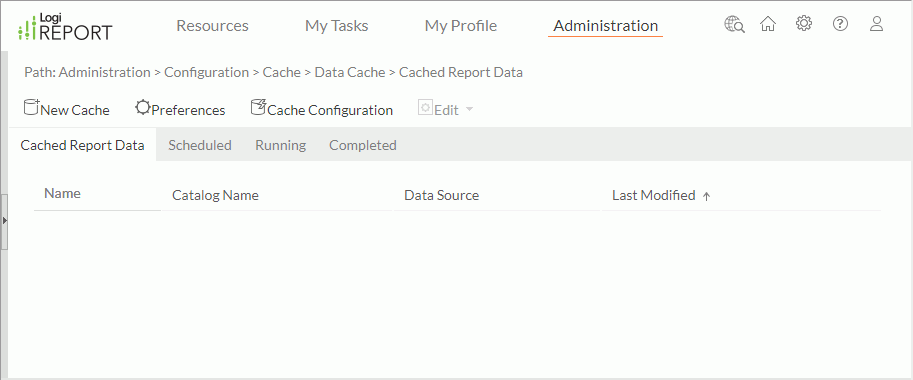
- On the system toolbar of the Server Console, navigate to Administration > Configuration > Cache > Data Cache. Server displays the Data Cache page.
- Select Cache Configuration on the task bar. This option is not available to organization admin.
- Server displays the Cache Configuration dialog box. Select Automatic Cache and Automatic Cache JSON/XML stream to enable creating cached report data automatically.

- In the Maximum Disk Usage text box, edit the maximum hard disk space for the automatically created CRD. The size determines how many auto CRD that Server can hold within one server session. The value should be between 4 MB and 1024*1024 MB.
- In the Expires section, choose how long Server can keep an automatically cached data result within one server session.
- Never
The auto CRD will not expire. - Custom
Select Custom if you want the auto CRD to expire after a period and then specify the period.
- Never
- In the Maximum Memory Usage text box, edit the maximum memory usage when running reports using CRD. The value should be a whole number that is at least 4 MB and not more than 80% of the JVM current maximum heap size (-Xmx value in JRServer.bat).
All CRD (both auto CRD and scheduled CRD) share the same memory space. If possible, set the maximum memory usage to a number that the memory can tolerate, for example, 1024 MB or bigger. The cache improves performance when multiple users are running reports using the same CRD. Any size CRD can be accessed with even the smallest cache size. The larger the cache size, the faster performance will be for concurrent users. However, a large cache size may lower performance for users who do not use the CRD.
- Select OK to apply the settings.
After you enabled automatic cache, when running a report, if there is no CRD created for the data resource that the report is using directly or indirectly (for example, the report is created based on a business view and the business view is built from a data resource), Server fetches data from the data resource, and at the same time, caches the fetched data as an auto CRD.
When there are auto CRD generated for a data resource, the report running request based on the data resource will first search for the auto CRD that contains all the data required by the report. If it finds an applicable auto CRD, Server will retrieve data from the CRD to run the report; if it does not, it fetches data from the DBMS and caches it to be another auto CRD.
Auto CRD are only available within one server running life cycle. Once Server shuts down or restarts, they will be removed and a new cycle of auto CRD generation begins.
 Back to top
Scheduling Cached Report Data Results
You can schedule to have a cached data result (scheduled CRD) created for a data resource and updated at a specific time or periodically. This is especially useful for month and quarter end reports where multiple reports use the same dataset with the same parameters such as begin and end date.
You can generate scheduled CRD via Server's scheduling mechanism. In one scheduled CRD task, you can add more than one data resource, to create a cached data result for each data resource by applying the same creation and updating policy.
A data resource can have only one scheduled CRD. When a data resource contains parameters, its scheduled CRD can only represent the data of one parameter scenario.
To create a schedule task to generate cached report data at specified time condition:
- In the Data Cache page, select New Cache on the task bar. Server displays the New Cache dialog box.
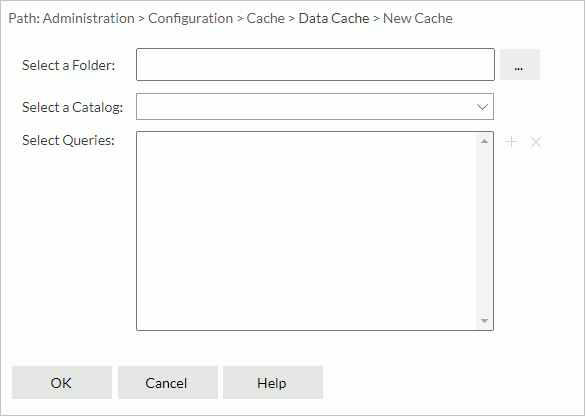
- Select the ellipsis button
 next to the Select a Folder text box. Server displays the Select Folder dialog box.
 - Browse to the folder that contains the catalog you want and select OK.
- From the Select a Catalog drop-down list, select the catalog in the specified folder.
- Select
 beside the Select Queries box. Server displays the Select Queries dialog box.
 - Select the data resources for which you want to create data cache and select OK.
- Server adds the data resources you just selected in the Select Queries box.
To remove a data resource from the box, select it, and then select
 .
. - Select OK to confirm the selection. Server displays a new dialog box for defining the schedule task.
- In the General tab, do the following:
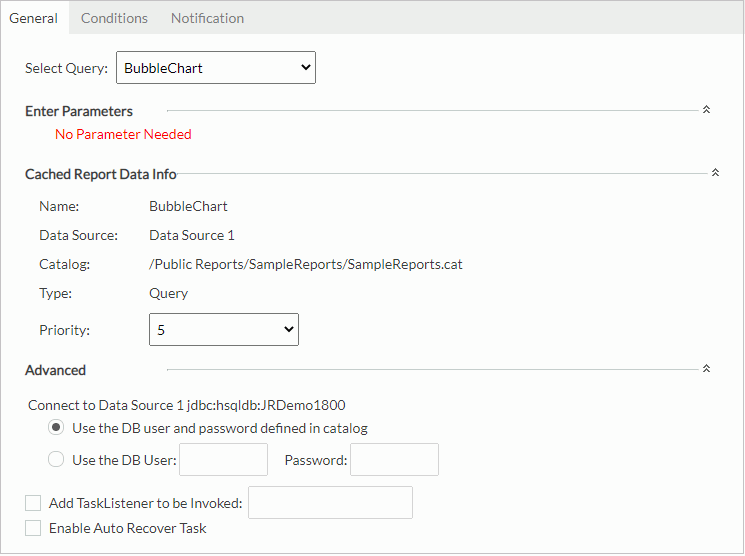
- From the Select Query drop-down list, select a data resource to specify the general properties of its scheduled CRD task.
- If the data resource uses parameters, you need to specify the parameter values in the Enter Parameters section.
- Expand the Cached Report Data Info section by selecting the down arrow on the right.
- Select a priority to the task from the Priority drop-down list. The priority levels are from 1 to 10 in ascending order of lowest priority to highest priority. By default, Server ignores this property unless you modify the server.properties file to set queue.policy not equal to 0.
- Expand the Advanced section to configure advanced settings for the CRD.
- Specify the DB user and password with which to connect to the data source. You can either use the default ones defined in the catalog or specify another DB user and password.
- Select Add TaskListener to be Invoked to call a Java application before/after the task runs to obtain information about the task (for more information, see Applying TaskListener).
- If you are in a Cluster environment, you can also directly specify an active server in the cluster to perform the schedule task via the Specify a preferred server to run the task option.
- If you want to enable task recovery, select Enable Auto Recover Task. Then specify the maximum number of times to retry running the task in order to recover it, the time interval between the retries, and whether to recreate all or just the failed results.
- Select another data resource from the Select Query drop-down list and repeat the preceding steps to define the properties of its scheduled CRD. Do this for all the added data resources.
- In the Conditions tab, specify the updating policy of the CRD. Server applies the condition to generate CRD for all the added data resources.
- In the Time tab, specify the time when you want Server to perform the task.
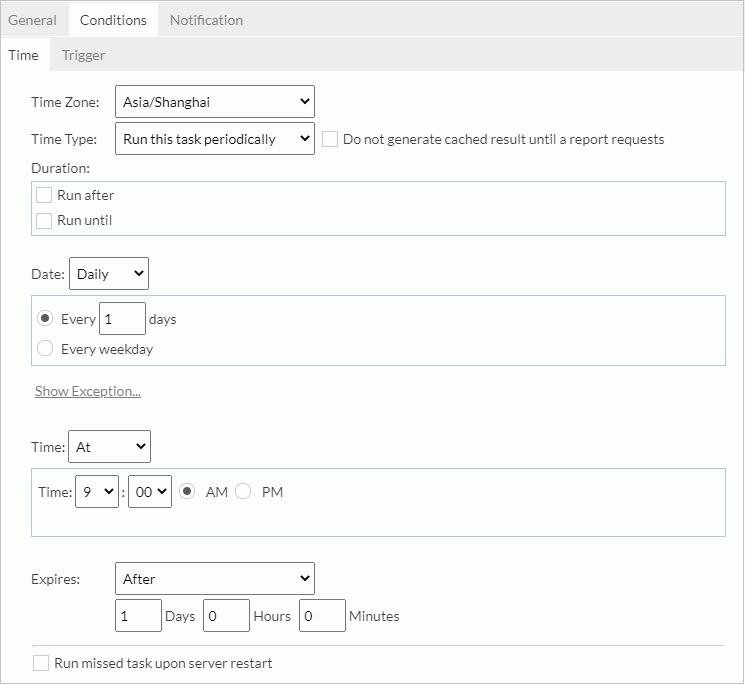
From the Time Zone drop-down list, select the time zone.
From the Time Type drop-down list, select when to run the task:
- To run the task as soon as you submit it, select Run this task immediately from the Time Type drop-down list.
- To run the task at a specified time, select Run this task at. Then define the date and time.
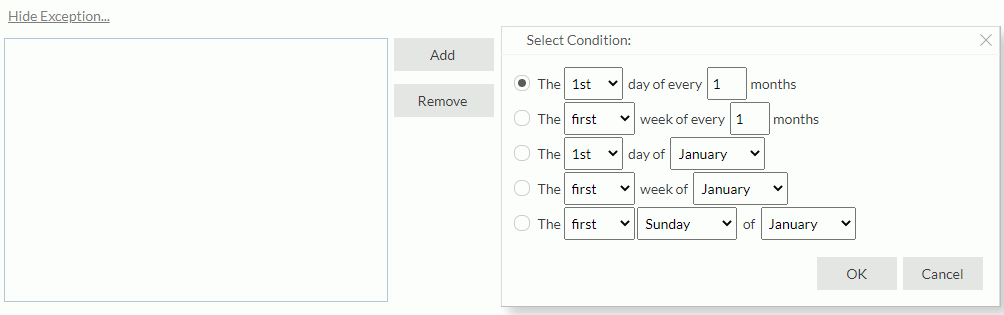
- If you want to run the task repeatedly, select Run this task periodically. Then specify the duration, date, and time. By default, Server generates the cached data according to the specified time condition. If you prefer to run the task only upon the first report running request after each scheduled time, select Do not generate cached result until a report requests. To add an exception date on which you do not want to run the task, select Show Exception, then select Add and in the Select Condition dialog box select the date. You can add more exception dates as you want. To remove an exception date, select it in the exception date box and select Remove.
From the Expires drop-down list, specify the expiration time for how long you want to keep the cached data:
- To make the cached data never expire, select Never.
- To make the cached data expire at a specified time, select At, then specify the date and time accordingly.
- To make the cached data expire after a period of time, select After, then specify the time period.
When you select to run the task at a specified time or repeatedly, you can select Run missed task upon server restart to run the missed tasks when you restart the server.
- If you want to bind a trigger to the task, select Trigger.
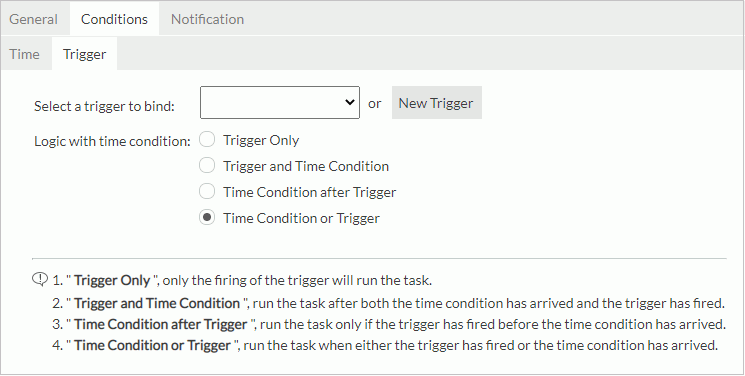
From the Select a trigger to bind drop-down list, select the required trigger or select New Trigger to create a new trigger in the New Trigger dialog box (the button is not available to organization admins), then specify the trigger logic with time condition.
- Trigger Only
Select if you want to perform the task only when the trigger is fired. - Trigger and Time Condition
Select if you want to perform the task when both time is up and the trigger is fired. When you select this logic:
 - No matter which condition is ready, Server performs the task only when its counterpart is ready.
- If you specify to perform the task at a specific time, you must select Run missed task upon server restart, otherwise Server regards the task as expired and deletes it when the time condition is ready before the trigger condition.
- Time Condition after Trigger
Select if you want to perform the task when time is up after the trigger is fired. If the time condition is ready before the trigger condition, Server regards the task as expired and deletes it. - Time Condition or Trigger
Select if you want to perform the task when either time is up or the trigger is fired.
- In the Time tab, specify the time when you want Server to perform the task.
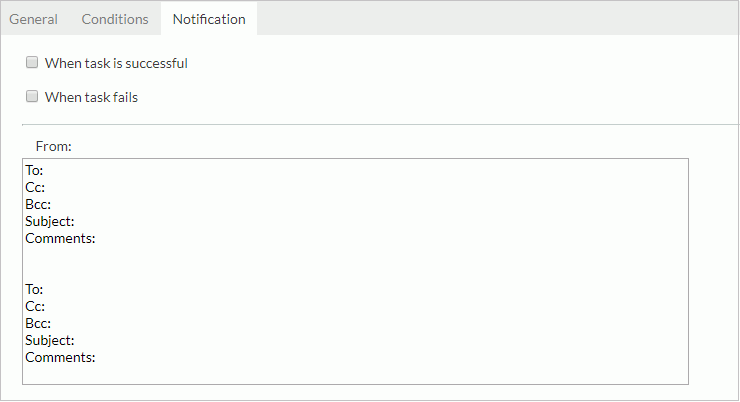
- In the Notification tab, specify to notify someone via email of when the task finishes or when it fails. Then in the mail box, type the information of the receivers and the mail contents. To send out mail notification, you should have predefined an email server first.
- Select Finish to submit the task. Server will then perform the task at the requested times to create cached data for all the specified data resources.
When a scheduled CRD is ready for use, all reports based on the same data resource as the CRD will automatically use the CRD for retrieving data.
A scheduled CRD freezes parameters in the data resource. If a report uses a scheduled CRD and its data resource contains parameters, when running the report, only parameters used in the report are available for specifying values and you cannot edit the data resource parameters. In Report, a parameter may depend on another parameter; if the latter is frozen, the former will be frozen as well.
If you update a data resource used for creating a scheduled CRD by republishing the catalog, the scheduled CRD will behave as follows:
- Before the next schedule time, the CRD cannot retrieve data to reports.
- When it is the next schedule time, Server fetches data from the new data resource to generate an updated scheduled CRD:
- If you added new parameters in the new data resource, Server uses the default values until you specify new values to them.
- If you deleted old parameters from the new data resource, Server removes the parameter values previously specified in the CRD.
- If you changed the parameters and the previously specified values do not match the type, Server displays error messages in the server error log and disables the CRD for use.
Managing Scheduled CRD Tasks
Server displays the tasks that you have submitted for generating scheduled CRD in the Cached Report Data, Scheduled, Running, and Completed tables in the Data Cache page according to their status.
The following section describes the columns each table contains.
This table displays the scheduled data cache tasks and consists of the following columns:
| Column | Description |
|---|---|
| Name | The name of the scheduled data cache. |
| Path | The path of the scheduled data cache in the server resource tree. |
| Catalog Name | The catalog that the scheduled data cache belongs to. |
| Data Source | The data source that the scheduled data cache belongs to. |
| Data Type | The type of the data resource that the scheduled data cache is based on. |
| Last Modified | The last time when the scheduled data cache was modified. |
You can further edit the scheduling information of the tasks in the table or remove the tasks.
- To edit a task, select the row in which the task is, then select Edit > Properties on the task bar or right-click on the row and select Properties from the shortcut menu. If parameters or schedule policy is changed, they will only take effect after the next CRD update time; before that, all reports using the CRD will still get the old data.
- To remove a task, select the row where the task is, then select Edit > Delete on the task bar; or right-click in the row and select Delete from the shortcut menu.
This table displays the data cache tasks that are waiting to be performed. It consists of the following columns:
| Column | Description |
|---|---|
| Name | The name of the scheduled data cache. |
| Path | The path of the scheduled data cache in the server resource tree. |
| Catalog Name | The catalog that the scheduled data cache belongs to. |
| Data Source | The data source that the scheduled data cache belongs to. |
| Data Type | The type of the data resource that the scheduled data cache is based on. |
| Last Modified | The latest time when the task was modified. |
| Next Run Time | The next scheduled time this task is to be performed. |
| Last Run Time | The last scheduled time this task was performed. |
| Is Successful | Shows whether the last running of this task performed successfully. The value true means that the last running performed successfully and false means the task failed. If the column is empty, the task has not run before. |
This table displays the data cache tasks that are currently being performed. It consists of the following columns:
| Column | Description |
|---|---|
| Name | The name of the scheduled data cache. |
| Path | The path of the scheduled data cache in the server resource tree. |
| Catalog Name | The catalog that the scheduled data cache belongs to. |
| Data Source | The data source that the scheduled data cache belongs to. |
| Data Type | The type of the data resource that the scheduled data cache is based on. |
| Start Time | The time when this task was started. |
| Parameters | The parameters of the query. |
This table displays the data cache tasks that have already been finished and consists of the following columns.
| Column | Description |
|---|---|
| Name | The name of the scheduled data cache. |
| Path | The path of the scheduled data cache in the server resource tree. |
| Catalog Name | The catalog that the scheduled data cache belongs to. |
| Data Source | The data source that the scheduled data cache belongs to. |
| Data Type | The type of the data resource that the scheduled data cache is based on. |
| Is Successful | Shows whether this task performed successfully. The value true means that the task performed successfully and false that the task failed. |
| Completed Time | The time when this task was completed. |
| Parameters | The parameters of the query. |
When Server lists a task in the Completed table, the cached report data generated from the schedule task are ready for use.
You can remove the record of a completed CRD task from the table. To do this, select the row where the record is and then select Delete on the task bar, or right-click on the row and select Delete from the shortcut menu.
Tips:
- You can customize the columns in the tables: switch to the table, select Preferences on the task bar of the Data Cache page. In the Preferences dialog box, select the column names which you want to display in the table, then select OK to apply the settings. For the Running table, you can also use the Parameter Display Size option to specify the display length in characters of the parameters in its Parameters column; and for the Completed table, specify the number of days for keeping completed tasks and the display length of the parameters in its Parameters column.
- You can sort the records in each table in the ascending or descending order by any column title. To do this, select on the underlined column title on which you want to sort the records. Server displays a sort icon right after the title, showing the sort direction.