 Previous Topic
Applying Web Controls in Page Report
Web controls are report components that Report designs to work like controls on web pages. This topic describes how you can apply these four types of web controls in Page Report Studio: parameter control, parameter form control, filter control, and navigation control.
For page reports that you created in Report Designer, you can add web controls to them only when the corresponding catalog contains business views.
You need a Report Live license for Server to use this feature. For more product information, including new purchases and upgrades, contact US Sales or UK Sales.
This topic contains the following sections:
- Using Parameter Control to Specify a Parameter to a Report
- Using Parameter Form Control to Run Reports
- Using Filter Control to Filter Report Data
- Using Navigation Control to Undo/Redo Value Selection in Filter Controls
Using Parameter Control to Specify a Parameter to a Report
A parameter control is a web control that is bound with a parameter used by the current report. By specifying values to the parameter in a parameter control, you can pass the parameter values to Page Report Studio and run the report with the specified values.
You cannot use cascading parameters in parameter controls. If you want to do this, use parameter form controls instead.
To insert a parameter control and use it to specify a parameter to a report:
- Do either of the following:
- Navigate to Menu > Insert > Parameter Control, then select the destination where you want to add the parameter control.
- Drag Parameter Control from the Toolbox panel to the destination in the report.
Server displays the Insert Parameter Control dialog box.
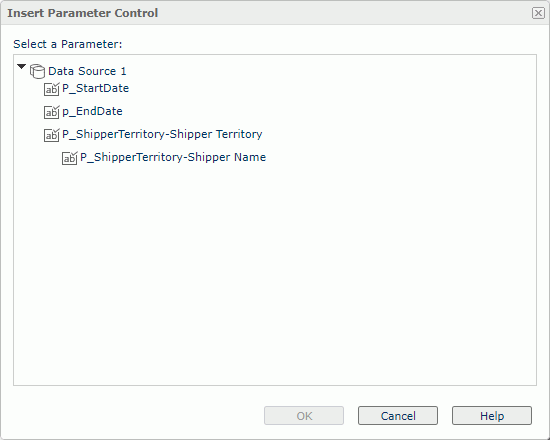
- Select the parameter you would like to add to the parameter control, then select OK. Server adds a parameter control into the report.
- Specify the value for the parameter. You may specify the value in one of these ways.
- Once the value in the parameter control changes, the report will re-run with the new parameter value.
 If the specified parameter is no longer used in the report, the parameter control becomes invalid.
 Back to top
Using Parameter Form Control to Run Reports
A parameter form control is a web control that is bound with the parameters used by the current report or other reports. By specifying values to the parameters in a parameter form control, you can make the reports run with the specified parameter values.
To insert a parameter form control and use it to run report:
- Do either of the following:
- Navigate to Menu > Insert > Parameter Form Control, then select the destination where you want to add the parameter form control.
- Drag Parameter Form Control from the Toolbox panel to the destination in the report.
Server displays the Insert Parameter Form Control dialog box.
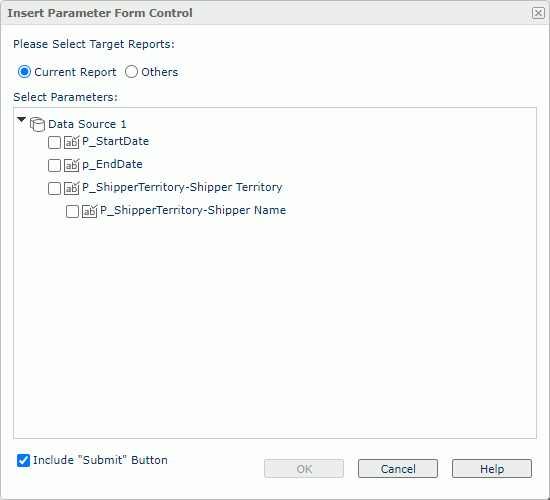
- Specify the target reports you want to run using the parameter form control.
- To run the current report, select Current Report, then specify the parameters used to run the report from the Select Parameters box.
- To run other reports, select Others, then select the reports you want to run. If all the selected reports contain no parameters, you cannot finish the dialog box.
- Specify whether you want to include the Submit button in the parameter form control. If yes, you can select Submit to submit the parameter values you specify in the parameter form control. If no, once you change the values of a parameter in the parameter form control, the new values will apply automatically.
- Select OK to save the changes.
Server inserts the parameter form control in the report. It lists the selected parameters for the current report or lists all parameters used by the specified reports.
- In the parameter form control, specify values of the listed parameters. You may specify the values in these ways.
- Select Submit to run the current report or the specified reports if Submit is available. If there is no Submit button, the change of values in the parameter form control will trigger report re-running.
If you save or publish a report containing a parameter form control to another folder, Server will not save or publish the reports that you bind the parameter form control with, along with the report.
Using Filter Control to Filter Report Data
You can use a filter control to filter one or more data components in a report, which refer to tables, banded objects, charts, and crosstabs. For how a filter control works, see Filtering Scenarios.
The filters that you created via filter controls are also referred to as on-screen filters.
To insert a filter control and use it to filter report data:
- Do either of the following:
- Drag Filter Control from the Toolbox panel to the destination in the report.
- Navigate to Menu > Insert > Filter Control, then select the destination where you want to add the filter control.
Server displays the Insert Filter Control dialog box.
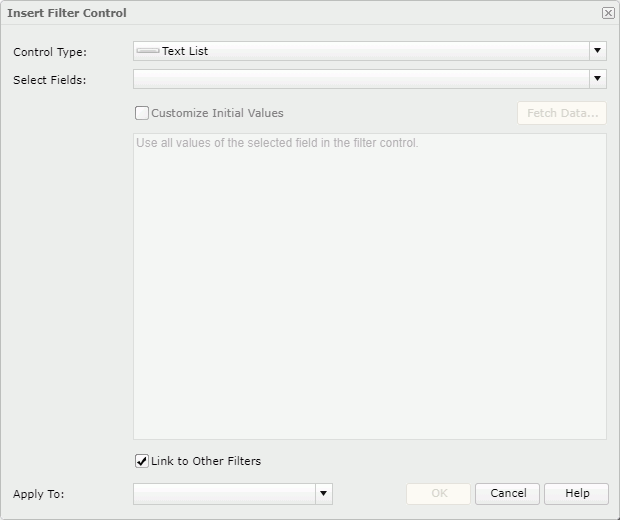
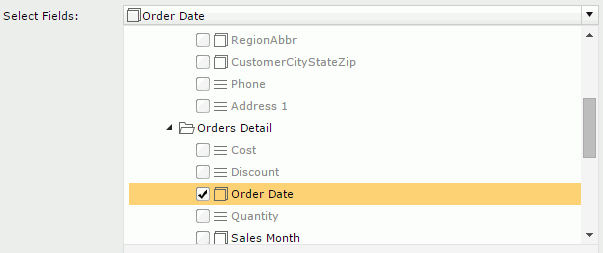
- In the Select Fields drop-down list, Server lists all the group and detail objects in the business views used by the current report. Select the objects of the same data type based on which you want to create the filter control, and then select outside of the drop-down list to close it. Server displays the name of the first selected object as the name of the filter control.
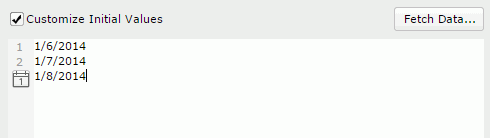
- Server applies all values of the selected objects in the filter control by default. If you want to customize the value list, select Customize Initial Values, and then select Fetch Data to select the values you want in the Fetch Data dialog box. You can also type the values manually in the text box.
Type a value in one row, and then press Enter to start a new row. Server supports general text editing operations such as Copy, Paste, Cut, Backspace, and Delete. You need to make sure of the accuracy of the formats and values.
- By default, Server links all filter controls that apply to the same data components. Selecting a value in one filter control, for example, USA, will result in that all the other linked filter controls respond to gray the values that do not belong to USA or that do not contain USA or that are not related to USA like London. If you do not want the filter control to be affected by other on-screen filters, clear Link to Other Filters.
- From the Apply To drop-down list, specify the data components in the report you want to apply the filter control to.
By default, Server applies the filter control to all the data components created using the business views from which the selected objects are. If you select data components which are not based on the same business view as any selected objects, Server will not use these objects in the filter control and thus will not list their values in the filter control.
- Select OK to insert the filter control. If the objects bound to the filter control have the same values, the values are distinctive in the filter control.
- Select the values with which you want to filter the report data. A filter condition based on the selected values then applies to the specified data components in the report.
You can make use of the Ctrl or Shift key to select multiple values. If the values themselves have inter-relationship, after you make the selection, Server will deal with the rest values to put the related ones on the top and gray the ones that have no relationship with the selected values. The grayed values are still selectable.
After inserting filter controls in the report, you can also insert a navigation control for undoing/redoing the value selection in the filter controls.
If you delete all the data components in a report that use a business view, Server removes the objects in the business view that have bound to the filter controls in the report from the filter controls too.
Managing a Filter Control
When you right-click on the title bar of a filter control, the following options are available for managing the filter control.
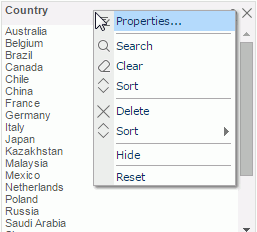
- Properties
Select to open the Filter Control Properties dialog box for modifying the properties of the filter control. The dialog box provides an entry to editing the filter control. To do this, in the General tab, select the ellipsis button beside the Filter On text box. Then in the Edit Filter Control dialog box, change the settings of the filter control.
 - Search
Select to open the search bar to search values in the filter control. You can also select the search button on the title bar of the filter control to launch the search bar.
See the following properties in the search bar:

- Text box
Type the text you want to search in the text box. Server lists the values that contain the matched text.  Close button
Select to close the search bar. More Options button
Select the button and Server displays more search options.- Highlight All
Select if you want to highlight all matched text. - Match Case
Select if you want to search for text that meets the case of the typed text. - Match Whole Word
Select if you want to search for text that looks the same as the typed text.
- Highlight All
 Previous button
Select to go to the previous matched text when you have selected Highlight All. Next button
Select to go to the next matched text when you have selected Highlight All.
- Text box
- Clear
Select to cancel the selection of values in the filter control. You can also use the button on the title bar to cancel the selection. You can undo/redo this operation.
 - Sort
Select to sort the values in the filter control in the ascending or descending order. - Delete
Select to remove the filter control from the report, and Server will remove the filter you created with the filter control from the report too. You can also use the close button on the title bar to remove the filter control. - Hide
Select to hide the filter control.
Saving and Using Default Values in Filter Controls
When you have enabled the Use Default On-screen Filter Values feature for page reports, you can save the values that you specified to the filter controls as the default values for a page report and for yourself. Next time when you run the page report, Server applies the saved values to the filter controls by default. The default values in filter controls work on a user-report basis.
- To save values that you specified for the filter controls in a report as the default values, navigate to Menu > Report > On-screen Filter Values, and then select Save as Default.
- To clear the default values that you have saved for the filter controls in a report, navigate to Menu > Report > On-screen Filter Values, and then select Clear Default.
- To replace the values that you specified for the filter controls in a report with the saved default values, navigate to Menu > Report > On-screen Filter Values, and then select Restore to Default.
- To generate the report data by applying all filters to the database, navigate to Menu > Report > On-screen Filter Values, and then select Push Down.
- Generally, for small data, setting Push Down as "false" can reduce the number of database accesses; for large data, setting Push Down as "true" can improve the performance by pushing down the execution to the database.
- On-Screen Filter Push-Down has higher priority than Business View Prefetch (See the Prefetch property in Business View Properties in the Report Designer Guide) and Dataset Reuse.
- On-Screen Filter Push-Down cannot work in reports that have used one of the following data resources: In-Memory Cube, Cached Report Data, and Query Result Set.
Link Relationship Between Filter Controls
By default, all the filter controls applied to the same data components in a report are interlinked. The link relationship is reflected on the filter values dynamically: selecting a value in one on-screen filter will result in that values which do not belong to the selected value, contain the selected value, or relate to the selected value are grayed in all the other linked filter controls for distinguishing. For example, there is a filter control based on the field Country and another on City, and they both apply to the same table. When you select USA in the Country filter control, the values in the City filter control will change as follows if the control has a scroll bar: the cities belong to USA are displayed in the upper area of the filter control, and the other cities are put in the lower area and grayed out. If the City filter control has no scroll bar, all the values retain their positions and the values not belonging to USA are grayed out. In both cases all the values are still selectable.
When using a filter control, you can determine whether to make the filter control apply the link relationship via the Link to Other Filters property.
See an example below showing the logic of other linked filters:
When
- Filter1 applies to DC1, DC2, and DC3.
- Filter2 applies to DC1.
- Filter3 applies to DC2.
- Filter4 applies to DC2 and DC3.
The result:
- For Filter1, other linked filters are Filter2, Filter3, and Filter4.
- For Filter2, other linked filter is Filter1.
- For Filter3, other linked filters are Filter1 and Filter4.
- For Filter4, other linked filters are Filter1 and Filter3
Using Navigation Control to Undo/Redo Value Selection in Filter Controls
You can consider a navigation control as an accessorial control for filter controls and use it to deal with the value selection operations in all the filter controls in a same report.
To insert a navigation control into a report, do either of the following:
- Navigate to Menu > Insert > Navigation Control, then select the destination where you want to add the navigation control.
- Drag Navigation Control from the Toolbox panel to the destination in the report.
A navigation control is a combination of three buttons:
- Back
Select to go back to the previous value selection status and refresh the report data accordingly. - Clear
Select to remove all the value selection histories and all the filter conditions based on the selections and refresh the report data accordingly. - Forward
Select to go forward to the next value selection status and refresh the report data accordingly.