Configuring Cache
Administrators can configure the cache settings of Report Server. This topic describes how you can cache reports, catalogs, images, security objects, report datasets, in-memory cubes, and connection data.
This topic contains the following sections:
- Configuring Cube
- Configuring Data Cache
- Configuring Connection Cache
- Configuring Report Cache
- Configuring Image Cache
- Configuring Security Cache
Configuring Cube
You can cache the aggregation objects of a business view as an in-memory cube, to improve the running performance of the reports that use the business view. For more information, select Managing In-Memory Cubes.
Configuring Data Cache
Server can cache the dataset of a report automatically when it runs the report, or you can schedule to cache the data without actually running a report. When a report has a cached data set, it will run with the data from the cache and not from the DBMS. See Managing Cached Report Data for more information.
Configuring Connection Cache
You can cache JSON/XML connection data on Server if you are an administrator so that reports created from these connections will be able to reuse the cached data to improve the performance of report rendering. This topic describes how you can create, use, and manage cached connection data.
You can create only one cached connection data (CCD) based on one JSON/XML connection.
You can schedule tasks to generate CCD immediately, at a specific time, or periodically to fetch the data from the DBMS and store it in Server. When a CCD is ready for use, all reports, library components, and visual analysis that use the same connection as the CCD will automatically use the CCD rather than go to the database for the data each time they are running.
To schedule a task to generate data cache for a connection at the specified time condition:
- On the system toolbar of the Server Console, navigate to Administration > Configuration > Cache > Connection Data. Server displays the Connection Data page.
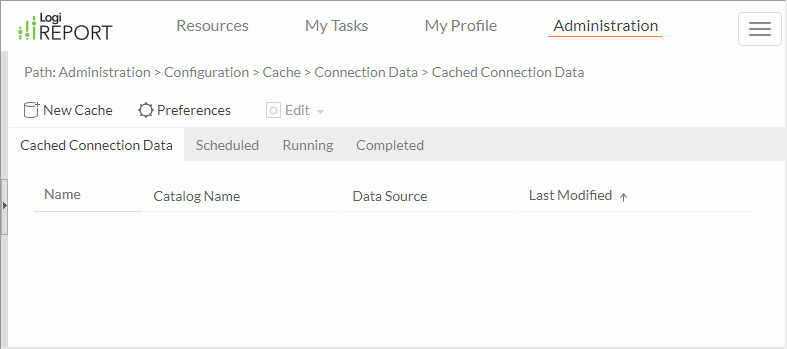
- Select New Cache. Server displays the New Cache dialog box.
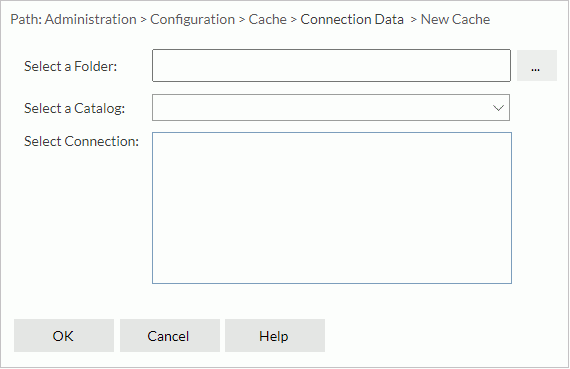
- Select the ellipsis button
 next to the Select a Folder text box. Server displays the Select Folder dialog box.
 - Browse to the folder that contains the catalog you want and select OK.
- From the Select a Catalog drop-down list, select the catalog in the specified folder.
- From the Select Connection box, select a connection for which you want to create data cache.
- Select OK. Server displays a new dialog box for defining the schedule task.
- In the General tab, do the following:
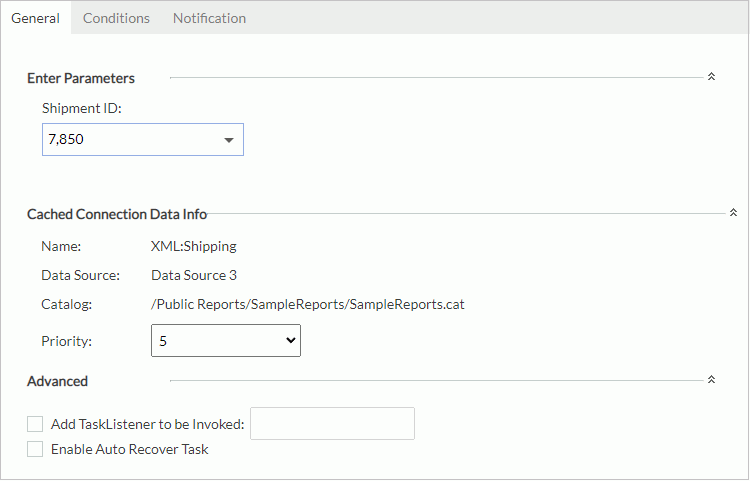
- When the connection uses parameters, you need to specify the parameter values in the Enter Parameters section.
- Expand the Cached Report Data Info section by selecting the down arrow on the right.
- Select a priority to the task from the Priority drop-down list. The priority levels are from 1 to 10 in ascending order of lowest priority to highest priority. By default, Server ignores this property unless you modify the server.properties file to set queue.policy not equal to 0.
- Expand the Advanced section to configure advanced settings.
- Select Add TaskListener to be Invoked to call a Java application before/after the task runs to obtain information about the task (for more information, see Applying TaskListener).
- If you are in a Cluster environment, you can also directly specify an active server in the cluster to perform the schedule task via the Specify a preferred server to run the task option.
- If you want to enable task recovery, select Enable Auto Recover Task. Then specify the maximum number of times to retry running the task in order to recover it, the time interval between the retries, and whether to recreate all or just the failed results.
- Select here for details about how to configure the settings on the Conditions and Notification tabs.
- Select Finish to submit the task. Server will then perform the task at the requested times to create cached data for the connection.
When cached connection data is ready for use, all reports based on the same connection as the cached data will automatically use the cached data for retrieving data.
Cached queries or business views have higher priority than cached connections.
A CCD freezes parameters in the connection. If a report uses a CCD and its connection contains parameters, when running the report, you can only update values of the parameters used in the report, but not values of the connection parameters. Server freezes a parameter when it depends on another frozen parameter.
Managing Scheduled CCD Tasks
Server displays all the scheduled tasks that you have submitted for generating CCD in the Cached Connection Data tab on the Connection Data page. You can further update the schedule information of the tasks or remove the tasks.
- To edit a task, select the row in which the task is, then select Edit > Properties on the task bar; or right-click on the row and select Properties from the shortcut menu. If you change the parameter values or schedule policy, the change will only take effect after the next CCD update time; before that, all reports using the CCD will still get the old data.
- To remove a task, select the row where the task is, then select Edit > Delete on the task bar; or right-click in the row and select Delete from the shortcut menu.
The Scheduled tab lists CCD tasks that are waiting to run.
The Running tab lists CCD tasks that are running.
The Completed tab lists CCD tasks that are completed. CCD generated from these tasks is ready for use. You can remove the record of a completed CCD task from this tab. To do this, select the row where the record is and then select Delete on the task bar, or right-click on the row and select Delete from the shortcut menu.
You can customize the columns you want to display in each of the four tabs above: switch to a tab, select Preferences on the task bar. In the Preferences dialog box, select the column names which you want to display in the tab, then select OK to apply the settings. For the Running tab, you can also use the Parameter Display Size option to specify the display length in characters of the parameters in its Parameters column; and for the Completed table, specify the number of days for keeping completed tasks and the display length of the parameters in its Parameters column.
You can sort the records in each tab in the ascending or descending order by any column title. To do this, select the column title on which you want to sort the records. Server displays a sort icon right after the column title, showing the sort direction.
Configuring Report Cache
To improve performance, you can cache reports and catalogs into memory in advance so that Report Server does not need to load them from disk when you run reports. Server clears the cached catalogs and reports from memory when it restarts.
To configure the report cache of Report Server:
- On the system toolbar of the Server Console, navigate to Administration > Configuration > Cache > Report Cache. Server displays the Report Cache page.
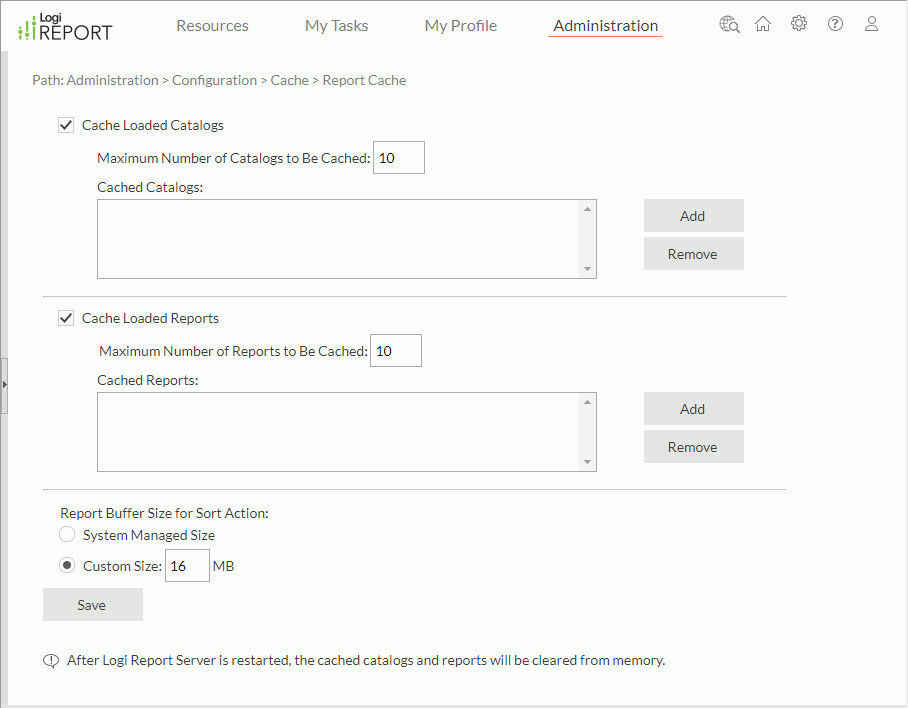
- Select Cache Loaded Catalogs if you want to keep catalogs in memory after you create reports using them. However, when running a report in Page Report Studio, Server does not cache its catalog even if you selected this option.
- In the Maximum Number of Catalogs to Be Cached text box, type the maximum number of catalogs you want to cache in the memory.
- The Cached Catalogs box lists the currently cached catalogs with their file paths in the server resource tree and catalog version numbers.
To add a new catalog to the cache, select Add. Server displays a dialog box. Select the catalog you want to cache and its catalog version.
To remove a cached catalog, select it in the Cached Catalogs box, then select Remove.
- Select Cache Loaded Reports to keep reports in memory after they are generated.
- In the Maximum Number of Reports to Be Cached text box, type the maximum number of reports you want to cache in the memory.
Each cached report uses part of heap memory. If the heap is used up, Server throws an OutOfMemoryException. In JRServer.bat/sh, you can use the -Xms setting to specify the initial heap and -Xmx the maximum heap. For example, -Xms256m -Xmx1024m means that the initial heap is 256 MB and the maximum heap is 1024 MB. You can refer to the Java VM documents for more information.
See the following example. The accuracy depends on your OS and VM.
Cache Size Heap Size Required 10 reports 16 MB 30 reports 25 MB The default cache size is 10 reports, and the default maximum heap space is 1024 MB. When you adjust the number, you should adjust the heap accordingly. The larger the heap space, the better the performance provided enough physical memory is available.
- The Cached Reports box lists the currently cached reports with their file paths in the server resource tree and report version numbers.
To add a new report to the cache, select Add. Server displays a dialog box. Select the report you want to cache and its report version.
To remove a cached report, select it in the Cached Reports box, then select Remove.
- Specify the buffer size for the sort action on page reports. Any change to the buffer size takes effect immediately. This setting is not available to organization admin.
- System Managed Size
Select to enable the system to automatically control the buffer size used in the RAM for each report when performing the sort action on page reports. Server stores all data for sorting in the RAM automatically. - Custom Size
Select to customize the buffer size used in the RAM for each report when performing the sort action on page reports. The default value is 16 MB, and the minimum size required by Report is 4 MB. Server ignores any value smaller than 4 MB and uses 4 MB instead. If the amount of data for sorting is large, for instance, 5,000,000 records, but the buffer size is small, it will require a lot of IO and produce poor performance.
- System Managed Size
- Select Save to apply the cache configuration.
Configuring Image Cache
You can cache images used in reports and dashboards so that Report Server does not need to load images from disk when you run reports and dashboards. Server clears the cached images from memory when it restarts.
To configure the image cache of Report Server:
- On the system toolbar of the Server Console, navigate to Administration > Configuration > Cache > Image Cache. Server displays the Image Cache page.
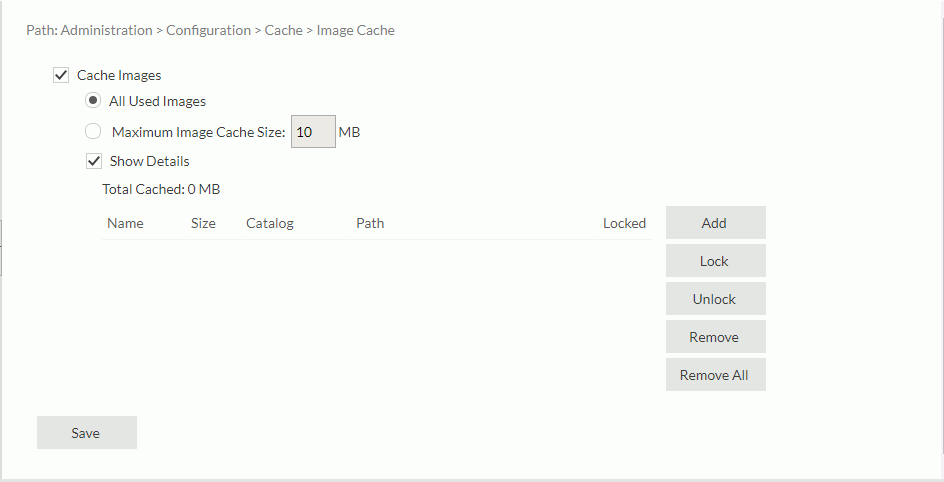
- Select Cache Images to enable image cache.
- Specify how you want to cache images.
- All Used Images
Server caches all the images that are used in reports and dashboards. - Maximum Image Cache Size
Select this option if you want to configure the maximum size for caching images in the memory.
- All Used Images
- To view the information of the cached images, select Show Details. Server displays a table with the following columns:
Column Description Name The name of the image. Size The size of the image file. Catalog The catalog file in which the image file is. Path The path of the cached image in the server resource tree. Locked The lock status of the image file. You can edit the cached images in the table:
- To add an image to the cache, select Add. Server displays a dialog box. Select an image you want to cache.
- To lock an image, select it, and then select Lock. When you lock an image, Server always keeps it in the image cache until you remove it manually or restart Server. You can select multiple images and lock them at a time. To release the lock, select the images and select Unlock.
- To remove an image from the cache, select it, and then select Remove. You can select Remove All to remove all the cached images.
- Select Save to apply the cache configuration.
Configuring Security Cache
The security cache system temporarily stores security objects such as users, roles, groups, and ACLs. For more information, see Security Cache System.
![]() When running a report, if there are multiple data resources available, the priority of applying a data resource is as follows: in-memory cube > push down aggregation > cached report data (CRD) or runtime result set > cached connection data (CCD) > fetch data from the database.
When running a report, if there are multiple data resources available, the priority of applying a data resource is as follows: in-memory cube > push down aggregation > cached report data (CRD) or runtime result set > cached connection data (CCD) > fetch data from the database.
 Previous Topic
 Back to top