Managing User Accounts
Managing user accounts includes many functions and they are available to administrators only. This topic describes how you can create user accounts, edit the roles and groups for users, customize the scheduling recipients for users, audit users, and perform other user account functions.
To manage users, first select the realm in which the users are, then on the system toolbar of the Server Console, navigate to Administration > Security > User to display the User page.

This topic contains the following sections:
- Creating a New User Account
- Editing a User Account
- Searching for Users
- Editing the Roles a User Holds
- Editing the Groups a User Belongs To
- Editing the Scheduling Recipients for a User
- Auditing a Specific User
- Changing the Password of a User
- Setting User Preferences
- Managing Users' Shared Reports
- Managing Users' Web Report Bookmarks
- Deleting a User Account
- Accessing a User's Personal Folders
Tip: To add or delete a user, you can also use URL commands directly.
Creating a New User Account
- Select New User on the task bar. Server displays the New User dialog box.
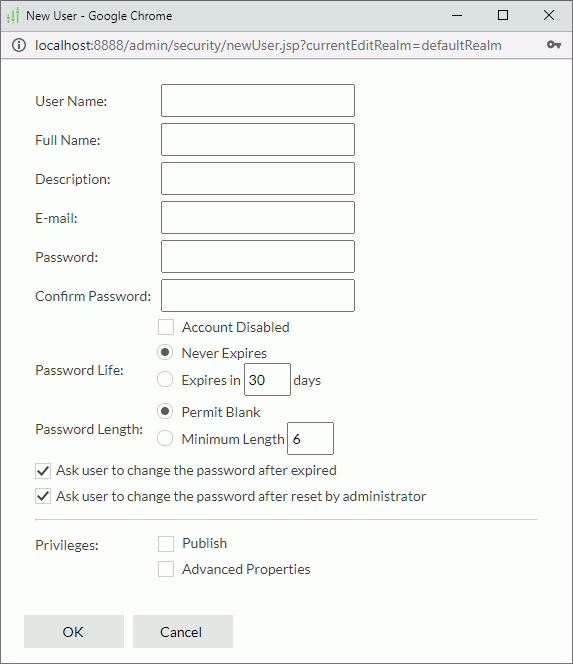
- Provide the name, full name, description, email address, and password for the new user.
- Select Account Disabled if you want to disable the user for the time being.
- The password never expires by default. Select Expires in N days and specify in how many days you want the password to get expired.
- The password can be blank, and its length is unlimited by default. Select Minimum Length and type a number for the allowed length. The number should be between 0 and 20.
- By default, Report will prompt the user to change the password after it gets expired or reset by the administrator. Clear Ask user to change the password after expired and Ask user to change the password after reset by administrator If you do not want such prompt for the user.
- Select Publish and Advanced Properties to give the user the privileges of publishing resources to Report Server and of viewing advanced resource properties information.
- Select OK to create the user. Server adds the new user in the user table.
Editing a User Account
- In the user table, select the name of the user. Server displays the Edit User dialog box.
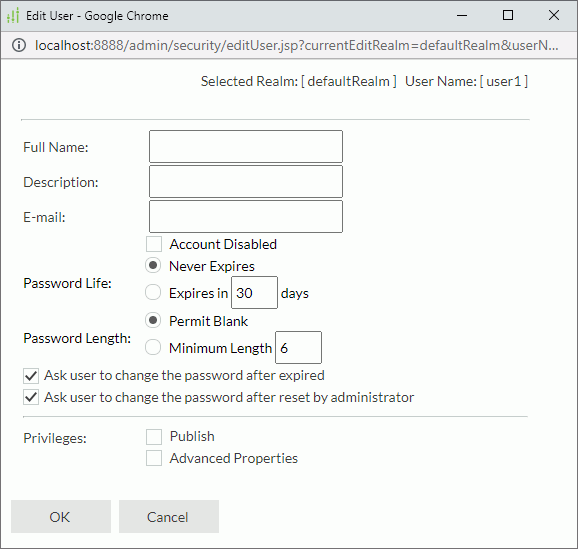
- Edit the user information.
- Select OK to accept the changes.
Searching for Users
In the Search box, type the text of the usernames you want to search for and Server lists the users that contain the matched text. After typing text in the Search box, you can select  in the box to specify the following search options: Highlight All, Match Case, and Match Whole Word. To cancel the search operation, clear the text or select
  .
.
Editing the Roles a User Holds
You can assign more than one role to a user. A user that holds multiple roles has all the privileges that these roles have.
To edit the roles that a user holds, in the user table, select roles of the user. Server displays the role list of the user.
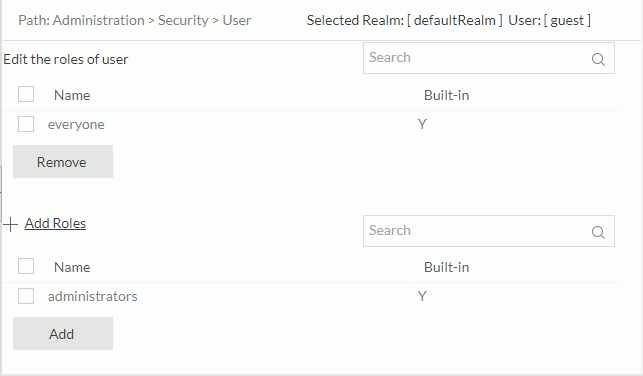
The following table describes the options in the role list:
| Option | Description |
|---|---|
| Search box | Search for the required roles. |
| Name | Name of the roles. |
| Built-in | Show whether the role is a built-in role. |
| Remove | Select to remove the selected roles from the user. |
| Add Roles | Select to display the roles that you can add to the user. |
| Add | Select to add the selected roles to the user. |
You can edit the roles that the user holds:
-
To add a role to the user, select Add Roles, select the new role, and then select Add.
- To remove a role from the user, select the role and then select Remove. Once you remove a role from a user, the user will no longer have the privileges that the role owns.
Editing the Groups a User Belongs To
You can assign more than one group to a user. A user that belongs to multiple groups has all the privileges that these groups have.
To edit the groups that a user belongs to, in the user table, select groups of the user. Server displays the group list of the user, which is similar to the role list of a user as above.
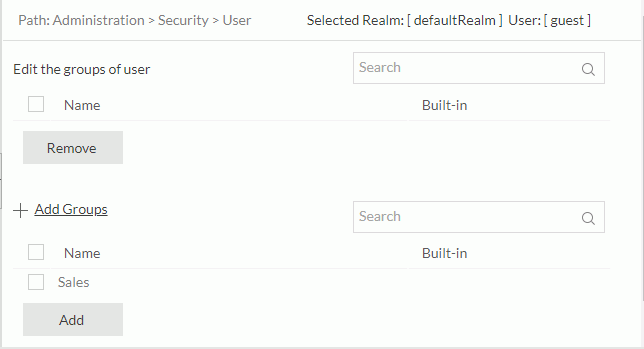
You can edit the groups that the user belongs to:
- To add the user to a group, select Add Groups, select the new group, and then select Add.
- To remove the user from a group, select the group and then select Remove. Once you remove a user from a group, the user will no longer have the privileges that the group owns.
Editing the Scheduling Recipients for a User
Report adopts permission control on the scheduling recipients each user can access, meaning when a user schedules a report task to publish reports to email, the user can send the reports to the email addresses of the users, groups, and roles in the Report Server security system, depending on the user's permission. The following are the basic rules on which users, groups, and roles are available as the scheduling recipients of a user by default:
- An administrator (the user with the "administrators" role) who does not belong to any organization can see all the users, groups, and roles in the Report Server security system. The permission is unchangeable.
- A normal user (the user without the "administrators" role) can see themselves only.
- An administrator in an organization can see all the users, groups, and roles in the organization. The permission is unchangeable.
- A normal user in an organization cannot see users, groups, and roles outside of the organization.
- A user, group, or role inherits the permissions from its parent users, groups, and roles.
An administrator can customize the scheduling recipients that are available to a normal user:
- In the user table, select recipients of the user. Server displays the recipient list for the user.
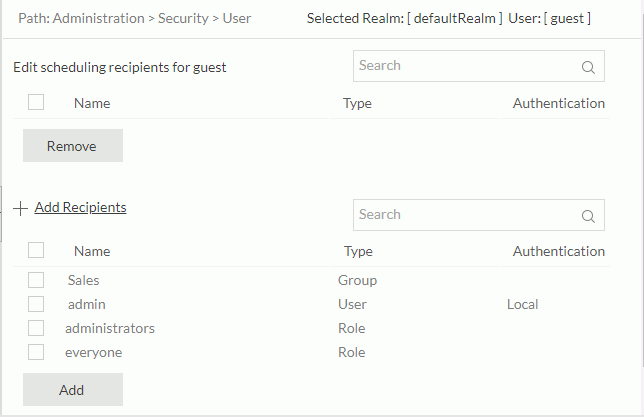
The following table describes the options in the recipient list:
Option Description Search box Search for the required recipients. Name Name of the recipients. Type Type of the recipients: User, Group, or Role. Authentication Recipients' authentication type: Local or LDAP. Remove Select to remove the selected recipients from the user. Add Recipients Select to display the recipients that you can add to the user. Add Select to add the selected recipients to the user. - Select Add Recipients. Server displays the recipients that you can choose.
- Select the recipients that you would like to be accessible to the user.
- Select Add. Server displays a confirmation message.
- After you confirm, server moves the recipients you just selected to the recipient list.
- To remove a recipient from the user, select it in the recipient list and then select Remove.
Then when the user schedules to publish reports to email, the user will be able to select the recipients from the Select Role, Group and User dialog box to use their addresses to send the email.
Auditing a Specific User
You can have Server to audit a user and record the resulting information into the log files. To audit a user:
- In the user table, select Auditing of the user in the Control column. Server displays the Auditing dialog box.
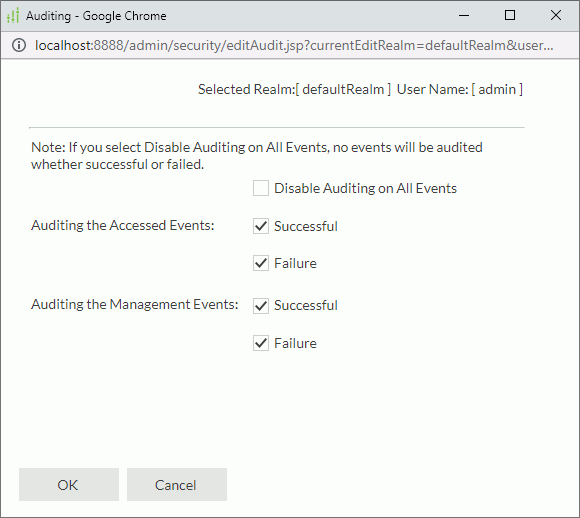
- Specify the events which you want to audit for this user.
- Select OK to confirm the settings.
Changing the Password of a User
- In the user table, select Change Password of the user. Server displays the Change Password dialog box.

- In the System Administrator Password text box, type the password of the currently signed-in user.
- Specify the new password for the user and confirm it by typing it a second time.
- Select OK to accept the changes.
Setting User Preferences
- In the user table, select Preference of the user. Server displays the Preference dialog box.

- Specify the server preferences for the user as well as the Default and Advanced properties you want the user to use in Page Report Studio.
- Select OK to accept the changes.
Managing Users' Shared Reports
When users have shared their reports, you can view and remove the shared reports if you want.
![]() System admin cannot see shared reports of organization users, and organization admin can only see shared reports of users in the organization.
System admin cannot see shared reports of organization users, and organization admin can only see shared reports of users in the organization.
Select N Reports (N is not zero) for a user in the Shared column in the user table. Server displays the user's My Shared page. Here, you see the original reports that the user has shared, where and when the reports were shared, the type of the reports, the descriptions, and the time when the shared reports were modified.

To view more information about a report sharing, hover over the report row, and then select the Properties button  on the floating toolbar. Or, you can select the report row, right-click in the report row, and then select Properties on the shortcut menu. Server displays the Sharing Properties dialog box. You can only view the properties in the dialog box but cannot change them.
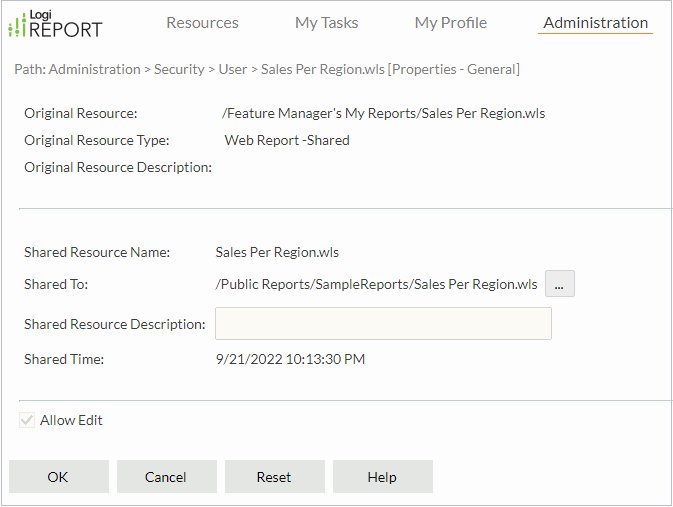
To remove a shared report, hover over the report row, and then select the Delete button  on the floating toolbar. Or, you can select the report row, right-click in the report row, and then select Delete on the shortcut menu. Server asks whether you want to delete the node. Select OK. Server will remove the shared report.
Managing Users' Web Report Bookmarks
After users create bookmarks for web reports in Web Report Studio, you can manage the bookmarks if you want.
![]() System admin cannot see bookmarks of organization users, and organization admin can only see bookmarks of users in the organization.
System admin cannot see bookmarks of organization users, and organization admin can only see bookmarks of users in the organization.
Select N Bookmarks (N is not zero) for a user in the Bookmarks column in the user table. Server displays the user's Bookmarks page. Here, you see the bookmark names, the reports for which the user created the bookmarks, the descriptions of the bookmarks, and the last time when the bookmarks were modified.

You can perform the same operations on the bookmarks as you do in the My Bookmarks folder on the Resources page, except that you cannot run bookmarks here.
Deleting a User Account
If you find a user account is no longer required, you can delete it by selecting the corresponding Delete in the Control column of the user table. However, you cannot delete the built-in user accounts such as admin and guest, and users that hold roles other than the everyone role, or that belong to any group. You cannot delete yourself from the user table, either.
Accessing a User's Personal Folders
You can access and fully control other users' personal folders including My Reports and My Components, for example, you can edit the properties of the folders and remove the redundant folders when necessary.
- Open the server.properties file in
<install_root>\binto add the server.security.expose_my_folders=true property manually. - Restart Server.
- Navigate to the user table. The My Folders link is now available for each other user except yourself in the Control column of the table.
- Select the link for a user. Server displays the My Reports and My Components folders of the user. You can now perform on the folders with full permissions as the user does.
 Previous Topic
 Back to top