 Previous Topic
Creating Business Views in a Catalog
Designer includes the interactive Business View Editor to help you create any business views you need. This topic introduce how you can create and edit business views in a catalog using this editor.
This topic contains the following sections:
- Predefining Business Views in a Catalog
- Adding and Modifying Elements in a Business View
- Defining Hierarchies in a Business View
- Customizing Filter Resources of a Business View
- Editing Data Resources of a Business View
- Creating Predefined Filters for a Business View
- Applying Union Query to a Business View
- Creating Branches for a Business View
Predefining Business Views in a Catalog
You can predefine business views in a catalog, so you can use them directly to create reports.
- Open the catalog, then do either of the following:
- In the Catalog Manager, expand the data source to create the business view, then select the Business Views node or any existing business view in the data source and select New Business View on the Catalog Manager toolbar, or right-click the Business Views node in the data source and select New Business View from the shortcut menu.
- Navigate to Home > New > Business View or File > New > Business View, specify the data source to create the business view, then select OK.
- In the Enter Business View Name dialog box, type a name for the business view and select OK. Designer displays the Add Tables/Views/Queries dialog box.
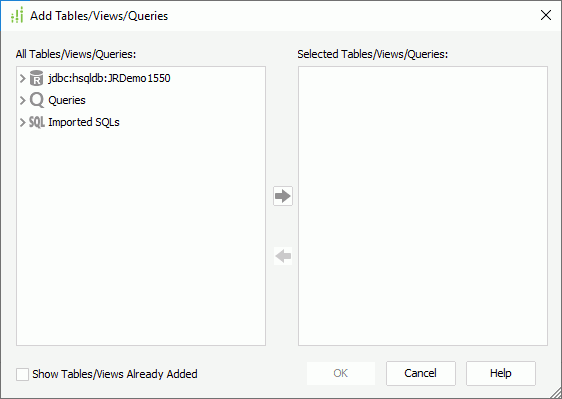
- In the All Tables/Views/Queries box, expand the resource node, select the data resources you want to use for the business view, select Add
 to add the resources to the Selected Tables/Views/Queries box, then select OK.
 - When the catalog data source is connected with multiple connections, you can mash up multiple data resources for the business view that come from all these connections, including tables, views, synonyms, imported SQLs, imported APEs, stored procedures, queries, and user-defined data sources. When you add a query, imported SQL, imported APE, stored procedure, or user-defined data source, Designer adds it as a single table with all of its columns. When two resources, for example, a table and a view, use the same name, you cannot add them at the same time, and when a table is already contained in a query, you cannot add the table and the query at the same time.
- When the current catalog data source contains JDBC connections, Designer displays the Show Tables/Views Already Added option. Select it if you want to show the tables, views, and synonyms in the resource tree in the All Tables/Views/Queries box, which you have already added to the Selected Tables/Views/Queries box. You can then add the tables, views, and synonyms of the JDBC connections for the business view as many times as you want by providing different names for the tables, views, and synonyms each time you add them.
- If you add more than one data resource for the business view, Designer displays the Query Editor dialog box for you to edit the data resources. Make necessary changes and select OK.
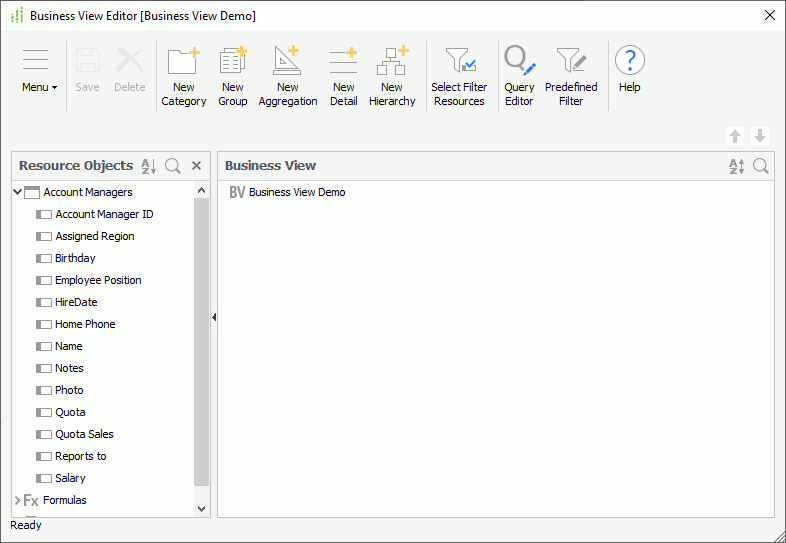
- Designer displays the Business View Editor dialog box. You can fine all the resources you have selected for the business view, and the formulas and summaries in the current catalog data source that are valid for these resources in the Resource Objects panel.
- Add elements to the business view based on the available resources.
- Define hierarchies on the business view to allow users to drill report data to particular groups at runtime.
- Create predefined filters on the business view for users to choose when using the business view to create reports.
- Configure security for the business view to limit user access to the view elements.
- Select Save on the toolbar to save the business view.
- Navigate to Menu > File > Close to close the Business View Editor dialog box. Designer adds the business view to the catalog.
Besides predefining business views in a catalog from the Catalog Manager, Designer also provides you quick access to create business views from the UI where a business view list is available, for example, in the Data screen of the component wizard. In this business view list, you can find the option <New Business View...> on the top. Select the option and you can create a business view in the catalog and use it for the current scenario.
 Back to top
Adding and Modifying Elements in a Business View
Designer lists the data resources you have selected for a business view with their DBFields, and the formulas and summaries in the current catalog data source that are valid to the data resources, in the Resource Objects panel in the Business View Editor dialog box. You can use the resources to create view elements in the business view.
 In the Catalog Manager, you can also create, edit, rename, or delete an element in a business view, by using the corresponding command on the element's shortcut menu.
Adding Elements by Dragging
In the Business View Editor, a data resource displays as a folder containing its DBFields. You can drag DBFields, formulas, summaries, and a whole data resource folder with all its DBFields, from the Resource Objects panel to the business view or a category in the Business View panel. You can select multiple resources and drag them all at a time. Designer then converts the resources into corresponding view elements in the business view based on the following rules:
- DBFields and formulas are added as group objects.
- A whole data resource folder with all its DBFields is added as a category with group objects.
- Summaries are added as aggregations based on the same sum-on fields and summary functions. You can convert the group objects to detail objects using the Edit View Element dialog box if you prefer to use them as detail objects.
When you drag a DBField of the Timestamp/DateTime data type, Designer displays the Select Time Interval dialog box for you to specify how you want to create the group object. By default, Designer selects Keep Original in the dialog box, meaning, to create a group object based on the DBField itself. If you also want to create a group object that uses an expression to retrieve the years/quarters/months/weeks/days of the DBField as its values, select the corresponding checkbox. In the meantime, you can use the Auto Create Hierarchy option to specify whether to create a hierarchy in the business view automatically and edit the name of the hierarchy. The hierarchy contains all the group objects you have specified to create from the DBField, and the order of the group objects in the hierarchy is the same as that of the checkboxes in the dialog box. You can further edit the hierarchy.
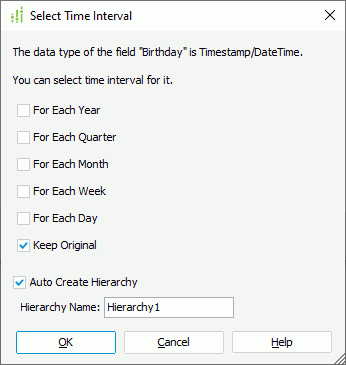
If you drag multiple DBFields of the Timestamp/DateTime data type, Designer displays the Select Time Interval dialog box multiple times for you to specify the settings for each DBField.
Creating and Editing Categories with Dialog
To create a category in a business view using dialog box
- In the Business View Editor dialog box, select the business view or an existing category in the Business View panel, then do one of the following:
- Right-click and select New Category from the shortcut menu.
- Select New Category on the toolbar.
- Navigate to Menu > New > Category.
Designer displays the Category Property dialog box.
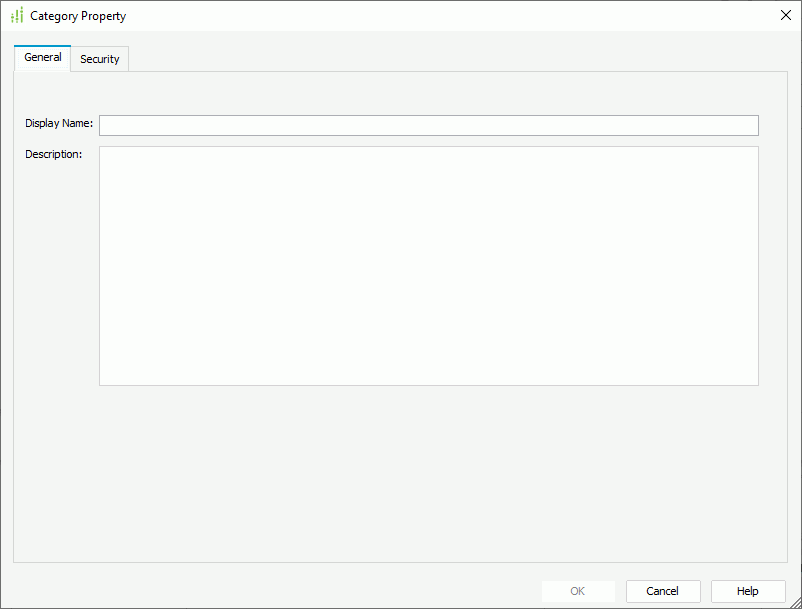
- In the General tab, set the display name of the category in the Display Name text box.
- In the Description text box, type a description for the category to help others get an idea about it. The description displays when users point to the category in the resources panel of Web Report Studio and Page Report Studio.
- You can select the Security tab to configure business view security.
- Select OK. Designer adds a new category to the business view or the selected category. You can then add elements to it.
To edit a category
- In the Business View Editor dialog box, select the category from the business view resource tree in the Business View panel, right-click it and select Edit Category from the shortcut menu.
- In the Category Property dialog box, edit its general information in the General tab and security information in the Security tab.
- Select OK to confirm the changes.
Creating and Editing View Elements with Dialog
To create a view element in a business view using dialog box
- In the Business View Editor dialog box, select the business view or any existing category into which you want to add the view element in the Business View panel, then do one of the following:
- Right-click and select New View Element from the shortcut menu.
- Select New Group, New Aggregation, or New Detail on the toolbar.
- Navigate to Menu > New > Group/Aggregation/Detail.
Designer displays the New View Element dialog box.
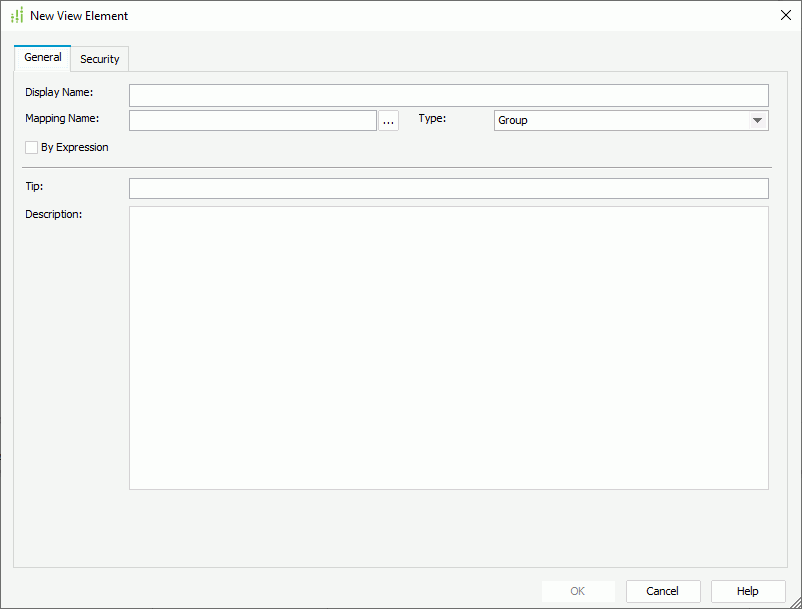
- In the General tab, decide the type of the view element by selecting the corresponding item from the Type drop-down list.
- Select the ellipsis
 to specify the mapping field of the view element.
When creating a group object, if you want to write an expression to retrieve values for it, select By Expression, then select Settings. In the Formula Editor dialog box, compose the expression using resources in the current catalog data source. The expression should follow the record level pass one formula syntax.
to specify the mapping field of the view element.
When creating a group object, if you want to write an expression to retrieve values for it, select By Expression, then select Settings. In the Formula Editor dialog box, compose the expression using resources in the current catalog data source. The expression should follow the record level pass one formula syntax. - In the Display Name text box, specify the display name of the view element. By default, the display name is the same as the mapping name.
- When you choose to create an aggregation, select the function to calculate the mapping field from the Aggregate Function drop-down list. If you select DistinctSum, you should select the ellipsis next to the Distinct On text box to specify one or more fields according to whose unique values to calculate DistinctSum using the Select Fields dialog box. Select Customized if you want to create a custom aggregation, then select Settings to open the Formula Editor dialog box to compose the expression using resources in the current business view.
- Specify the tool tip and description of the view element in the Tip and Description text boxes respectively to help others get an idea about it. The tool tip displays when users point to the view element in the business view resource tree at runtime.
- You can select the Security tab to configure business view security.
- Select OK to create the view element and close the dialog box.
- In the Business View Editor dialog box, select the view element from the business view resource tree in the Business View panel, right-click it and select Edit from the shortcut menu.
- In the Edit View Element dialog box, edit its general information in the General tab and security information in the Security tab. You can convert a group object to a detail object and vice versa, by selecting Detail or Group from the Type drop-down list in the General tab.
- Select OK to confirm the changes.
You can also select multiple view elements of the Group and Detail types and edit them at a time using the Edit View Element dialog box to apply the same Tip and Description settings to them, and change their element type to Detail or Group.
Adjusting Element Order
In the Business View Editor dialog box, you can change the position of the view elements in any category or the categories in the business view in the resource tree of the Business View panel. The position here determines the display order of the elements and categories in any UI that shows the business view, except that in the Catalog Manager resource tree which applies its own sort rule. You can place the elements and categories alphabetically or based on their using frequency to help others easily locate the element they need.
You can use the following methods to change the position:
- Select one or more categories or elements in a category and select Move Up
 or Move Down
  .
. - Right-click one or more categories or elements in a category and select Move Up or Move Down on the shortcut menu.
- Select the Sort icon
 at the upper right corner of the Business View panel and select Ascending or Descending from the drop-down menu to display the resources excluding the elements in hierarchies in either ascending or descending order.
The No Sort item in the Sort drop-down menu is always grayed out. It is selected by default each time you open the Business View Editor. However, this does not cancel the ascending or descending order if you have applied one to the elements the last time you were working in the editor, in other words, once you have selected the ascending or descending order and saved the business view, when you open the editor the next time, Designer displays the elements in the specified order although No Sort is selected on the drop-down menu. You may also find that No Sort is selected automatically when the elements apply neither the ascending nor descending order, for example, you adjust the element order by moving them up or down.
at the upper right corner of the Business View panel and select Ascending or Descending from the drop-down menu to display the resources excluding the elements in hierarchies in either ascending or descending order.
The No Sort item in the Sort drop-down menu is always grayed out. It is selected by default each time you open the Business View Editor. However, this does not cancel the ascending or descending order if you have applied one to the elements the last time you were working in the editor, in other words, once you have selected the ascending or descending order and saved the business view, when you open the editor the next time, Designer displays the elements in the specified order although No Sort is selected on the drop-down menu. You may also find that No Sort is selected automatically when the elements apply neither the ascending nor descending order, for example, you adjust the element order by moving them up or down.
You can also drag a view element or a category and drop it to another category node to change its position. When you perform this operation, Designer always places the view element or category at the end of the target category. However, when you drag a group object or category to another category, Designer automatically removes the group object or group objects in the selected category from hierarchies that contain these group objects; therefore, you need to add the group object from the target category to the hierarchies again if you still need them in the hierarchies.
Renaming an Element
To rename a view element or a category, that is, to change its display name, take the following steps:
- In the Business View panel of the Business View Editor dialog box, right-click the element or category and select Rename from the shortcut menu, or select on the name twice. The name text box then becomes editable.
- Type a new name and select outside the text box to accept the change.
Deleting an Element
To delete an unwanted element or category, select it in the Business View panel of the Business View Editor dialog box, then:
- Select Delete on the toolbar.
- Right-click and select Delete from the shortcut menu.
- Drag it to the Resource Objects panel on the left.
You can select multiple elements and delete them at one time.
Defining Hierarchies in a Business View
You can regard a hierarchy as a category that contains group objects sharing a hierarchical relationship in the order from the highest level to the lowest. Hierarchies enable users to drill report data up and down to particular groups at runtime. For example, you can add these group objects into one hierarchy called Dates: Sales Year, Sales Quarter, Sales Month, and Sales Date. When you use any of these group objects to group data in a table, crosstab, or chart, users can use the context menu to drill up or down to the next level. You can create any number of hierarchies such as dates, times, geography, and product types.
The group objects added in a hierarchy are just references to the real group objects and therefore cannot be edited.
To create hierarchies in a business view
- In the Business View Editor dialog box, do one of the following:
- Select New Hierarchy on the toolbar.
- Navigate to Menu > New > Hierarchy.
- Right-click the business view root node or any category in the Business View panel and select New Hierarchy from the shortcut menu.
You can add a hierarchy to any category in a business view and it does not make any difference where you place the hierarchy. For easy look-up, you can put them under the root category. - In the New Hierarchy dialog box, type a name for the hierarchy and select OK. Designer adds a blank hierarchy to the business view resource tree.
- You can now drag group objects from the business view resource tree to the hierarchy as hierarchical groups. Where Designer places a group object in the hierarchy depends on the position you drag it to:
- When you drag the group object to the hierarchy root node, Designer places it at the bottom of the hierarchy.
- When you drag the group object to an existing hierarchical group, Designer places it below this hierarchical group.
- When you drag the group object between two hierarchical groups, Designer places it between them.
- You can also drag fields from the Resource Objects panel to the hierarchy. Then, if you have not added any of the selected fields as group objects in the business view, Designer automatically adds them to the business view and places them at the bottom of the business view resource tree.
- You can adjust the position of the group objects in the hierarchy by selecting a group object and selecting Move Up or Move Down . The higher you place a group object, the higher its level is in the hierarchy.
- If you want to remove a group object from the hierarchy, select it, then right-click and select Remove from Hierarchy on the shortcut menu, or drag it to the Resource Objects panel.
- Repeat the preceding steps to create more hierarchies in the business view.
- To rename a hierarchy, select it from the business view resource tree, then right-click it and select Rename on the shortcut menu, or select on the hierarchy name twice. When the name text box becomes editable, type in a new name and select outside the text box to accept the change.
- To remove a hierarchy, select it from the business view resource tree, then right-click it and select Delete on the shortcut menu, or select Delete on the toolbar. You can select multiple hierarchies and remove them all at a time.
- Save the business view to save the hierarchies into it.
You can also add and manage hierarchies in a business view from the Catalog Manager.
- Adding a hierarchy
- In the Catalog Manager resource tree, right-click a category in the business view and select New Hierarchy from the shortcut menu.
- In the New Hierarchy dialog box, provide a name for the hierarchy and select OK. Designer then adds the hierarchy in the business view.
- Right-click the business view and select Edit on the shortcut menu to open the Business View Editor.
- Drag group objects to the hierarchy to define its hierarchical groups.
- Save the business view to save the hierarchy.
- Removing a hierarchical group from a hierarchy
In the Catalog Manager resource tree, locate the group in the hierarchy, then right-click it and select Remove from Hierarchy on the shortcut menu. - Renaming a hierarchy
In the Catalog Manager resource tree, locate the hierarchy in the business view, right-click it and select Rename on the shortcut menu, or select on the hierarchy name twice. When the name text box becomes editable, type in a new name and select outside the text box to accept the change. - Removing a hierarchy
In the Catalog Manager resource tree, locate the hierarchy in the business view, then right-click it and select Delete on the shortcut menu, or select Delete on the Catalog Manager toolbar.
Customizing Filter Resources of a Business View
When you use a business view to create a report and want to filter the business view to narrow down data shown in the reports, by default, Report lists all the view elements the business view contains for you to choose to define the filter. In the case when a business view contains a large number of view elements, you may find it difficult to locate the element you need to focus on. To avoid such inconvenience, you can customize which view elements you prefer to be available as the filter resources of the business view when creating the business view.
To customize filter resources for a business view
- In the Business View Editor dialog box, select Select Filter Resources on the toolbar. Designer displays the Select Filter Resources dialog box.
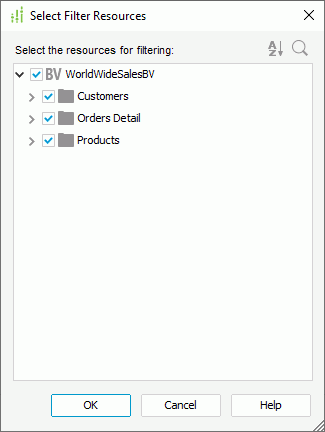
- By default, Designer selects all the view elements in the resource box. Clear the view elements you do not want to use in filters. To deselect all the view elements, clear the top checkbox; to deselect the view elements in a category, clear the category.
- Select OK to apply the settings.
You can also access the Select Filter Resources dialog box in the following way: in the Catalog Manager resource tree, right-click the business view and select Select Filter Resources on the shortcut menu.
When you define filters while creating a link or sending/receiving a message, the available resources include all the view elements in the corresponding business view.
Editing Data Resources of a Business View
After the initial selection of the data resources for a business view, you can edit these data resources at any time.
- In the Business View Editor dialog box, select Query Editor on the toolbar or navigate to Menu > Tools > Query Editor.
- In the Query Editor dialog box, edit the data resources you have selected to use for the business view in the same way you would do for a query. For example, you can:
- Select the columns to use for the business view in each table. To select all columns in a table, select * at the top of the table. However, for tables from MongoDB connections, you cannot select all columns by selecting *, because you cannot use the PrimaryKey and ForeignKey columns in such table for a business view.
- Add or delete data resources for creating the business view.
- Set up joins between the data resources.
- Define filters to narrow data for the business view.
- Create computed columns and formula fields to use in the business view.
- Select OK to apply the changes. Designer automatically creates an underlying query for the business view.
- You can navigate to Menu > Query > Save As to save this query into the catalog if you want to reuse it.
Creating Predefined Filters for a Business View
You can predefine filters in a business view for users to choose when they design or modify data components that use the business view, so as to filter out the unnecessary data in the data components.
If you want to filter the data to use in a business view, you need to define query filter while specifying the data resources for the business view.
To create predefined filters in a business view
- In the Business View Editor dialog box, select Predefined Filter on the toolbar or navigate to Menu > Tools > Predefined Filter. Designer displays the Predefined Filter dialog box.
- Select New to add a filter.
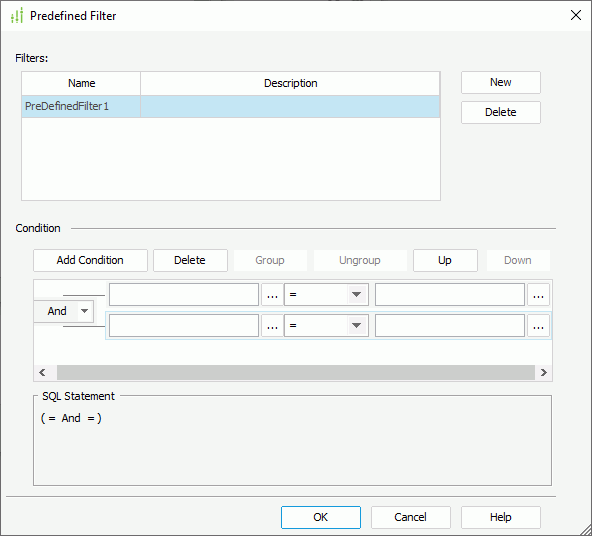
- In the Filters box, double-click in the Name and Description text boxes to edit the name and description of the filter.
- In the Condition panel, select Add Condition to add a condition line.
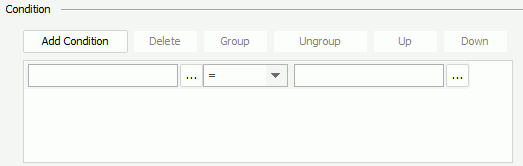
- Select the ellipsis next to the field text box (the first text box), then in the View Element Resources dialog box, locate the element you want to filter and double-click it, or select the element and select OK. You can also type the name of the view element as @ElementName in the text box.
- From the operator drop-down list, select the operator with which to compose the filter condition.
- In the value text box, specify the value of how to filter the element.
- Select the ellipsis next to the value text box (the second text box), then in the Values dialog box, switch to the Value tab. The tab contains all values of the selected element. Double-click the required one, and then close the dialog box. However, if you choose to manually specify the element name in step 5, you need to select the element in the Fields tab of the Values dialog box once again to get its value list. You can also select the User Name special field or a parameter in the Fields tab as the value to filter the element dynamically (for the usage of parameters in filter conditions, see the example in Dynamically filtering queries).
- If you are familiar with the values of the selected view element, you can also type in the value manually (when the selected operator requires multiple values, you have to specify the values manually). When you type the value, if multiple values are required, you should separate them with ","; if a value contains the character "," or "\", type the character as "\," or "\\".
- When the condition is based on a String field, you can apply an empty string as the value, by simply leaving the text box blank (value length=0).
- Select the ellipsis
- Repeat the preceding steps to define more condition lines and specify the logic relationship between the condition lines: "And" or "Or".
- To group some condition lines, select them and select Group, Designer then adds the selected condition lines in one group and applies them as one line of filter expression (you can also group conditions and groups together).
- To take out any condition or group from a group, select it and select Ungroup.
- To adjust the priority of the condition lines, select it and select Up or Down.
- To delete a condition line, select it and select Delete.
- Repeat steps 2 to 8 to add more filters and define the conditions for each filter. To remove a filter, select it from the Filters box and select Delete on the right of the box.
- Select OK to save the filters.
- Save the business view to save the filters into it.
You can then apply the filters when creating or editing reports based on the business view in Designer or at runtime after you publish the corresponding catalog to Server.
- If you remove the resources that you have used in some predefined filters from the business view, the next time when you open the Predefined Filter dialog box, Designer displays warning messages and automatically removes the filters from the dialog box.
- You cannot filter the following SQL types of data: Db.SQL_BINARY, Db.SQL_BLOB, Db.SQL_CLOB, Db.SQL_LONGVARCHAR, Db.SQL_LONGVARBINARY, Db.SQL_VARBINARY, and Db.SQL_OTHER.
Applying Union Query to a Business View
Each business view is running upon an underlying query that Designer creates automatically based on the data resources you select to use for the business view, thus you can take benefit from the Union feature of queries, so each report applying the business view can have their own SQL query that is built dynamically at runtime.
To create a union query for a business view
- In the Business View Editor dialog box, select Query Editor on the toolbar.
- In the Query Editor dialog box, navigate to Menu > Query > Union. Designer displays the Union dialog box.
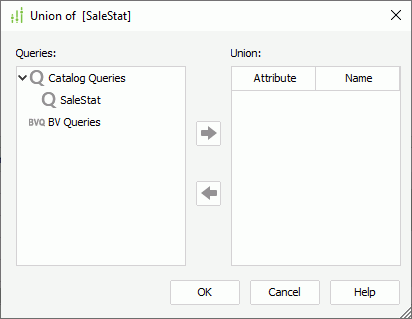
- The Queries box contains queries in the current catalog that you can combine to the underlying query of the business view. You can create more queries in the catalog or create queries for this business view in specific (BV queries) to combine.
- To create a query in the catalog, right-click the Catalog Queries node and select New; to create a BV query, right-click the BV Queries node and select New. Then, type a name for the query and define it as you want. The selecting order of the columns to include in the new query should refer to the order in the business view's underlying query. The SQL type and the number of the columns should also match those in the business view's underlying query. For example, when you select two columns in the business view's underlying query, the first one is Integer data type and the second String, then in the new query, you should also first select an Integer column and then a String column.
- You can further edit a BV query by right-clicking it and selecting Edit.
- To rename a BV query, right-click it and select Rename. The BV queries you create for a business view are private resources of the business view. You can only use them in the union query of the business view. Designer saves BV queries in its business view, so you cannot access them in the catalog resource tree.
- Select a query in the Queries box and select Add to combine it to the underlying query of the business view.
- In the Union box, select in the Attribute column to specify the attribute of the query in the union.
 : Select it if you do not want to return duplicate records from the query.
 : Select it if you want to return all records from the query.
- Repeat the preceding two steps to add all the queries you want to combine. To remove a query from the union, select it in the Union box and select Remove
 .
. - Select OK to create the union query for the business view.
Creating Branches for a Business View
Defining branches in the underlying query of a business view is a new way of joining different result sets for the business view. You can specify some tables a business view applies as the parent tables, and then use branches to specify parent-child relationships between the tables. When Report Engine generates dataset for the business view, it joins each child result set with the parent result set to create a branch, and then merges these branches of data through a common key, which is a set of columns in the parent tables and is common to all branches.
For example, you may have two traditional joins between the tables a business view uses: the first joins the City and Avenue tables, and the second joins City and Boulevard. The dataset Report Engine generates for this business view is then:
| City | Avenue | Boulevard |
|---|---|---|
| Los Angeles | Melrose Ave | Hollywood Blvd |
| Los Angeles | Melrose Ave | Sunset Blvd |
| Los Angeles | Melrose Ave | Colorado Blvd |
| Los Angeles | La Brea Ave | Hollywood Blvd |
| Los Angeles | La Brea Ave | Sunset Blvd |
| Los Angeles | La Brea Ave | Colorado Blvd |
By using City as the parent table and creating one branch for the Avenue table and the other for Boulevard, with the City column as common key, you can get a dataset like this:
| City | Avenue | Boulevard |
|---|---|---|
| Los Angeles | Melrose Ave | Hollywood Blvd |
| Los Angeles | La Brea Ave | Sunset Blvd |
| Los Angeles | Colorado Blvd |
To create branches for a business view
- In the Business View Editor dialog box, select Query Editor on the toolbar.
- In the Query Editor dialog box, navigate to Menu > Query > Branches. Designer displays the Branch Editor dialog box.
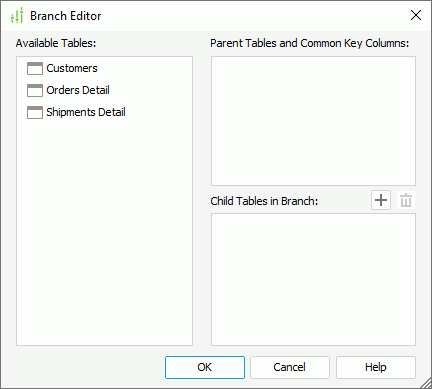
- From the Available Tables box, drag the tables you want to use as the parent tables to the Parent Tables and Common Key Columns box, then select at least one column to be the common key. To remove a parent table, drag it back to the Available Tables box.
- Select Add
 to add a branch, then drag tables from the Available Tables box to it to add these tables to the branch. You can also drag a table to the Child Tables in Branch box to create a branch containing this table.
 - Repeat the preceding step to add more branches. To remove a branch, select it and select Remove
 ; to remove a table from a branch, drag it back to the Available Tables box.
 - Select OK to apply the settings.
- You should add all available tables either as parent tables or to branches.
- Each branch should contain at least one table, and there should be no joins between the tables you include in any two branches.